Introduction
In this installation guide we have provided step by step instructions to remove the OEM downpipe and install the 27WON Performance downpipe on a 2022+ Honda 1.5L Turbo Civic.
Advisory:
- Working under the vehicle requires a safe and sturdy location for the vehicle to sit on jackstands.
- The exhaust piping, turbocharger, and cooling system will be hot after recent vehicle operation. Allow the vehicle to cool or use a fan to cool the exhaust components before working on the vehicle.
Tools
- 1/4" Ratchet
- 4" Extension (1/4" Drive)
- 5.5mm Socket (1/4" Drive)
- 10mm Socket (1/4" Drive)
- 12mm Socket (1/4" Drive)
- Torque Wrench (3/8" Drive)
- 3/8" Ratchet
- 4" Extension (3/8" Drive)
- Breaker Bar (3/8" Drive)
- 14mm Socket (3/8" Drive)
- 15mm Socket (3/8" Drive)
- Wrench, 12mm
- Wrench 22mm
- Flathead Screwdriver
- Phillips Screwdriver - #2
- Push Clip Removal Tool
- Loctite or Permatex Anti-Seize
- Jack Stand × 2
-
-
First and foremost; THANK YOU for becoming a part of the 27WON Family. We hope to REDEFINE your experience of the aftermarket with the highest level Parts, Customer Service, Packaging, & Support
-
Catted Downpipes are intended for racing use only. Installation and use are at the customers own risk.
-
-
-
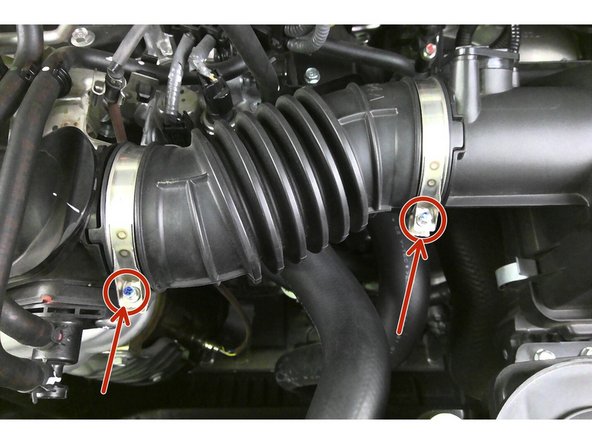
Use a 5.5mm socket and 1/4" ratchet to remove the two (2) clamps securing the accordion style intake air tube
-
Remove intake air tube from car and sent aside
-
-
-
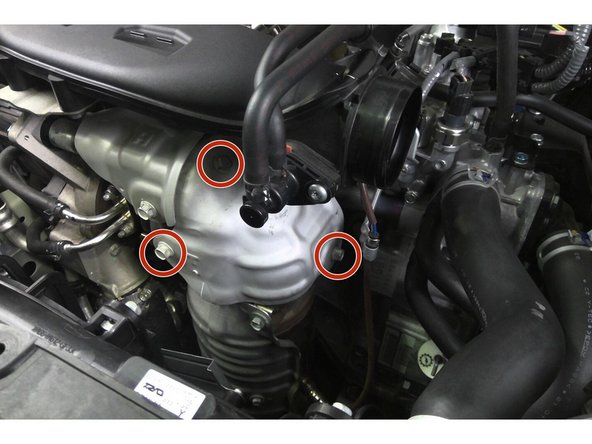
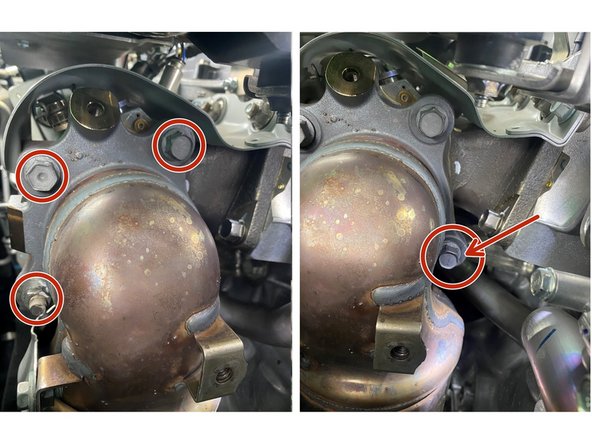
Use a 12mm ratcheting wrench to remove the three (3) x 12mm bolts securing the upper heat shield to the factory downpipe
-
Remove OEM heat shield & set aside for later use
-
-
-
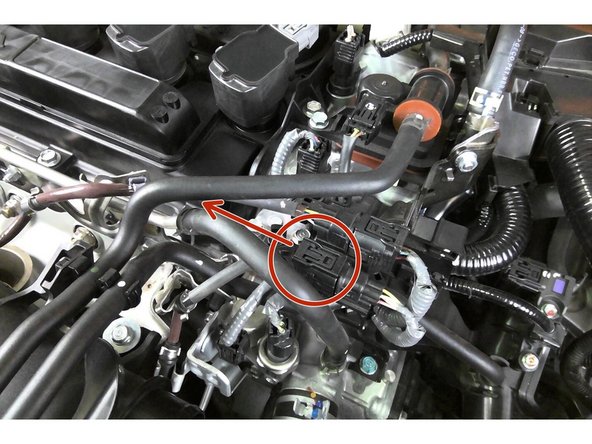
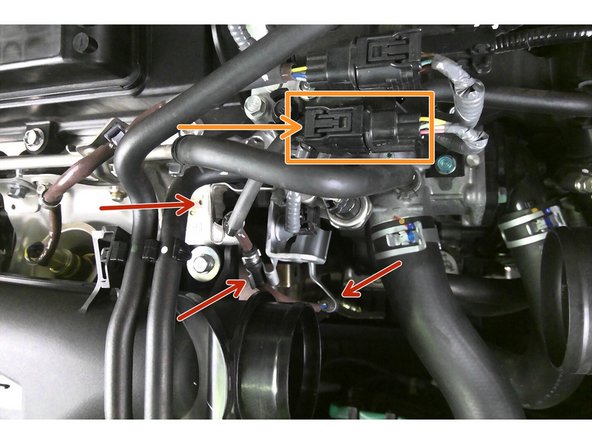
Undo the clip for the secondary O2 sensor plug, and remove the plug
-
Remove the three (3) locating tabs for the secondary O2 sensor wire
-
These are three (3) metal tabs that hold the O2 sensor wire in place. By lightly bending them, the O2 sensor wire can be disconnected from the wire bracket
-
-
-
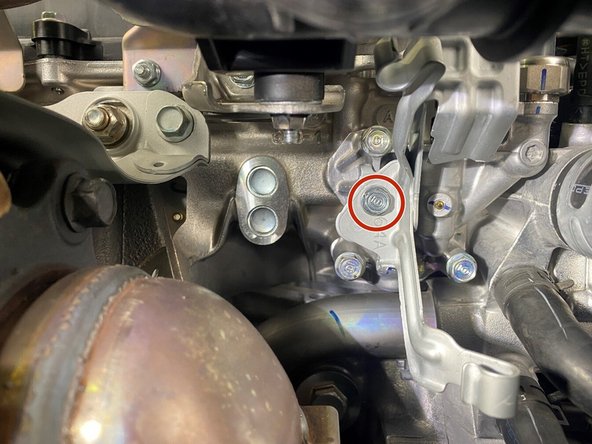
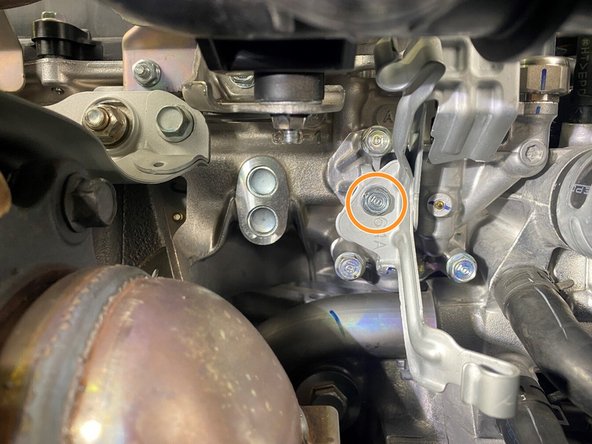
Using a 1/4" ratchet with a 4" extension and a 10mm socket, remove the one (1) 10mm bolt securing the secondary O2 wiring bracket
-
Remove the bracket and set aside for later use
-
-
-
You will proceed to remove the OEM Downpipe from the vehicle in the coming steps
-
The next steps will be performed underneath the vehicle. Please make sure vehicle is secured on a lift or jack stands
-
-
-
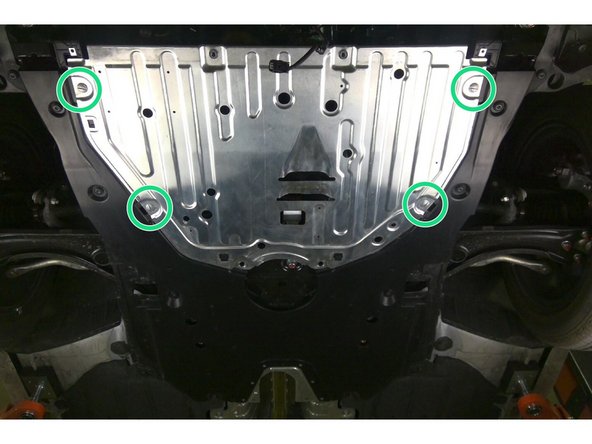
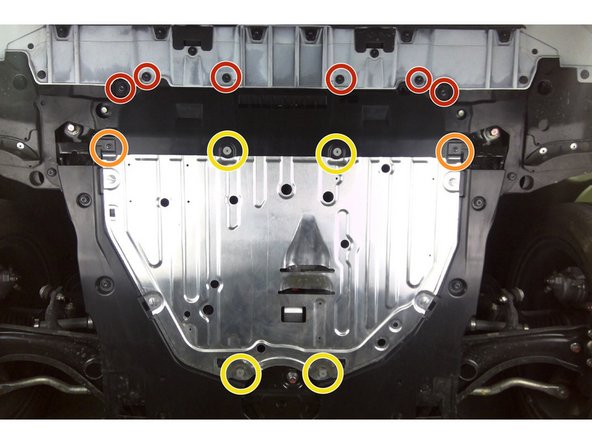
Remove plastic portion of skid tray as follows:
-
Six (6) push clips from front
-
Use a flathead screwdriver or a prying tool
-
Using a screwdriver, remove metal portion of skid tray as follows:
-
Two (2) black philips head screws
-
Four (4) silver phillips head screws
-
Four (4) flat head screws
-
-
-
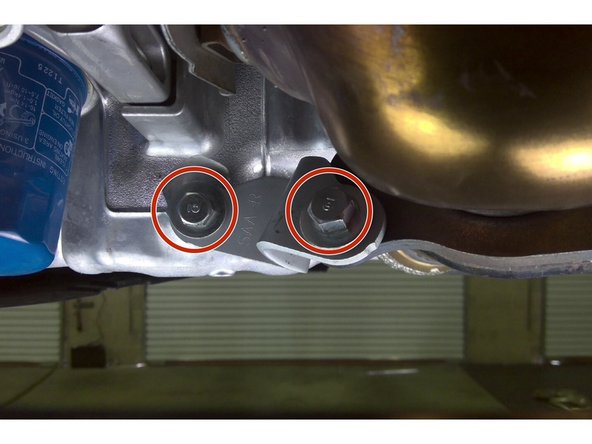
Remove the four (4) 14mm bolts securing the two lower downpipe support brackets
-
DO NOT discard the bolts. The four bolts will be reused to attach newly supplied brackets
-
You will not use the OEM downpipe support brackets
-
-
-
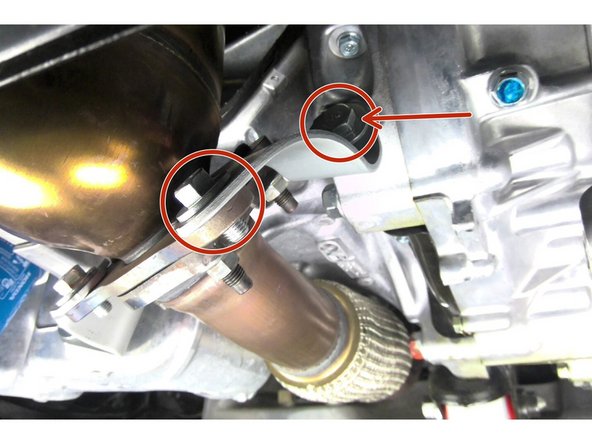
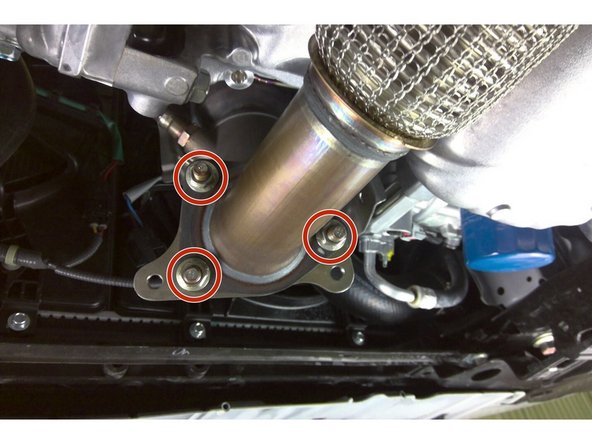
Using a 3/8" drive ratchet and a 14mm socket, remove all three (3) nuts securing the downpipe studs
-
The stud may come out of the downpipe with the nut. This is OK, as you will not be reusing this hardware
-
Separate the front pipe from the downpipe, the front pipe will remain in place
-
If you are installing the front pipe with the downpipe then proceed to steps 6-9 of those instructions, L15-6-211-12 11th Gen Civic Front-Pipe then return
-
-
-
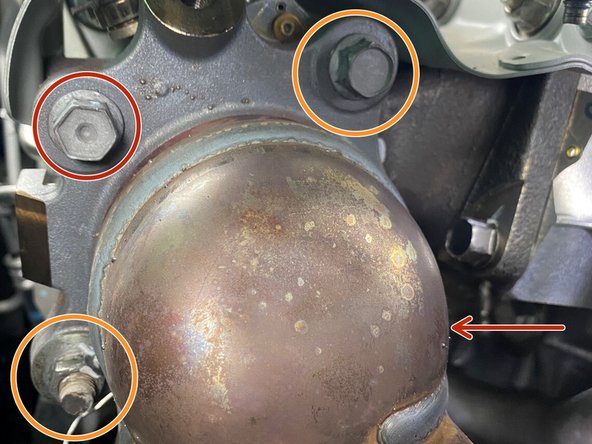
Prior to attempting removal of the downpipe, liberally apply penetrating lubricant (PB Blaster, Deep Creep, etc.) on the downpipe nuts & bolts
-
Using the 3/8" drive 14mm socket and ratchet along with the aid of a breaker bar, remove the following from the turbine side of the turbocharger:
-
Two (2) 14mm bolts
-
Two (2) 14mm nuts
-
The highlighted bolt in the 2 o'clock position is a nut on a stock vehicle. The nut on the pictured vehicle was replaced with a bolt
-
Be careful and take your time to avoid breaking a stud inside the turbine housing. Trust us, a broken stud is going to make this install a lot longer. It will require you remove the stud by removing the OEM turbocharger and sourcing new studs an hardware from Honda
-
Lower the downpipe out the bottom of the engine bay, being careful not to damage the wiring harness on the secondary oxygen sensor
-
Pull downpipe out from under the vehicle and set on workbench.
-
-
-
Using a 1/4" drive ratchet and 12mm socket, remove the one (1) 12mm bolt
-
This bolt will not be resused
-
Using a 1/4" drive and 10mm socket, remove the four (4) 10mm bolts securing the OEM heat shield to the OEM downpipe
-
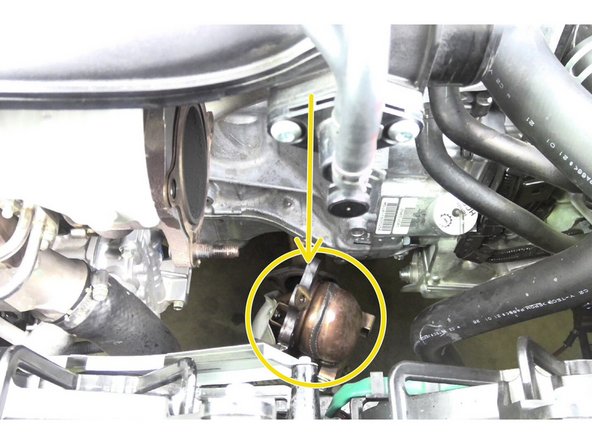
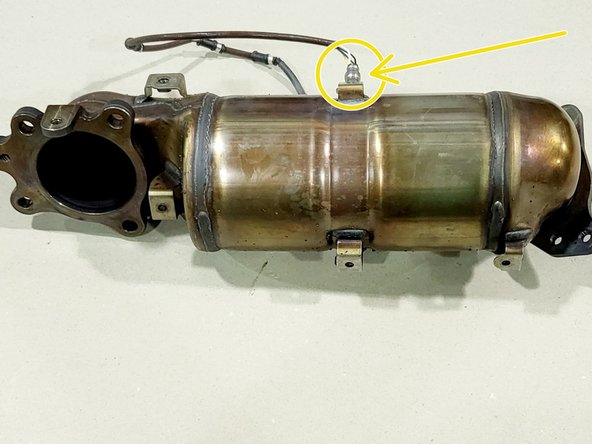
Use a 22mm open-ended wrench or oxygen sensor socket to remove the secondary oxygen sensor
-
-
-
Install the OEM secondary O2 sensor into the downpipe and tighten with a 19mm wrench or O2 sensor tool
-
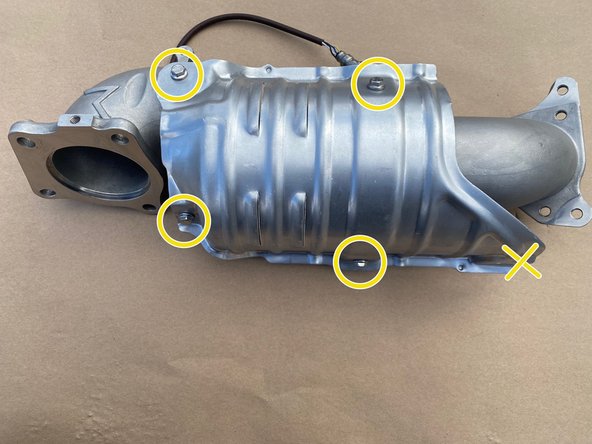
Using the four (4) provided M6x1.0x12mm bolts, reinstall the OEM heat shield
-
You will not be using the lower bolt hole on the OEM heat shield.
-
-
-
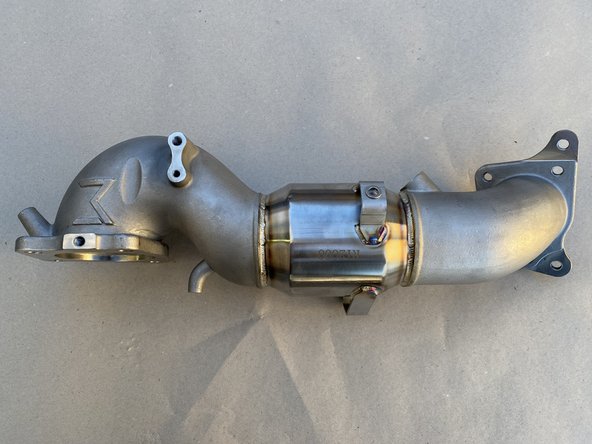
You may now install the 27WON catted downpipe into the car via the reversed order of removing it, by entering from the bottom of the vehicle
-
Reinstall the two (2) bolts and two (2) nuts securing the downpipe to the turbine housing. Torque to 33 ft-lbs
-
Use of anti-seize compound (Loctite, Permatex, etc.) is recommended when reinstalling the highlighted hardware
-
-
-
Bolt the secondary O2 sensor wire harness support bracket back in place. Torque bolt to 80 in-lbs.
-
-
-
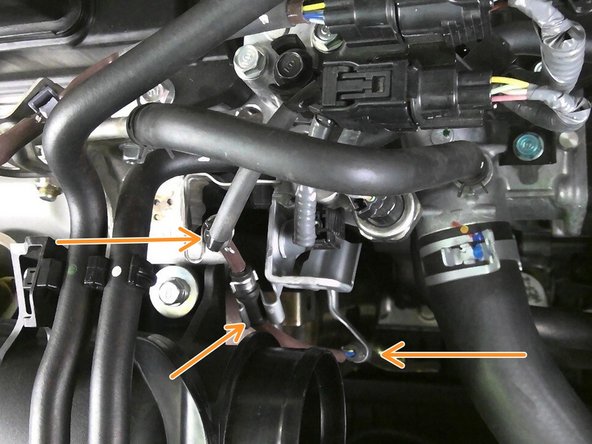
Re-route the secondary O2 sensor wire harness back into the appropriate tabs, securing the black round spot in the tabs
-
Clip the secondary O2 sensor plug back into the harness
-
-
-
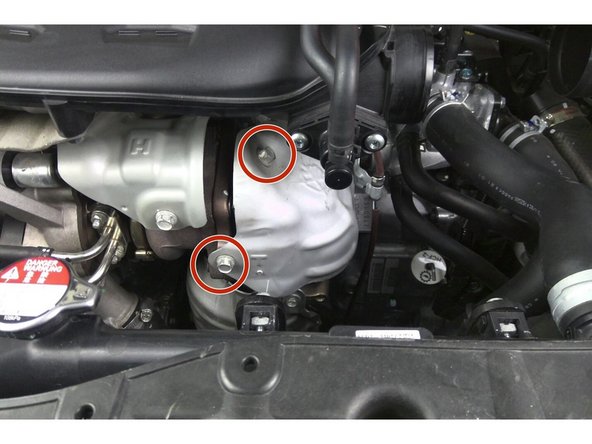
Reinstall the OEM upper heat shield using only two (2) of the three OEM bolts Torque to 18 ft-lbs.
-
The lower bottom hole towards the back will not be reused
-
-
-
Reinstall accordion intake tube and tighten clamps with 5.5mm socket
-
-
-
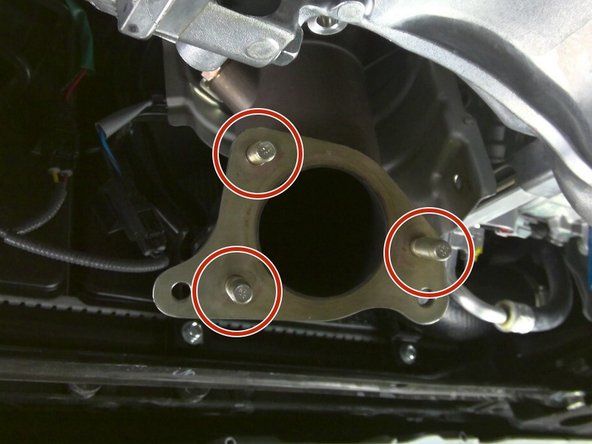
Apply anti-seize to the supplied studs
-
From bottom of car, install three (3) provided studs into the outlet flange
-
If you are installing the front pipe with the downpipe then proceed to steps 10-18 of those instructions, L15-6-211-12 11th Gen Civic Front-Pipe then return to step 20 of these instructions
-
-
-
Using a 15mm socket and 3/4" drive ratchet, install the three (3) provided nuts. Torque to 40 ft-lbs. at outlet flange
-
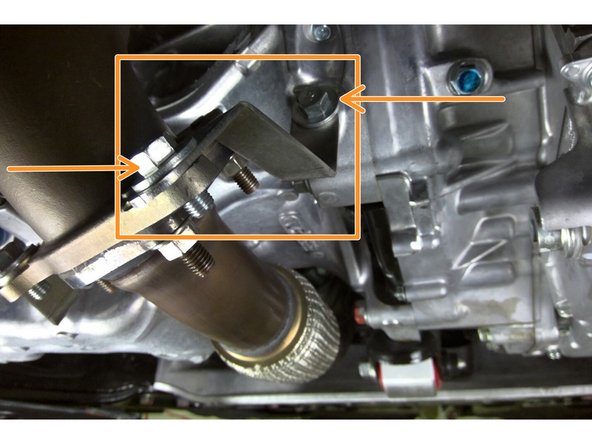
Install the provided driver side bracket as shown. Torque bolt to 33 ft-lbs
-
Install the provided passenger side bracket as shown. Torque bolt to 33 ft-lbs
-
-
-
Reinstall the skid tray:
-
Six (6) push clips from front
-
Two (2) black philips head screws
-
Four (4) silver phillips head screws
-
Four (4) flat head screws
-
-
-
Defouler & Catted Downpipes are strictly intended for racing use only. Installation and use are at the customers own risk
-
Some smell may be present on the first start as any residue on the downpipe burns off. This is normal and will not happen after the 1st heat cycle.
-
To get the best performance from your Performance Downpipe, we highly recommend a custom tune.
-
A custom tune for your specific vehicle with your specific modifications will provide the best performance for your Civic and the location you live in
-
-
-
This completes the installation of your 27WON Performance Downpipe
-
We hope you were impressed with your 27WON experience and love your new Downpipe for years to come. Email us at sales@27won.com or call us at 571-271-0271 with any questions or concerns
-
Please leave a review here: https://store.27won.com/2022-civic-turbo...
-
Share your experience using #27WON on Instagram and Facebook
-