Introduction
In this installation guide we have provided step by step instructions to setup, remove the OEM exhaust, and install the 27WON Performance Exhaust.
Advisory:
- Working under the vehicle requires a safe and sturdy location for the vehicle to sit on jackstands.
- The exhaust piping will be hot after recent vehicle operation. Allow the vehicle to cool or use a fan to cool the exhaust piping before working on the vehicle.
Tools
-
-
First and foremost; THANK YOU for becoming a part of the 27WON Family. We hope to REDEFINE your experience of the aftermarket with the highest level Parts, Customer Service, Packaging, & Support
-
If you are looking for the installation instructions for the 27WON SI Sedan Exhaust please follow this link: https://www.performanceinstalls.com/Guid...
-
-
-
The following instructions are shown with no bubble wrap or cardboard for clarity of the installation process.
-
We recommend leaving as much protective bubble wrap/cardboard on the exhaust as possible during install to protect against scratches and dings during the process.
-
Cut holes in the bubble wrap to expose on the flanges, hanger rods, and fastening locations
-
-
-
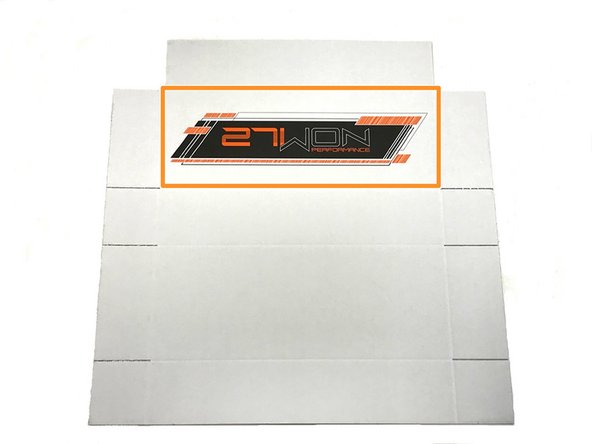
The 27WON packaging is not only designed to get your performance parts to your doorstep safely, but to also provide you with an awesome garage banner and/or comfy cardboard mat to lay on under your car for installation
-
You can cut out the banner as shown with the orange square
-
Or you can use the entire unfolded box as a mat to lay under your vehicle
-
Remove the staples from the box as they don't feel great on your backside...
-
-
-
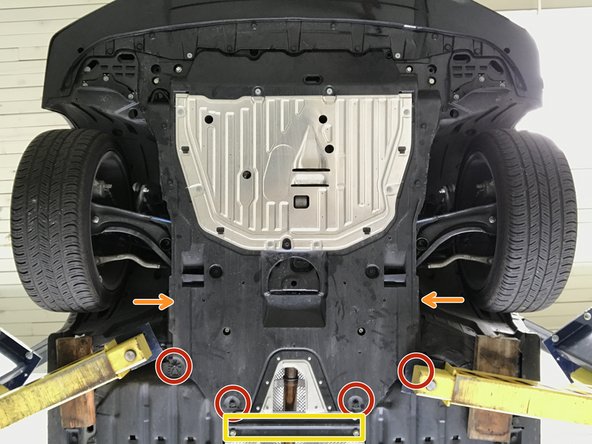
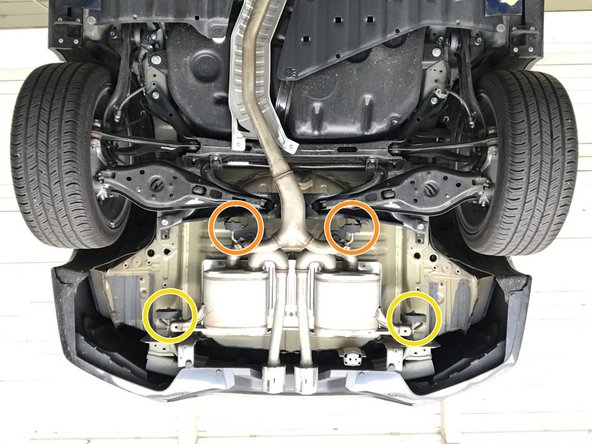
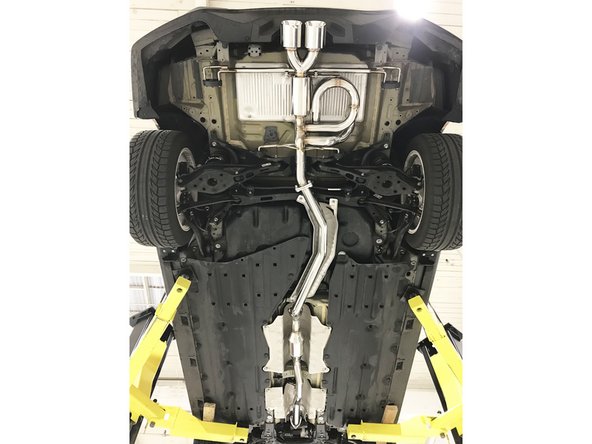
Locate the engine under tray to gain access to the connection between the front-pipe and down stream exhaust
-
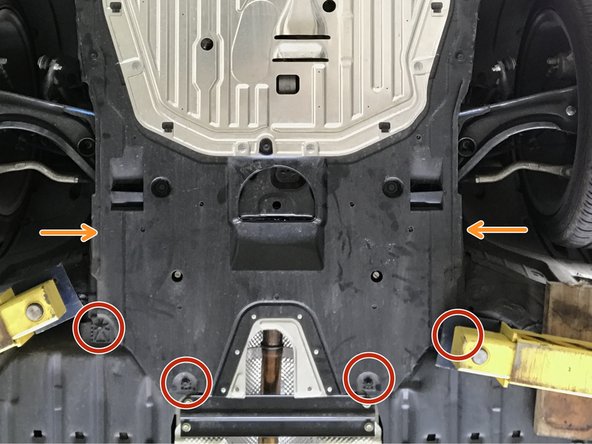
Use 10mm socket & ratchet to remove the bolts
-
Orange arrows identify push-clips in Step 5
-
Yellow square identifies cross-member in Step 6
-
-
-
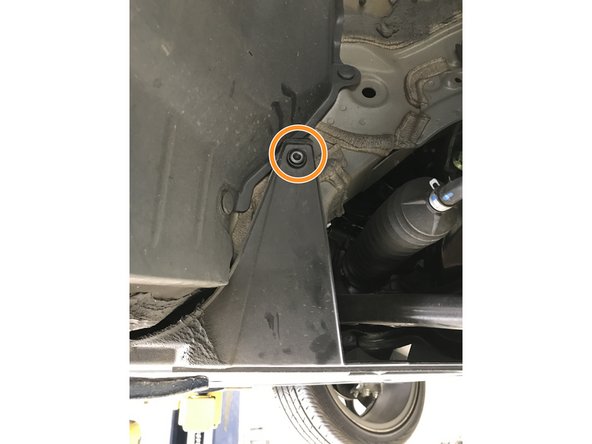
Use large flat head screw driver to remove push-clips on each side of undertray
-
-
-
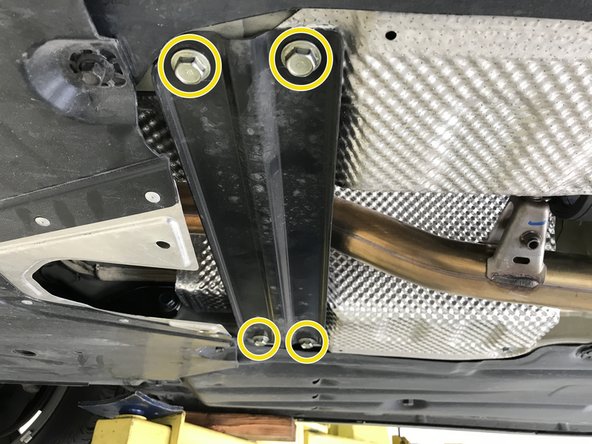
Use 14mm socket & ratchet to remove the 4 bolts holding the cross member
-
-
-
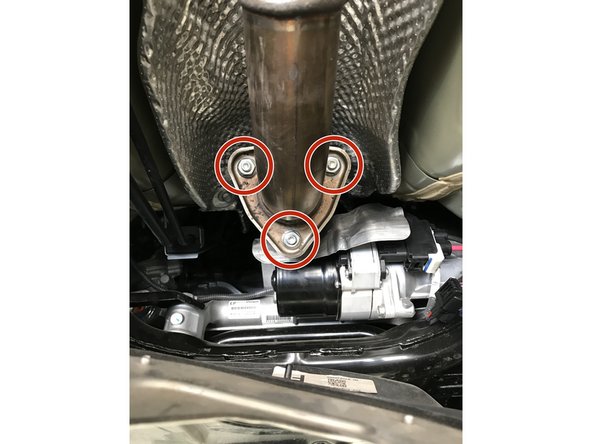
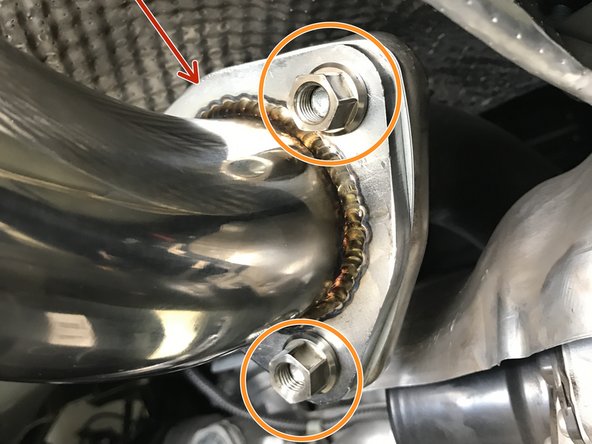
Locate the connection between the front-pipe and down stream exhaust
-
Verify that the exhaust is not to hot to touch, if still hot use a fan to cool the exhaust piping before proceeding
-
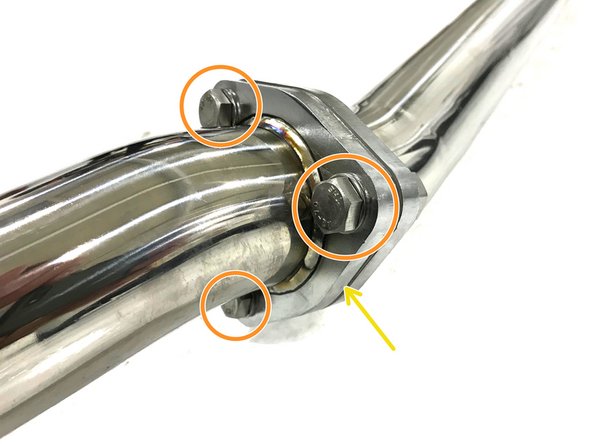
Use 14mm socket & ratchet to remove 3 OE nuts
-
-
-
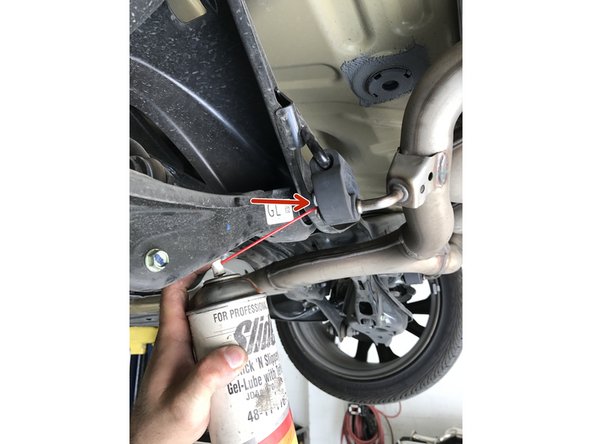
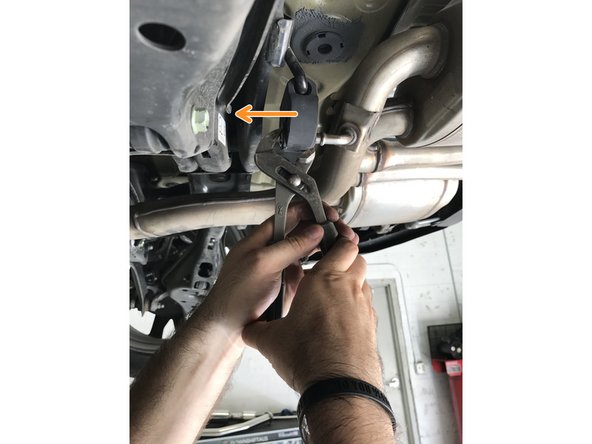
This step and the next are meant to show you how to remove a rubber hanger - Parts are not being removed from the vehicle at this time
-
Exhaust hangers can be difficult to remove without lubricant
-
Apply small amount of silicone spray lubricant to end of hanger rod
-
-
-
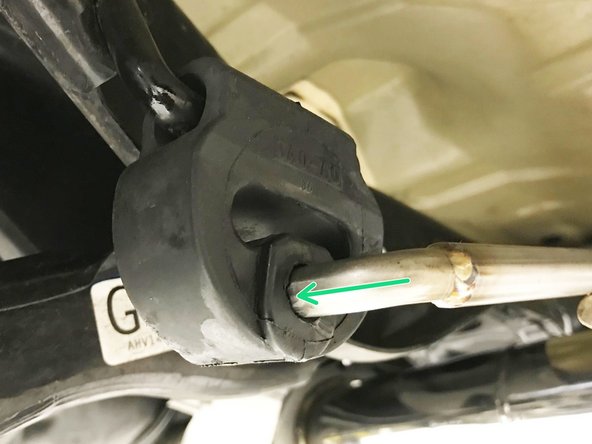
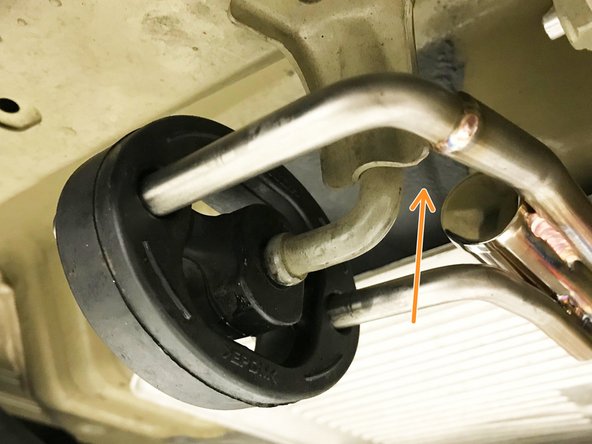
Use tongue & groove pliers to press the rod out of the rubber hanger
-
Hook the lower jaw to the edge of the rubber hanger. Hook the end of the upper jaw on the end of the rod to push the rod out of the hanger
-
-
-
Support the exhaust mid-section with a jack stand, bungy, or second set of hands before the next step
-
Support Mid-Section forward of the resonator as shown
-
Support Rear Muffler Section in two locations as shown
-
-
-
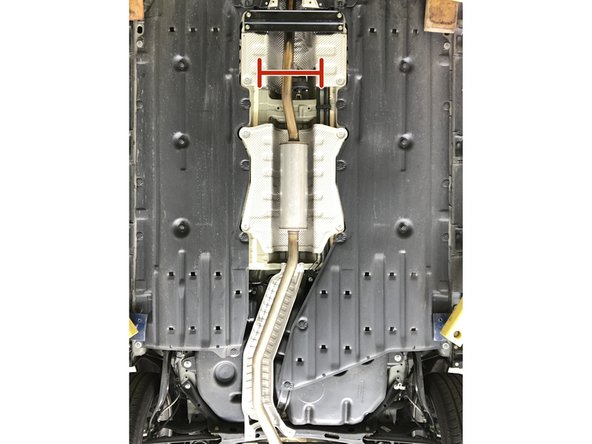
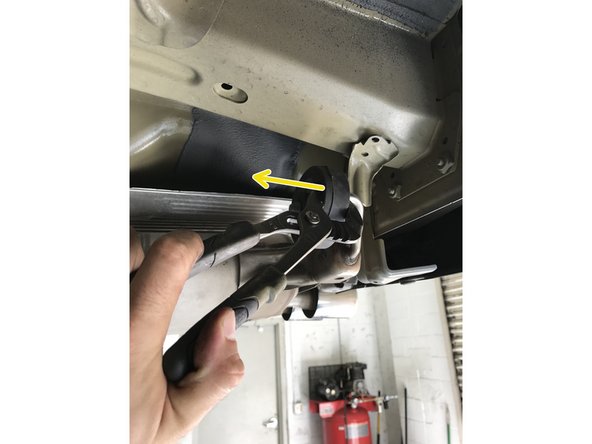
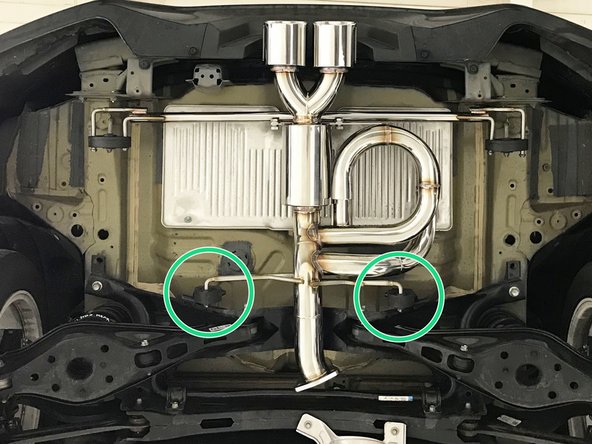
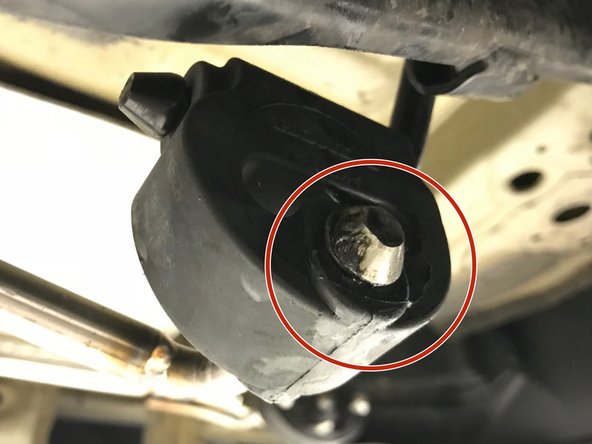
Locate the dual rod rubber hanger in the exhaust mid section
-
Use the tongue & groove pliers to pull the rubber hanger off the chassis rod in the direction of the red arrows
-
The rubber hanger will come off with the OE exhaust
-
-
-
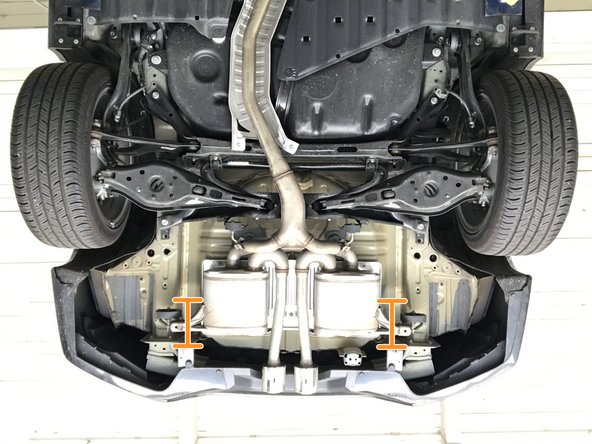
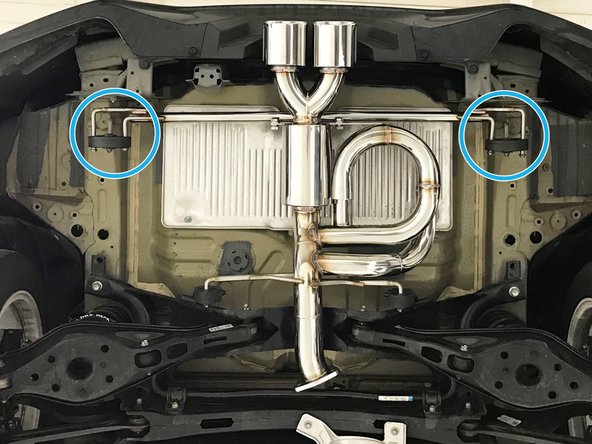
Forward single rod rubber hangers
-
Rearward dual rod rubber hangers
-
-
-
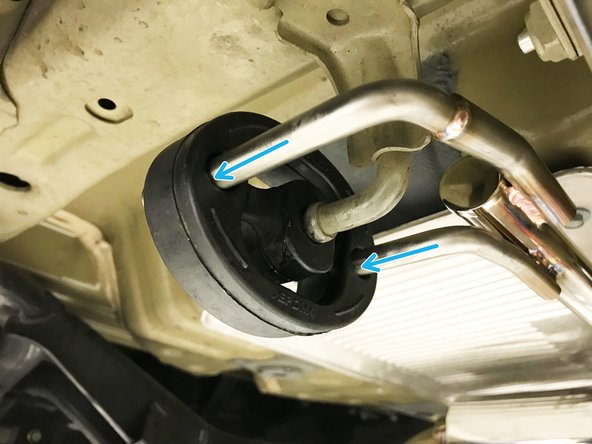
Pull the single rod hanger completely off the hanger rod and pivot out of the way as shown
-
Complete for both passenger and drivers sides
-
-
-
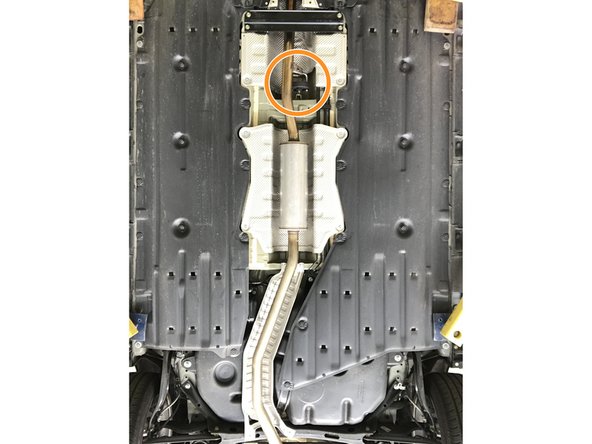
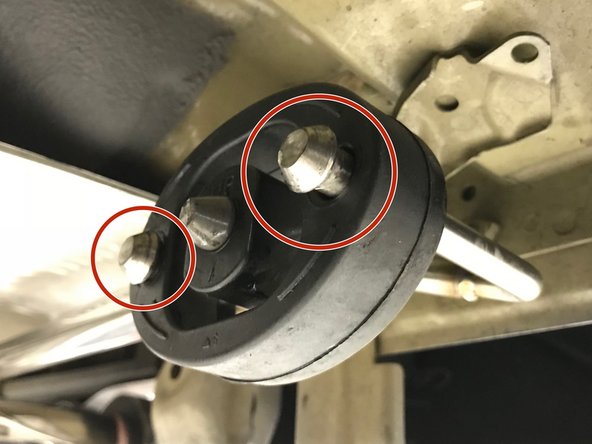
Pull the dual rod rubber hangers off the exhaust hanger rods; the rubber hangers will stay on the vehicle
-
Lower the exhaust to the ground and remove from under vehicle
-
-
-
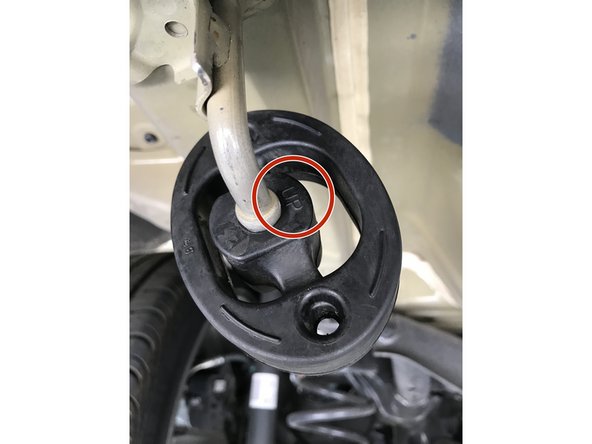
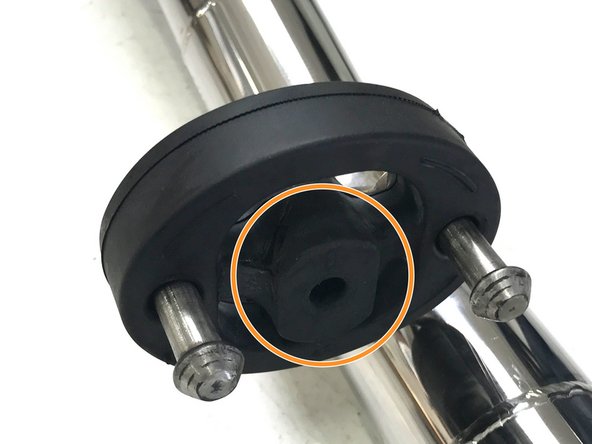
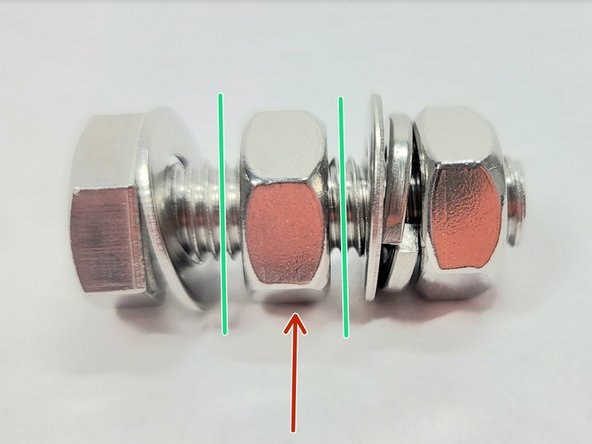
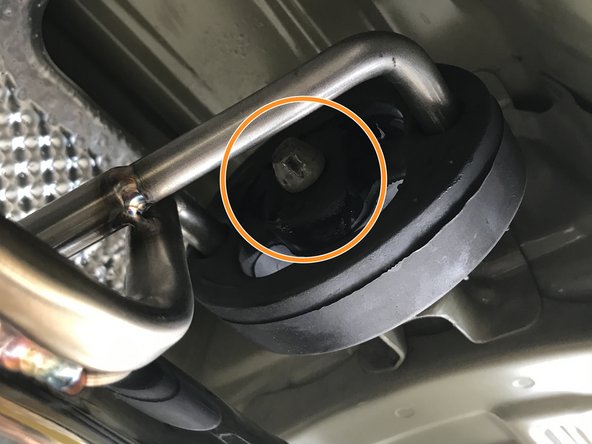
Before starting the installation of 27WON Performance Exhaust please identify the required orientation of the rubber exhaust hangers
-
Each dual rod rubber hanger has "UP" formed in the mold on the center part of the rubber hanger. Verify that the "UP" on the rubber hanger is up before installing the 27WON exhaust
-
-
-
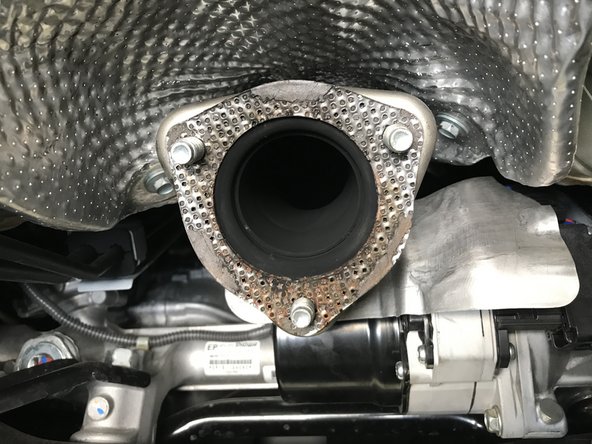
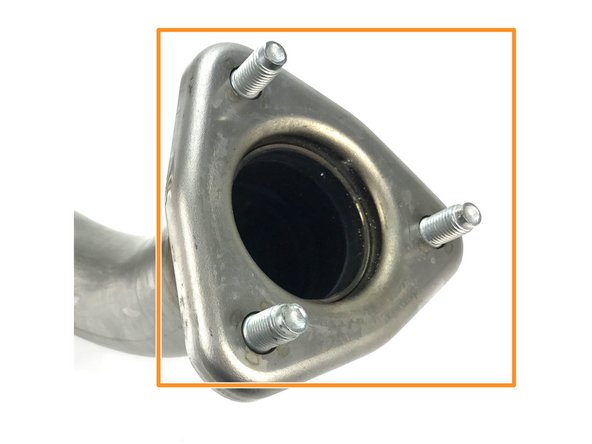
Remove any debris/residue remaining on the OE front pipe
-
The surface should be clean and smooth for good gasket sealing; the result should look as shown
-
An assortment of tools can be used to remove the old gasket material. For example: scraper, sand paper and scotch bright pad, sand paper wheel...etc then cleaned with WD-40 and break clean
-
Do NOT remove the OE studs found in the front-pipe; these are used for installation
-
-
-
Expose the hanger rods through the bubble wrap, but maintain bubble wrap protection on remaining exhaust
-
Install the OE dual rod rubber exhaust hanger into the hangers of the 27WON exhaust
-
Use of silicone spray may be needed
-
-
-
Verify that "UP" is up on the OE dual rod rubber hanger
-
-
-
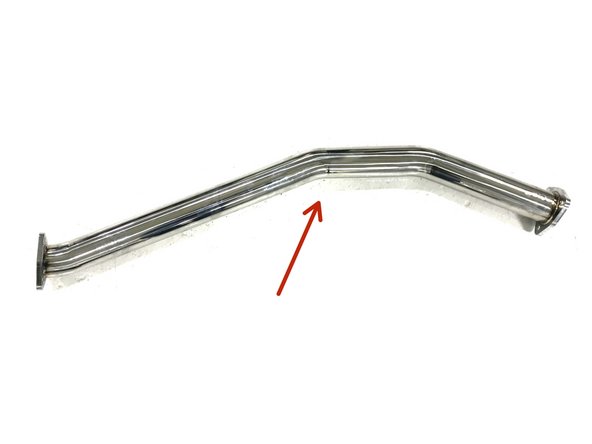
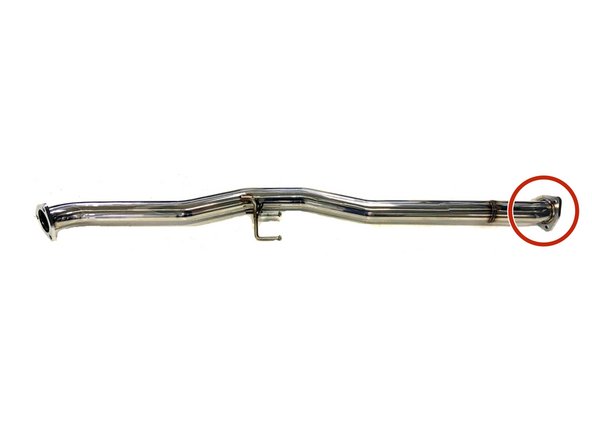
Locate the rearward mid-section exhaust pipe
-
This process is performed off the vehicle for best results
-
Locate QTY=3 sets of 35mm length M10 bolts
-
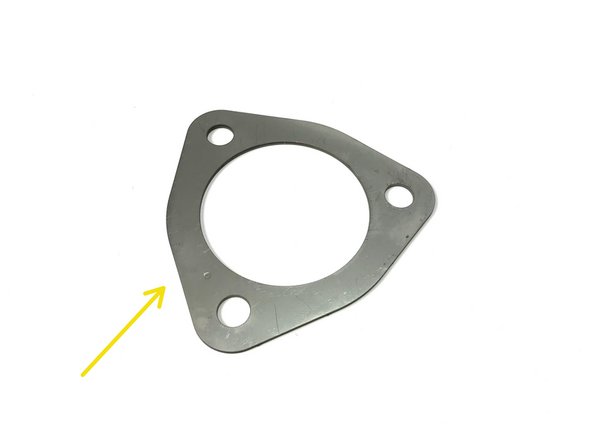
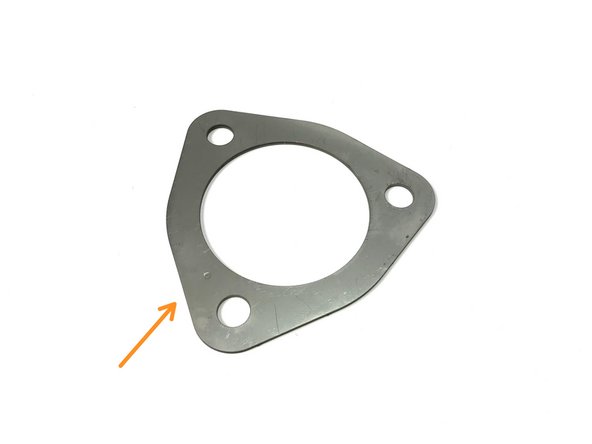
Locate QTY=1 tri-bolt gasket
-
-
-
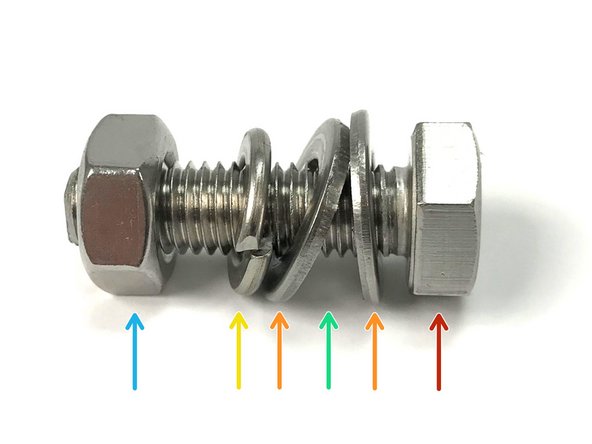
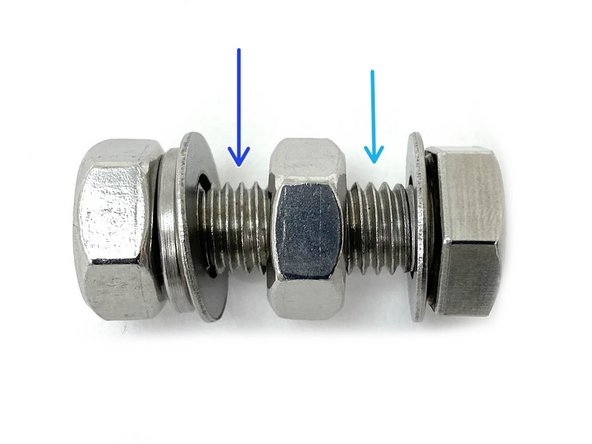
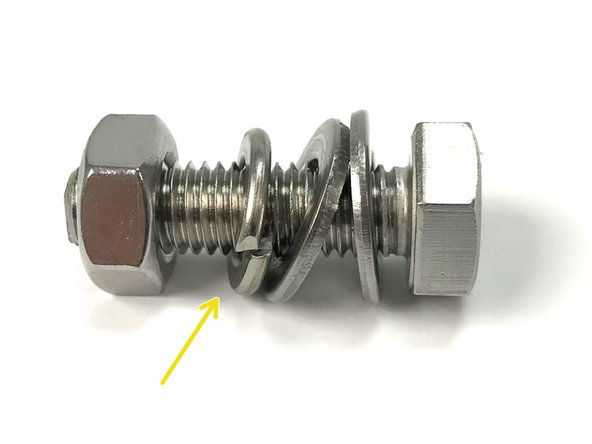
The location of the flat washers, flanges, and split lock washer are critical for proper fastening and vibration resistance.
-
17mm M10 Nut
-
M10 Split Lock Washer
-
M10 Flat Washers
-
Exhaust Pipe Flange and tri-bolt gasket Location - Between the two flat washers
-
17mm M10 Bolt Head
-
-
-
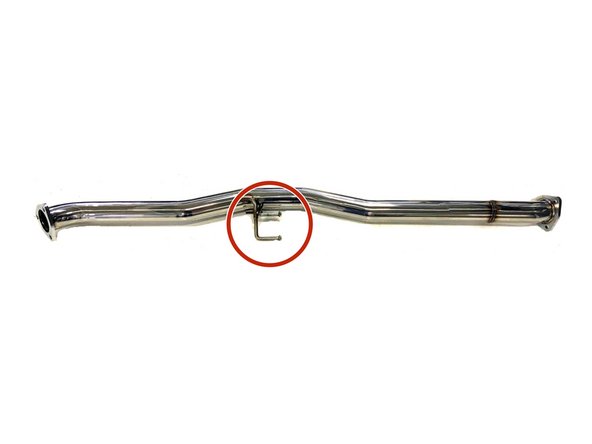
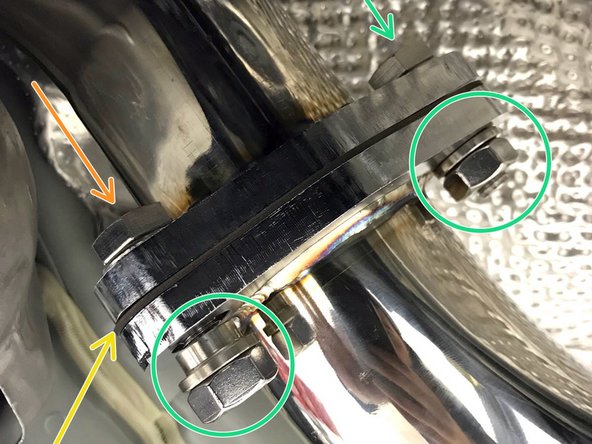
Expose the flanges through the bubble wrap, but maintain bubble wrap protection on remaining exhaust
-
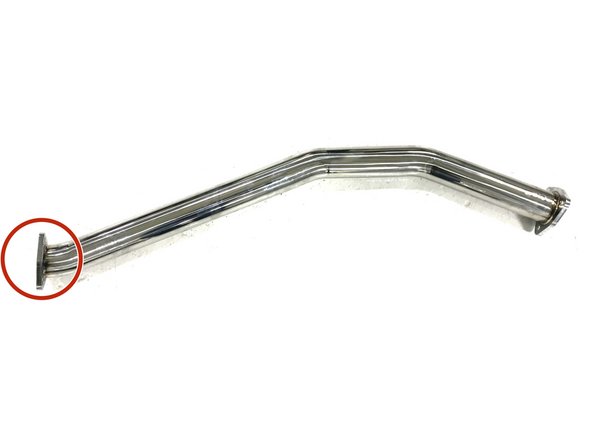
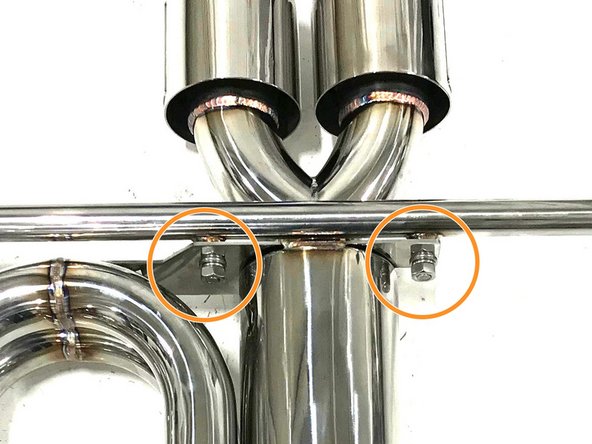
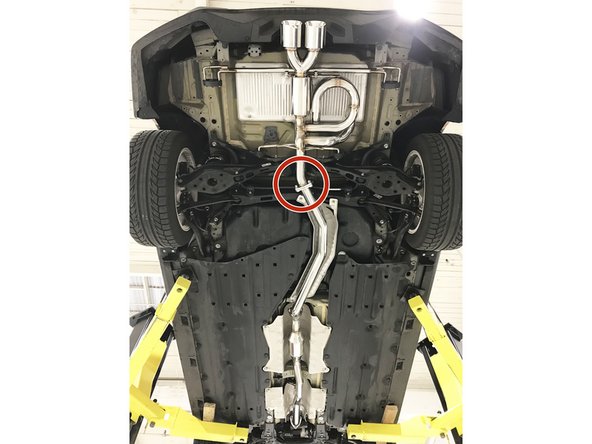
Position the forward and rearward mid-section inline with the flanges circled in red next to each other.
-
-
-
Install the provided metal gasket
-
Using the 35mm length M10 bolts, insert the bolts through the forward mid-section pipe
-
See Step 20 for hardware setup
-
Install the remaining washers and nuts. Get the bolts snug, but leave loose enough for each pipe to move independently
-
-
-
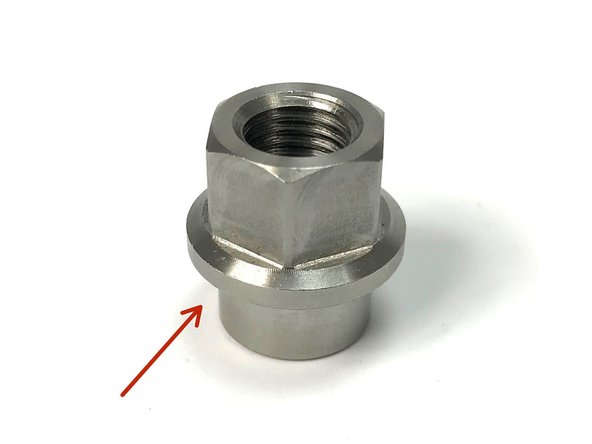
Locate QTY=2 sets of 35mm length M10 bolts with spacer nut
-
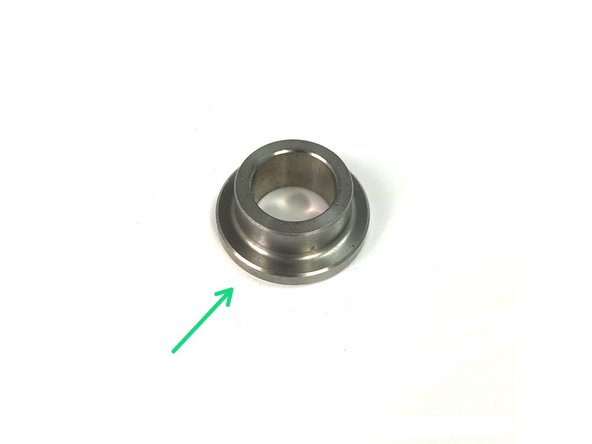
Spacer Nut
-
Where hanger bar will go
-
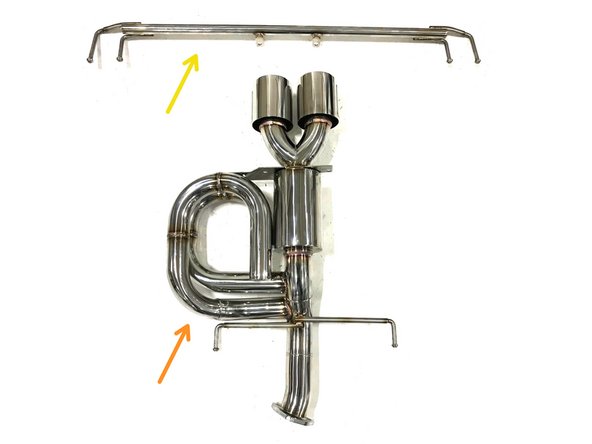
Locate the muffler section
-
Locate hanger bar
-
-
-
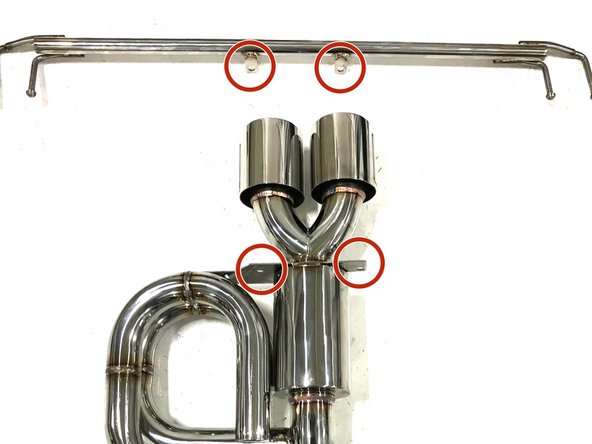
Expose the hanger rods and bolting locations through the bubble wrap, but maintain bubble wrap and cardboard protection on remaining exhaust
-
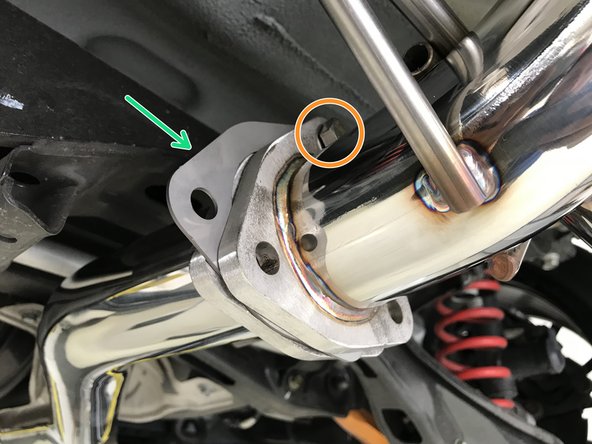
The two brackets on the hanger bar circled in red will align with the holes in plate on the muffler section also circled in red
-
-
-
Hardware stack-up shown. Note location of hanger bar and muffler bracket
-
Muffler bracket in this gap
-
Hanger bar in this gap
-
Example of hanger bar mounting shown
-
This is a different exhaust but the hanger bar mounts the same for FK7
-
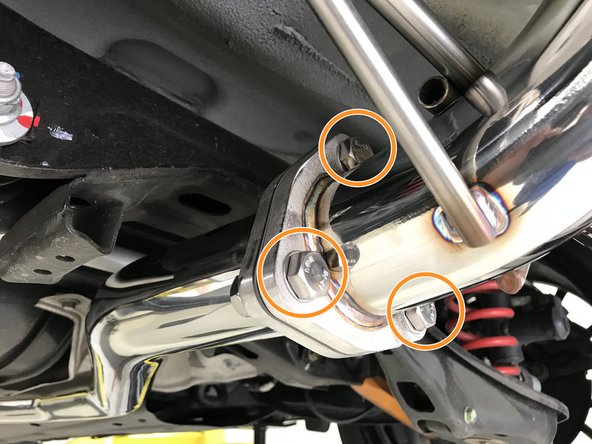
Align the bar onto the muffler section as shown and secure with the head of the bolt towards the exhaust tips
-
This image does not show spacer nut. Make sure spacer nut is in place
-
Use a 17mm socket and torque wrench to torque the bolts to 30-40 ft-lbs
-
-
-
Verify that "UP" is up on the OE dual rod rubber hanger
-
An extra set of hands may be useful for this step. Also the use of silicone spray on the hangers may be helpful with installation
-
The hanger bar is located on the top of the 27WON exhaust
-
-
-
Insert both forward hangers as shown
-
-
-
Then raise the rear end of the muffler section up and insert both rearward hangers
-
-
-
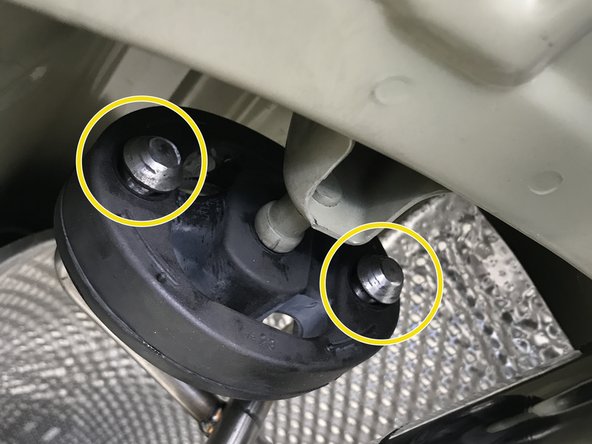
Verify that the bead of the hanger rod is through both forward rubber hangers as shown
-
-
-
Verify that the bead of the hanger rods are through the dual rod rubber hangers as shown
-
-
-
Verify that the hanger bar is not contacting the chassis. Move the muffler section rearward if the hanger bar is very close or touching the chassis
-
-
-
Position the rubber hanger as far forward on the hanger rods as possible to provide clearance for the chassis hanger rod
-
-
-
Silicone spray may help installation on the chassis hanger rod
-
Install the assembled mid-section pipes onto the vehicle. Mount the rubber hanger on the chassis hanger rod. Verify the rod bead is fully through the rubber hanger
-
-
-
Re-position the rubber hanger rearward so it is against the hanger rod beads
-
-
-
Locate QTY=3 provided step nuts for OE front pipe
-
Locate QTY=3 step washers that came with your front pipe for connecting exhaust to 27WON front pipe
-
Locate QTY=2 provided tri-bolt gaskets
-
Locate QTY=3 provided 35mm length M10 bolts
-
-
-
If you have 27WON front pipe installed then skip to the next step
-
Install the provided tri-bolt gasket onto the OE front-pipe
-
Align the studs through the flange then hand tighten the step nuts
-
Use a 14mm socket & torque wrench to torque each to 30-40 ft-lbs
-
-
-
If you have the OE front pipe installed then skip to the next step
-
Install the provided tri-bolt gasket
-
Install the provided step washers and nuts as shown
-
It is important that the provided step washers are used with the 27WON Front-Pipe Back Exhaust to properly align the flanges
-
When using the step washer, DO NOT use the flat washer and split lock washer
-
Use a 17mm socket & torque wrench to torque to 30-40 ft-lbs
-
-
-
Connect mid-pipe to muffler section
-
Install the provided tri-bolt gasket between the muffler section and the rear mid-pipe section as shown
-
Install the 35mm length M10 bolts
-
See Step 35 for hardware setup
-
Use a 17mm socket & torque wrench to torque the middle flange bolts to 30-40 ft-lbs
-
-
-
Remove the protective bubble wrap and cardboard from the 27WON exhaust system as shown
-
-
-
Re-install the 10mm bolts with a 10mm socket & torque wrench. Torque to 8-12 ft-lbs
-
-
-
Re-install the push clips at each side of the untertray
-
-
-
Re-install the cross member. Use a 14mm socket & torque wrench to torque the bolts to 25-35 ft-lbs
-
-
-
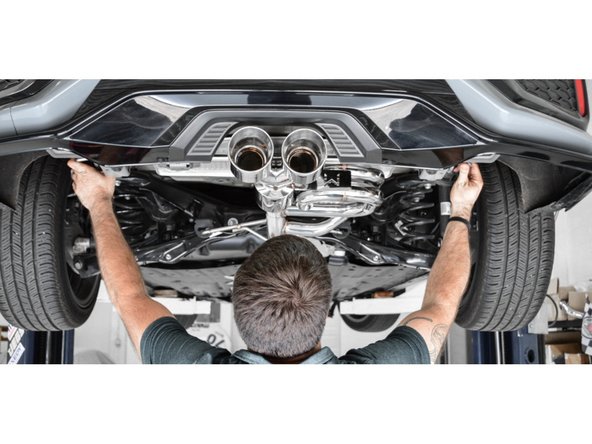
Stand back from the car and verify that the tips are centered and have sufficient clearance from the bumper
-
If the tips are not centered try gently shaking the exhaust to settle the rubber hangers
-
If the tips are sitting high, there may be a rubber hanger that is upside-down. Verify that all hangers are orientated correctly
-
-
-
Start the vehicle to check for leaks or rattles. If none, then take a spin around the block for further verification. If you do find a leak or rattle, please inspect the exhaust further
-
A leak could be caused by a loose flange bolt, improperly used gasket, or if debris is stuck between the gasket and flange
-
A rattle could be caused by misaligned pipe or a rubber hanger being orientated incorrectly
-
If you have exhausted all investigation then give us a call and we would be happy to help and resolve the issue with you
-
-
-
Exhaust may smoke for the first 30 minutes or so of use. This is normal
-
Exhaust sound will settle a bit during the first 100 miles of use. This is normal.
-
Your Honda has a cold start system which causes louder exhaust for around 15 seconds when you start your car cold
-
-
-
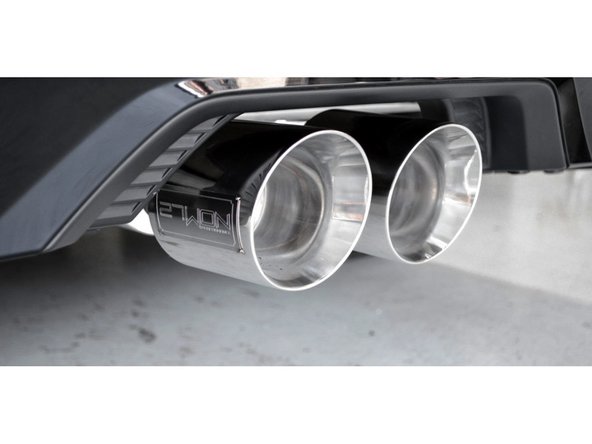
This completes the installation of your 27WON Performance Exhaust
-
We hope you were impressed with your 27WON experience and love your new exhaust for years to come. Email us at sales@27won.com or call us at 571-271-0271 with any questions or concerns
-
Please Leave a review here: https://store.27won.com/civic-hatchback-...
-
Share your experience using #27WON on Instagram and Facebook
-