Introduction
In this installation guide we have provided step by step instructions to remove the OEM rear motor mount and install the 27WON Performance Rear Motor Mount.
Advisory:
- Working under the vehicle requires a safe and sturdy location for the vehicle to sit on jackstands.
- The engine & exhaust can be hot after recent vehicle operation. Allow the vehicle to cool or use a fan to cool before working on the vehicle.
-
-
First and foremost; THANK YOU for becoming a part of the 27WON Family. We hope to REDEFINE your experience of the aftermarket with the highest level Parts, Customer Service, Packaging, & Support
-
27WON Performance has worked hard to design a Performance RMM that performs great and minimizes unwanted harshness to the vehicle passenger compartment, however Performance Engine Mounts will increase the NVH (Noise, Vibration, Harshness) of the vehicle over OEM levels.
-
-
-
Hello and welcome to the 27WON Rear Motor Mount install guide. Through out this guide we have included photos of both our Billet RMM and our Cast RMM to aid in your install. We have done this for your convenience but just so you are aware the install will be the same no matter which mount you have purchased.
-
Noise, Vibration, & Harshness is an evaluation of the various irritants that can be transmitted through the vehicle into the cabin and directly to the driver and passengers. Not all NVH is created equal, an OE designer may consider turbo noise to be unwanted NVH, whereas a performance enthusiast may consider it a desired sound.
-
With the addition of a 27WON performance engine mount, increased NVH will be an inherent part of the upgrade.
-
While we do our absolute best to deliver a mount that works great and feels amazing some customers may find the higher levels of NVH to be too great. It is our guarantee that 100% of customers will love this mount. If for any reason you have any concerns with the mount simply reach out to us and our team will take care of any issues for you.
-
-
-
Raise the vehicle and support with jackstands in the OE recommended locations
-
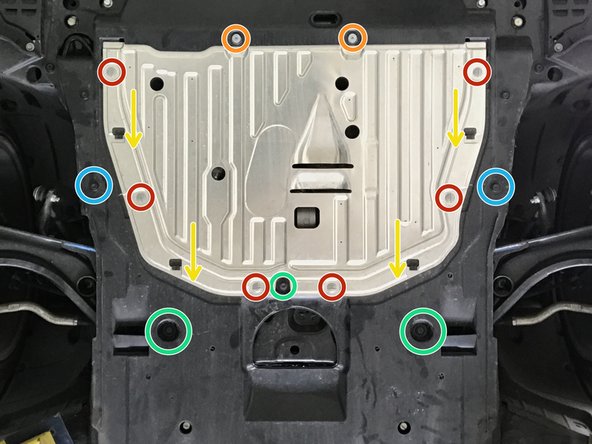
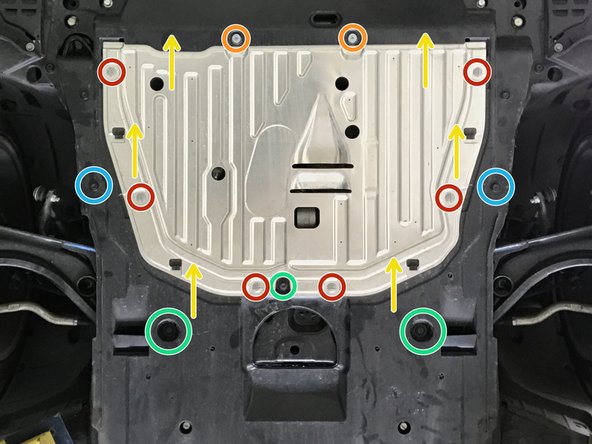
Use a flathead screwdriver to remove the six (6) click-lock fasteners circled in red
-
Use 5mm Allen wrench to remove the two (2) bolts shown circled in orange
-
Slide the metal undertray section towards the rear of the car off the plastic retention clips (shown with yellow arrows), then remove from vehicle
-
Use 10mm socket & ratchet to remove the three (3) bolts shown circled in green
-
Use a flathead screwdriver to remove the two (2) plastic push-clips circled in blue
-
-
-
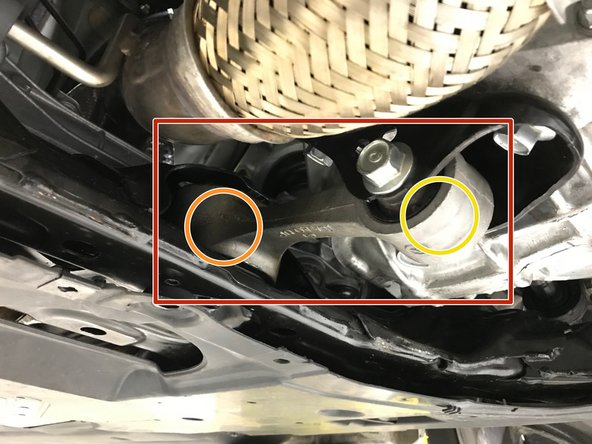
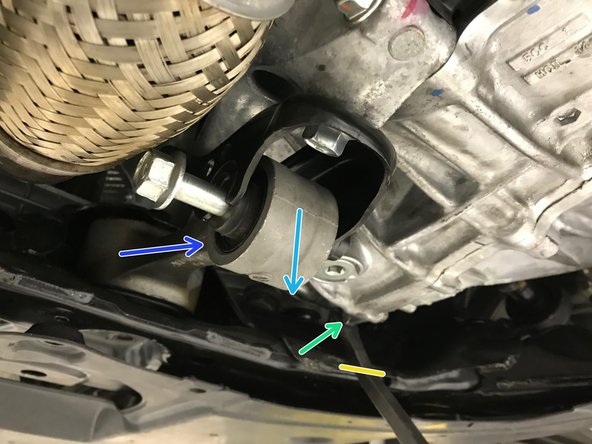
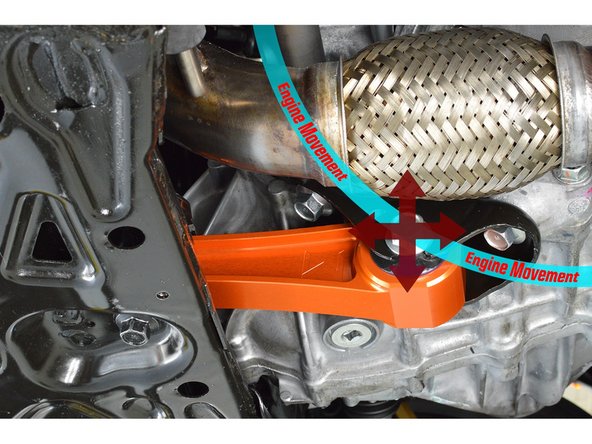
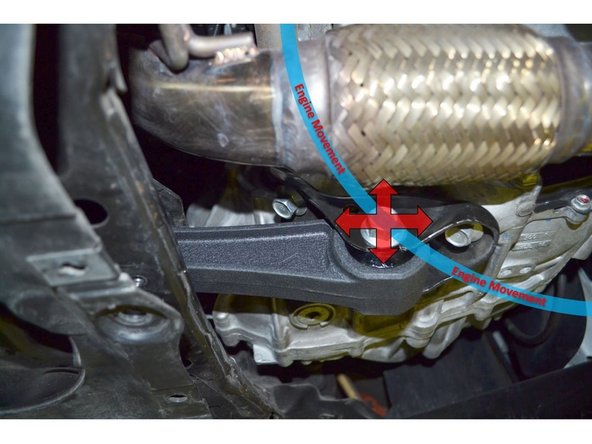
The OE RMM is shown with the red square
-
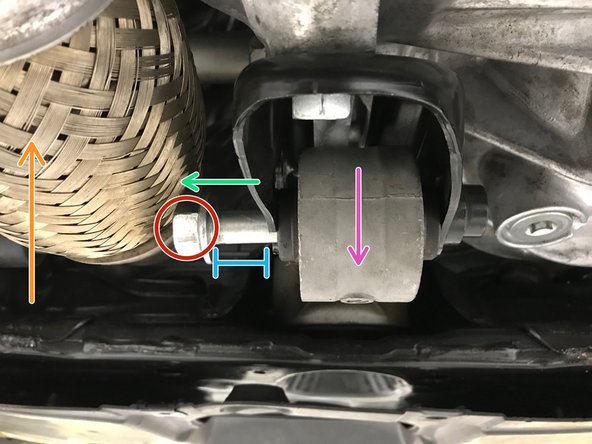
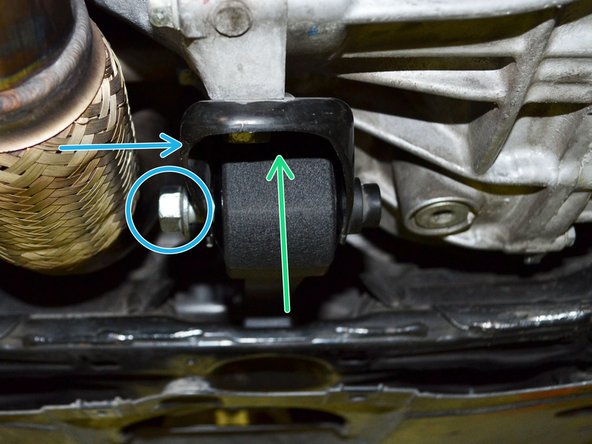
Through the installation instructions we will reference each end of the RMM, below is the identification:
-
Shown with the orange circle is the chassis mounting end of the RMM
-
Shown with the yellow circle is the engine mounting end of the RMM
-
-
-
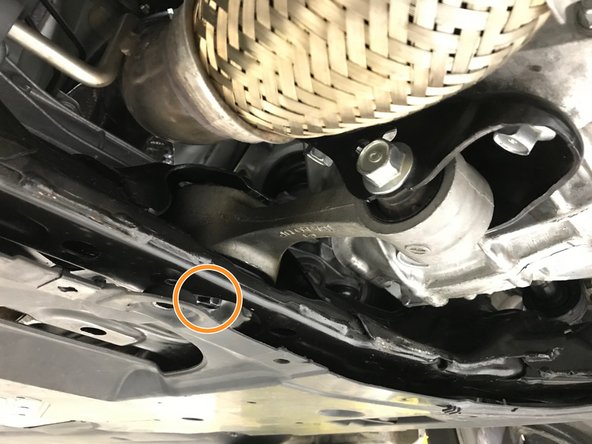
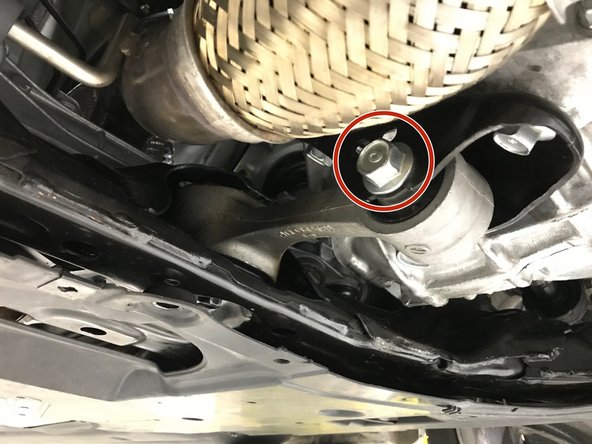
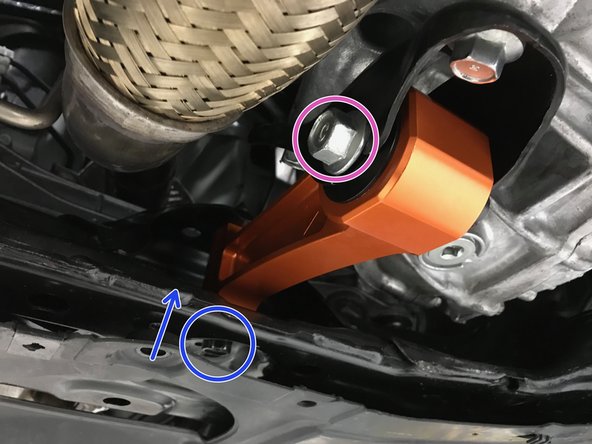
Using a 17mm socket and breaker bar, loosen the chassis end RMM bolt indicated with orange circle
-
Unthread and remove the 17mm chassis end RMM bolt
-
The plastic undertray will need to be pulled downward to provide clearance - the plastic can flex enough to provide clearance without issue
-
-
-
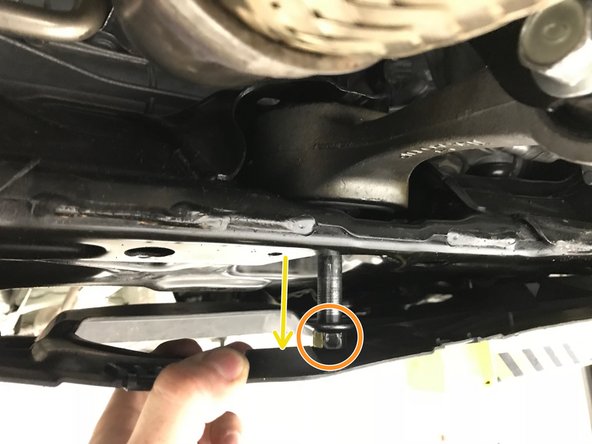
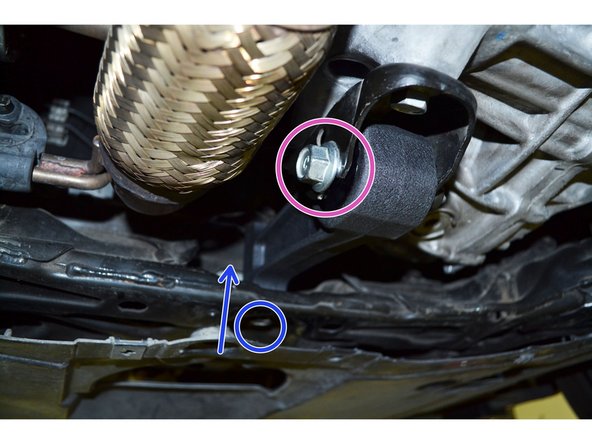
Using a 19mm socket and breaker bar, loosen the engine end RMM bolt indicated with red circle
-
Unthread the 19mm engine end RMM bolt
-
Due to exhaust (front-pipe) location, the engine end RMM bolt will only unthread to this extent - this is not an issue for RMM removal
-
At this point the engine end of the RMM should be able to move vertically down a small amount. If the bolt cannot be completely unthreaded, then the front pipe (orange arrow) may need to be loosened and moved out of the way.
-
With some aftermarket front-pipes, the diameter of the front-pipe may not allow the bolt to be unthreaded fully. If the bolt cannot be completely unthreaded, the front pipe may need to be moved
-
-
-
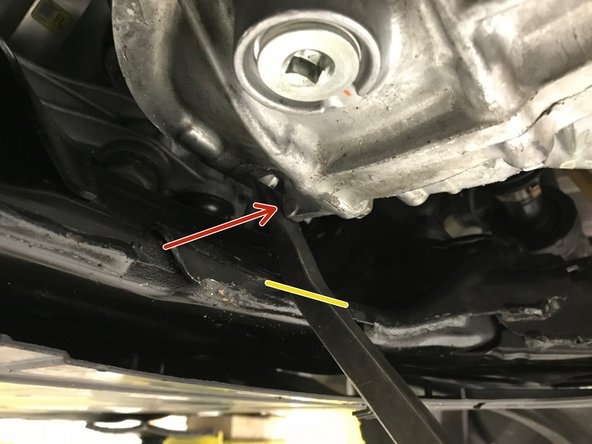
For improved clarity we have provided an image of the Civic 1.5L MT transmission and the Civic Type-R transmission
-
To remove/install the RMM, the transmission must be rotated forward with pry bar to provide extra clearance
-
Civic 1.5L MT Transmission prying location shown with red arrow
-
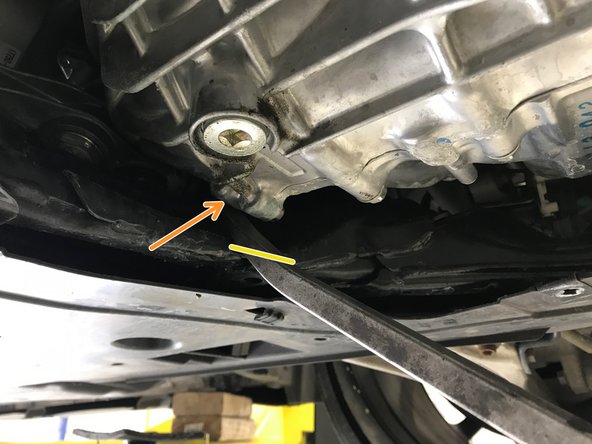
Civic Type-R MT Transmission prying location shown with yellow arrow
-
The yellow line shows the proper location to set the pry bar on the chassis for prying
-
-
-
Place the pry bar on the chassis as shown
-
Using the pry bar, pry against the transmission as shown - rotate the transmission forward ~1"
-
Using your hand, pull the engine side of the RMM downward and out of the engine mounting bracket
-
With the RMM angled downward, pull the RMM forward and out of the chassis
-
-
-
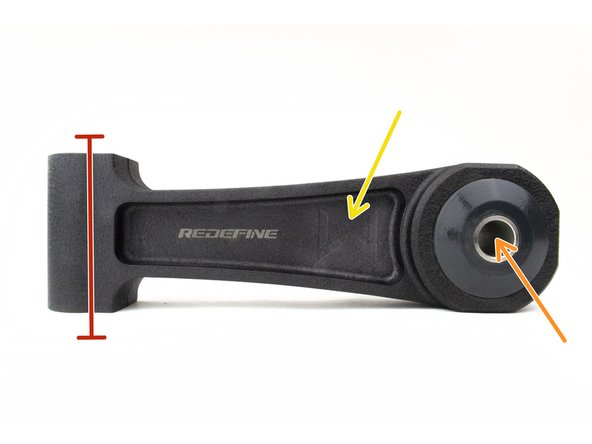
The 27WON RMM was design to be installed in one orientation. Please review before proceeding to the 27WON RMM installation
-
Chassis End - This side of the RMM will be mounted to the chassis sub-frame
-
Engine End - This side of the RMM will be mounted to the engine mounting bracket
-
Engraved W Logo - This logo should face the exhaust front-pipe of the vehicle when installed
-
-
-
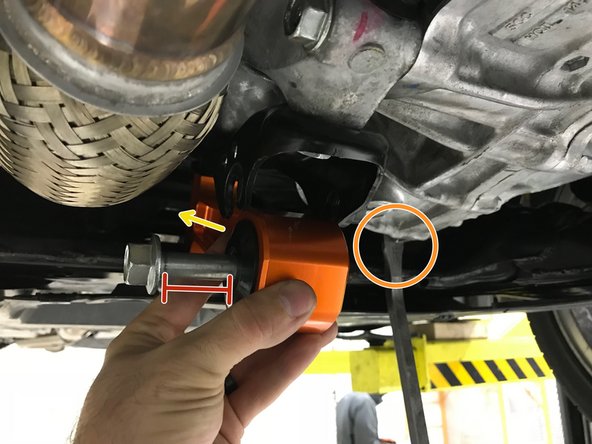
The installation of the 27WON RMM will follow the same steps to remove OE but in reverse order
-
Partially install the 19mm engine end bolt into the 27WON RMM with a gap shown by red line
-
Pry the transmission forward to provide clearance
-
Slide the chassis end of the RMM into the chassis sub-frame mounting location as shown
-
-
-
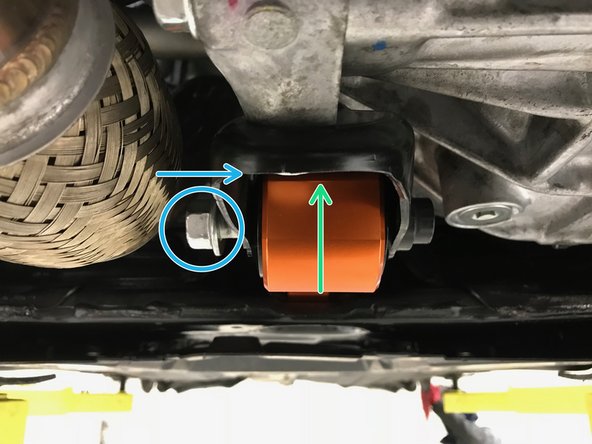
Rotate the RMM up and into the engine mounting bracket - the partially installed bolt will align with the slot in the engine side mounting bracket
-
Release the pry bar slowly to allow the chassis end of the RMM to slide into place
-
Hand thread the 19mm bolt fully into the engine mounting bracket
-
-
-
Align the chassis side of the RMM with the hole in the chassis then hand thread the 17mm bolt.
-
Using the 17mm socket and torque wrench, torque bolt to 65 ft-lbs
-
Using the 19mm socket and torque wrench, torque bolt to 50 ft-lbs
-
Re-install the front-pipe if it was loosened/moved for RMM installation
-
-
-
Install the two (2) plastic push-clips
-
Use 10mm socket & torque wrench to install the three (3) bolts. Torque to 8-12 ft-lbs
-
Slide the metal undertray section towards the front of the car onto the plastic retention clips and aligned with the front valance
-
Use 5mm Allen wrench & torque wrench to install the two (2) bolts shown. Torque to 6-8 ft-lbs
-
Use a flathead screwdriver to install the six (6) click-lock fasteners
-
Remove the jackstands and lower the vehicle back to the ground
-
-
-
A performance rear motor mount by design reduces engine movement to mitigate unwanted wheel hop, slow throttle response, and torque steer - the by-product of this is increased NVH (Noise, Vibration, Harshness) that is transmitted to the vehicle cabin
-
Like most performance modifications, understanding the changes to the vehicle caused by the modification is critical. In these instructions we want to advise you on the expected changes :
-
Polyurethane has a "break-in" period, we advise that you drive with the RMM for a couple weeks to let the RMM poly settle in. We are confident that you will love the new performance benefits
-
Increased vibration to the vehicle cabin is to be expected, there are some driving habit changes that will reduce the added vibration: try not to to "lug" the engine at low RPM. High engine load (hard throttle) at low RPM may exaggerate the vibration
-
The temperature of the poly will affect its stiffness, cold mornings may transmit more vibration. This will disappear as the polyurethane warms up with the engine heat
-
We want every customer totally satisfied with our RMM. Your personal satisfaction with the 27WON RMM is very important to us. If you have questions or concerns please give us a call at 571-271-0271.
-
-
-
This completes the installation of your 27WON Performance Rear Motor Mount
-
We hope you were impressed with your 27WON experience and love your new RMM for years to come. Email us at sales@27won.com or call us at 571-271-0271 with any questions or concerns
-
Please Leave a review here: https://store.27won.com/10th-gen-civic-r...
-
Share your experience using #27WON on Instagram and Facebook
-