Introduction
In this installation guide, we have provided step-by-step instructions to install the 27WON Front Mount Intercooler (FMIC) on your 2023+ Acura Integra A-Spec or 2022+ Honda Civic
Advisory:
- Working under the vehicle requires a safe and sturdy location for the vehicle to sit on jack stands
- The engine bay will be hot after recent vehicle operation. Allow the vehicle to cool or use a fan to cool the engine bay before working on the vehicle
Tools
- Flathead Screwdriver
- Phillips Screwdriver
- Needle Nose Pliers
- Optional: Hose Pliers
- Optional: Push Clip Removal Tool
- Optional: Riv-Nut Tool
- Dremel, File, or Chisel
- Torque Wrench (3/8" Drive)
- 1/4" Ratchet
- 3/8" Ratchet
- 3 8" Short extension
- 3/8" Long Extension
- 5.5mm Socket
- 8mm Socket
- 10mm Socket
- 12mm Socket
- 14mm Socket
- Wrench, 10mm
- Pry Bar
- Rubber Mallet
- Blue Masking Tape
- Flashlight
- Jack Stand × 2
- Hydraulic Jack
Parts
- FE1 Front Mount Intercooler
- FE1 FMIC Inlet Silicone
- FE1 FMIC Outlet Silicone
- FE1 Cold Pipe
- FE1 Throttle Body Silicone
- FE1 FMIC Mounting Bushing × 2
- FE1 FMIC Mounting Bracket, Left
- FE1 FMIC Mounting Bracket, Right
- T-Bolt Clamp - 54-62mm
- T-Bolt Clamp - 67-75mm × 2
- T-Bolt Clamp - 70-78mm
- T-Bolt Clamp - 76-84mm × 2
- M6x1.0x20mm Flange Bolt × 2
- M6x1.0x12mm SS Riv Nut × 2
- M6x1.0 Flanged Nuts × 2
-
-
First and foremost; THANK YOU for becoming a part of the 27WON Family. We hope to REDEFINE your experience of the aftermarket with the highest level Parts, Customer Service, Packaging, & Support
-
This guide describes a process to install your new Front Mount Intercooler (FMIC)
-
Installation requires relocating ambient temperature sensor
-
-
-
Follow manufacturer recommendations to jack up and support the front of vehicle
-
The passenger side wheel and tire were removed for clarity but are not required for bumper removal
-
-
-
Clear space around the front of the car and underneath to have ample space to remove the front bumper
-
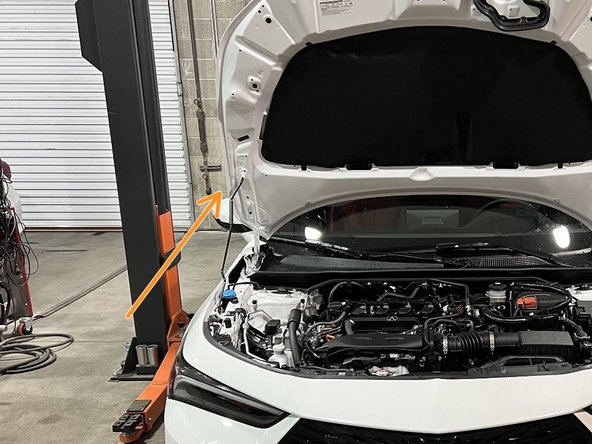
Pop open the hood and support with hood prop in fully up position
-
-
-
If you have a Honda Civic, skip to the next step
-
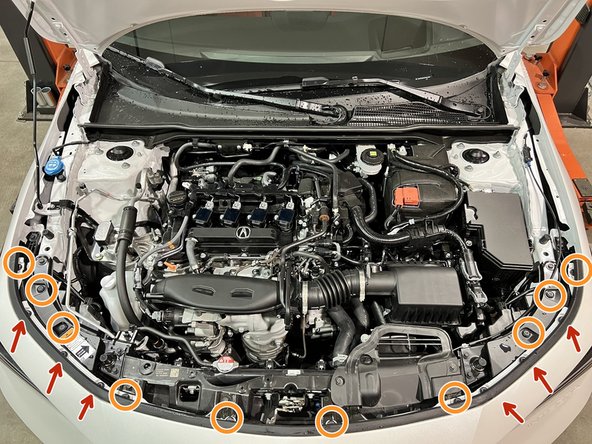
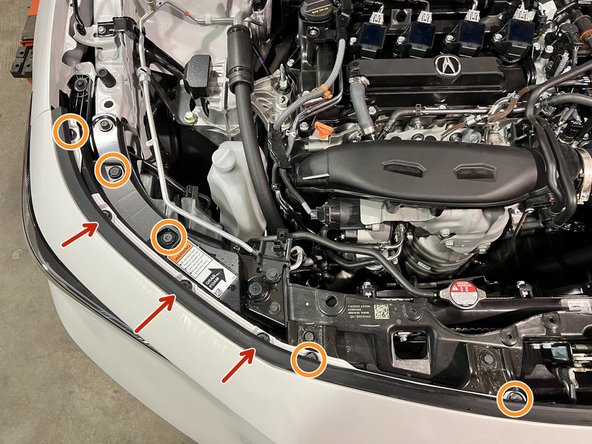
Use a large flathead screwdriver or prying tool to remove the ten (10) push-clips on the top of the bumper
-
These push clips are not removed
-
The 2nd and 3rd images give you a better view of the clips
-
-
-
If you have a Acura Integra, skip to the next step
-
Use a large flathead screwdriver or prying tool to remove the ten (10) push-clips on the top of the bumper
-
These push clips are not removed
-
The 2nd and 3rd images give you a better view of the clips
-
Other Civic trims not shown but process will be similar
-
-
-
The passenger side wheel and tire were removed for clarity but not required for bumper removal. Passenger side shown, Driver side similar
-
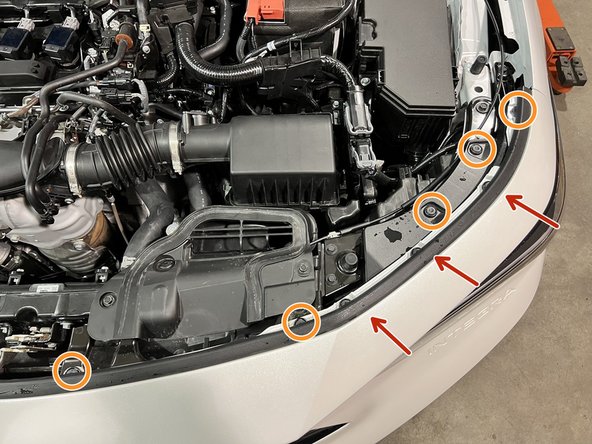
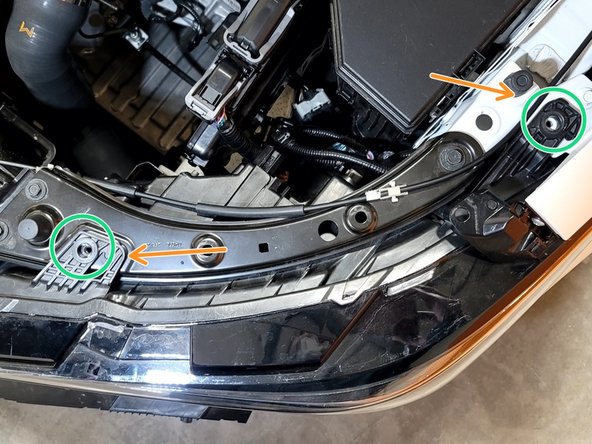
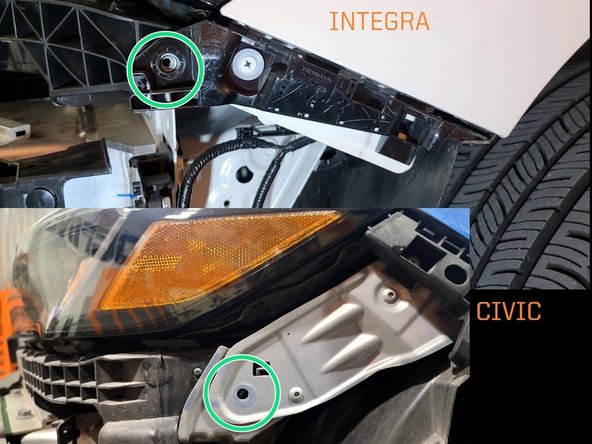
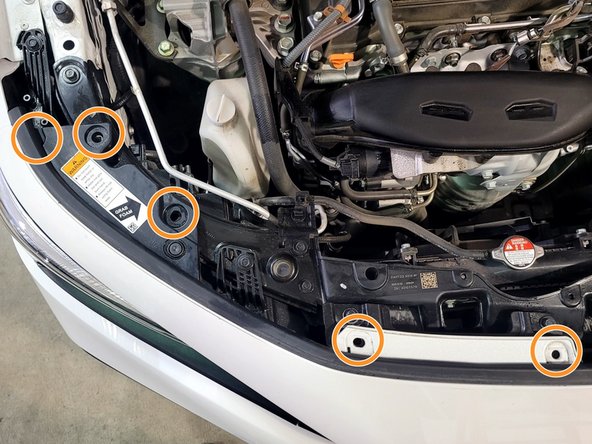
Integra
-
Remove the dome head screw with Philips screwdriver
-
Remove the screw with Philips screwdriver
-
Remove two (2) push clips with flat head screw driver
-
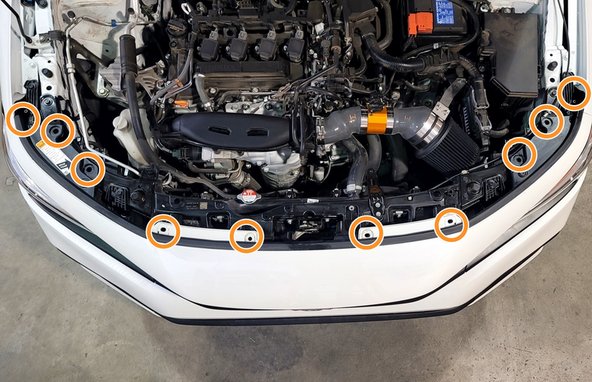
Civic
-
Remove two (2) screws with Philips screwdriver
-
Remove one push clip with flat head screw driver
-
-
-
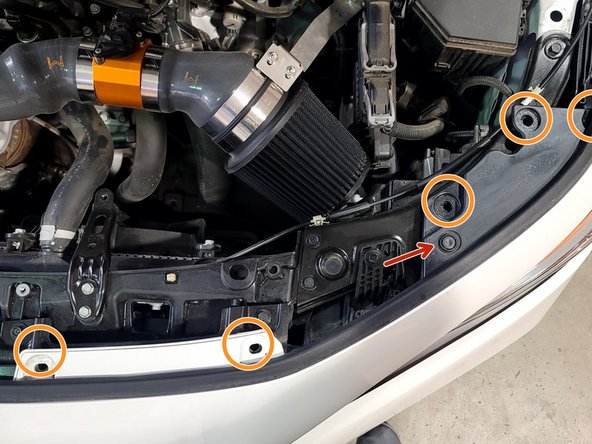
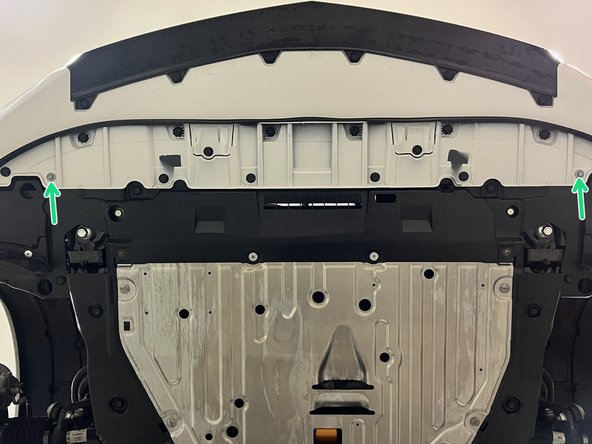
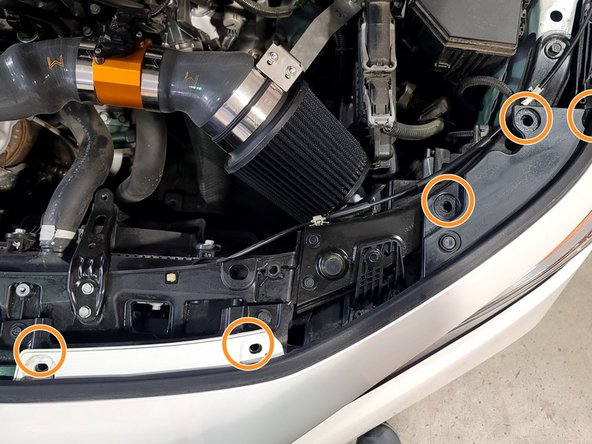
Integra
-
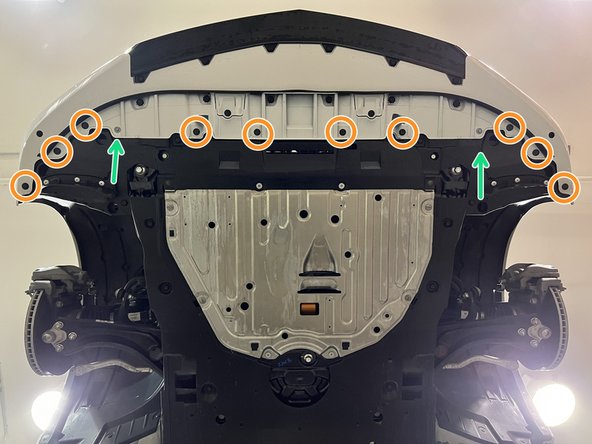
Use a large flathead screwdriver or prying tool to remove the ten (10) push-clips on the bottom of the bumper
-
Use 10mm socket and ratchet to remove two (2) M6 bolts
-
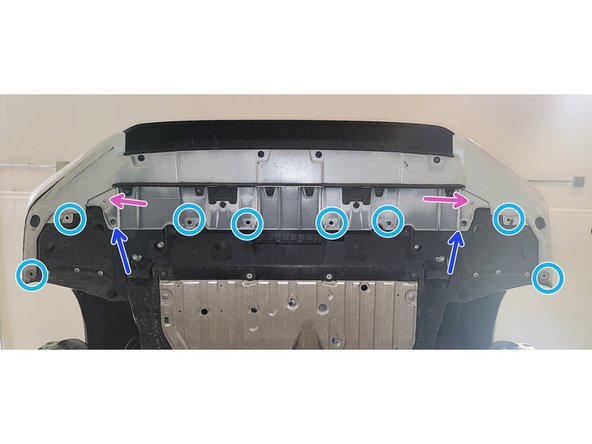
Civic
-
Use a large flathead screwdriver or prying tool to remove the eight(8) push-clips on the bottom of the bumper
-
Use 10mm socket and ratchet to remove two (2) M6 bolts
-
Use Phillips head screwdriver to remove two (2) screws
-
-
-
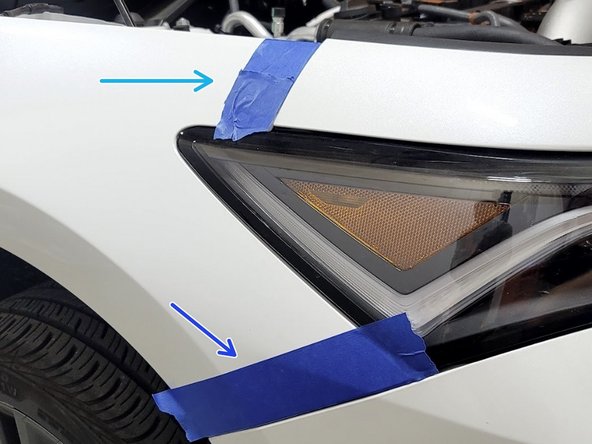
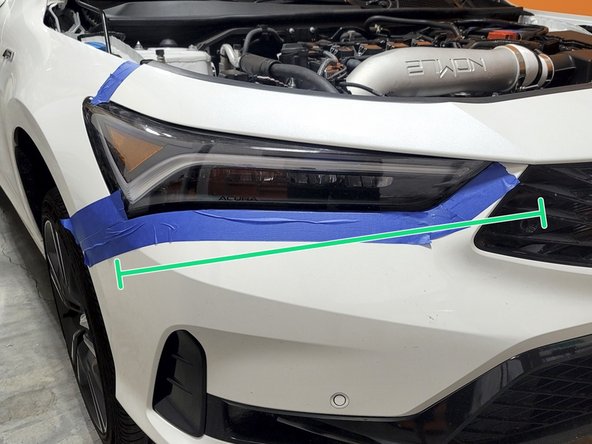
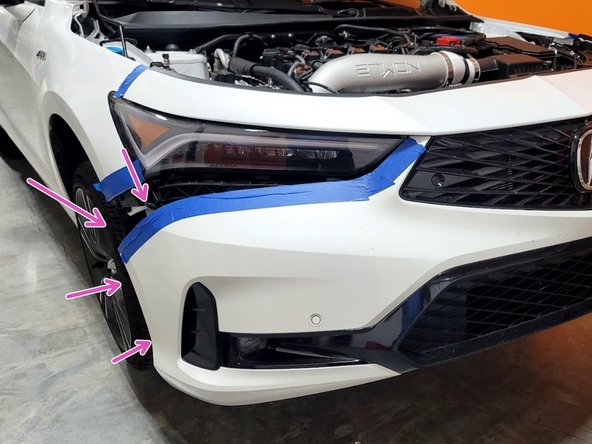
Integra shown. Civic Similar
-
Place a strip of blue Painters tape on the each fender as shown
-
Place a strip of blue Painters tape on the each fender as shown
-
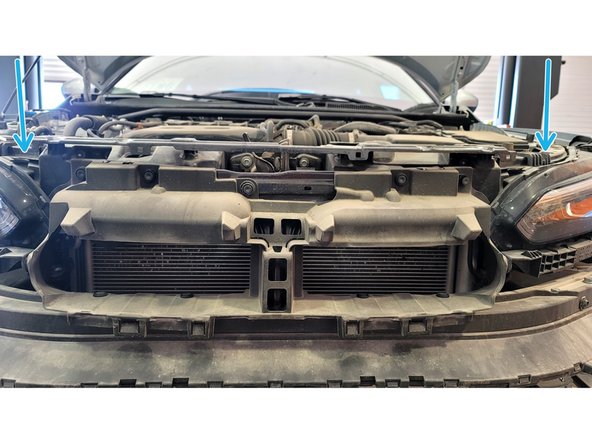
Place a strip of blue Painters tape under each headlight as shown to help prevent any paint scratches from bumper removal
-
-
-
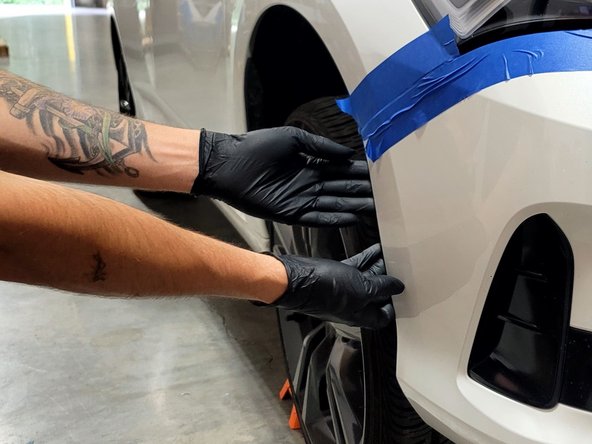
Integra shown. Civic Similar
-
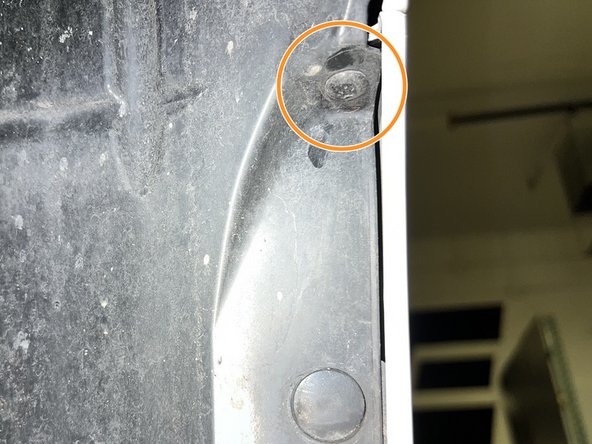
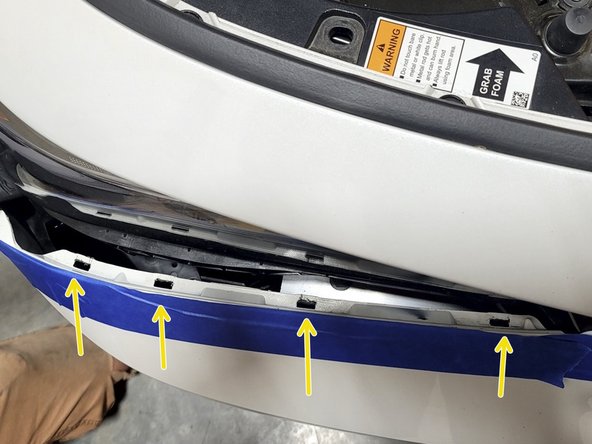
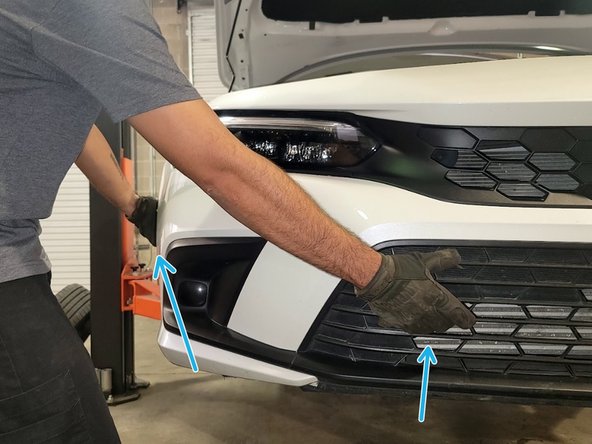
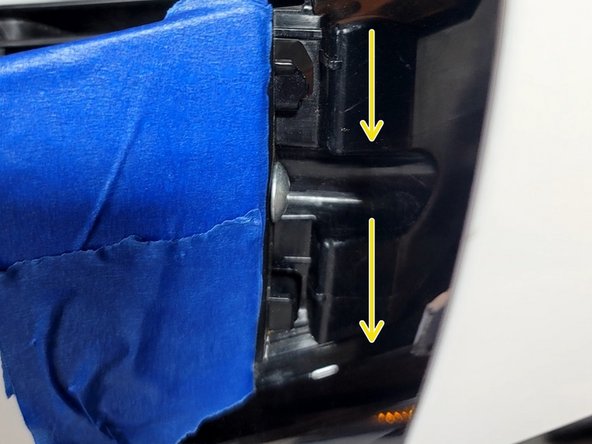
Use a forceful but controlled motion with both hands to pop the bumper out of the three fender clips as shown
-
Fender Clips
-
It may be easier to reach your hand between the bumper and the fender liner and pop out the first clip from behind the bumper
-
The bumper will take some force to remove the first time it comes off. This is ok. You will hear a lot of noise as the tabs pop loose. The bumper is not breaking, just separating. The key here will be to use one swift forceful motion as opposed to a bunch of small tugs
-
Do not fully pull the bumper off the car as there is some wiring to unclip later
-
-
-
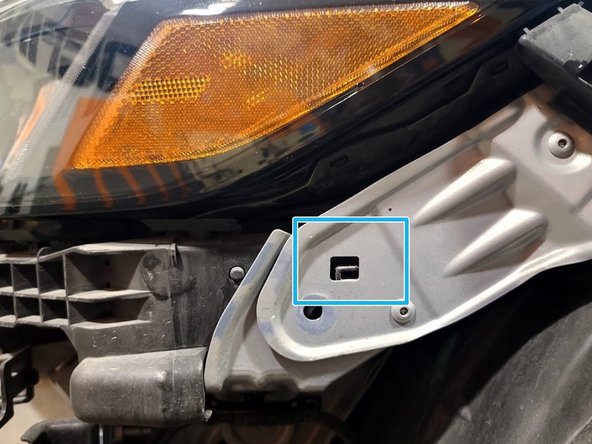
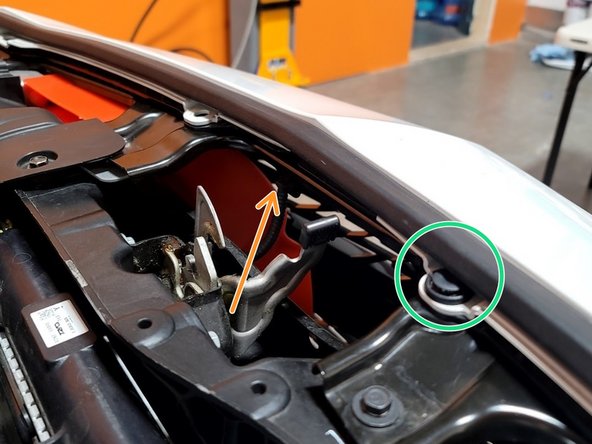
Gently pop off bumper above headlight from it's clip by pulling up and out
-
-
-
Do not fully pull the bumper off the car as there is some wiring to unclip later
-
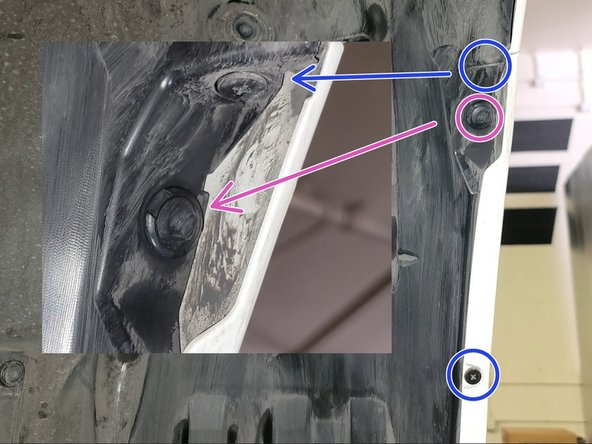
INTEGRA: Use a forceful but controlled motion with both hands to pop the bumper out of the four headlight clips as shown
-
Headlight Clips
-
CIVIC: Use a forceful but controlled rocking motion with both hands to pull the bumper out of the five headlight clips. This takes some force the first time
-
Do the same for the Driver side of bumper
-
Bumper could drop to the ground. Have friend hold the passenger side
-
-
-
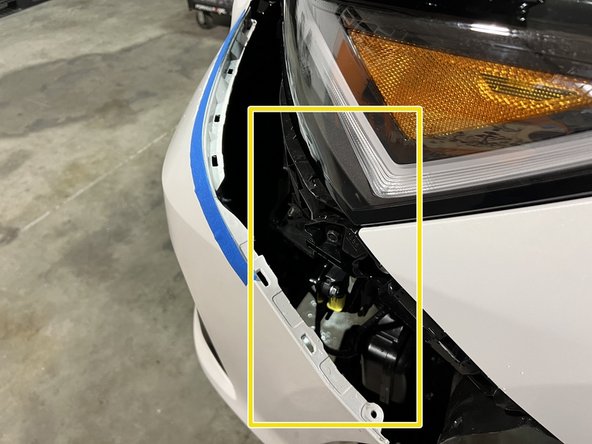
This step is for cars like the Integra that have Honda Sensing Suite and cars equipped with Fog Lights. Skip for other cars
-
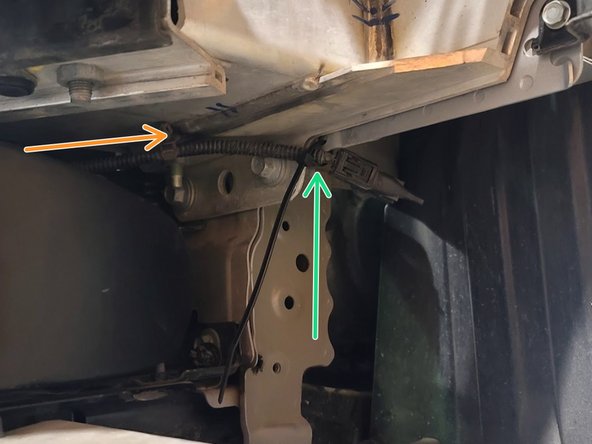
Use a Flashlight to see behind the driver side bumper that is loosely hanging off the car
-
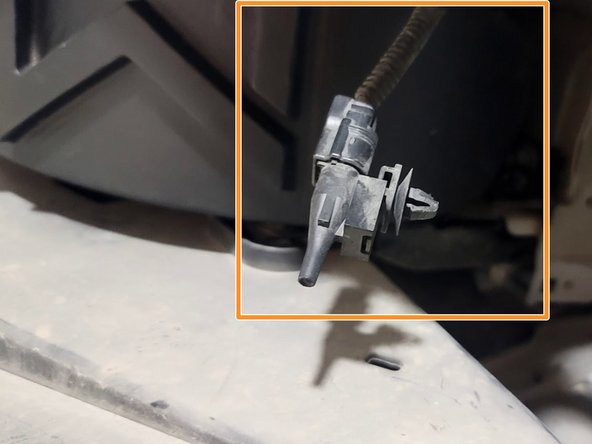
Use your hand to unclip the parking sensor pig tail
-
Use your hand to unclip the fog light pig tail
-
Repeat above for Passenger side
-
-
-
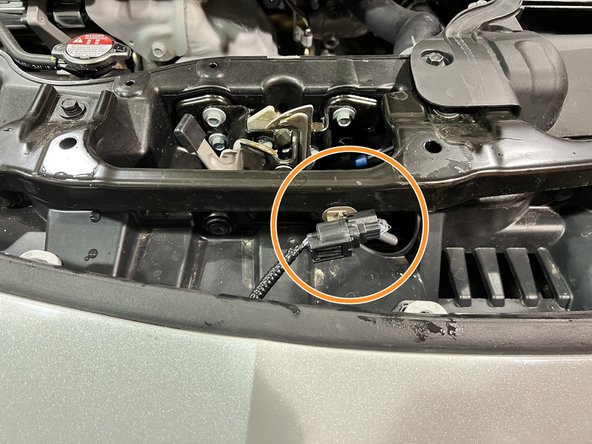
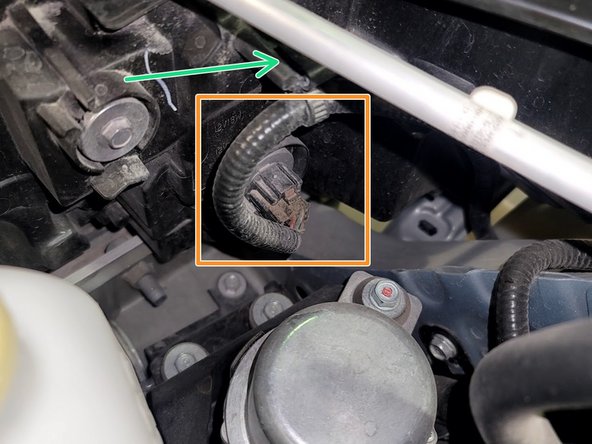
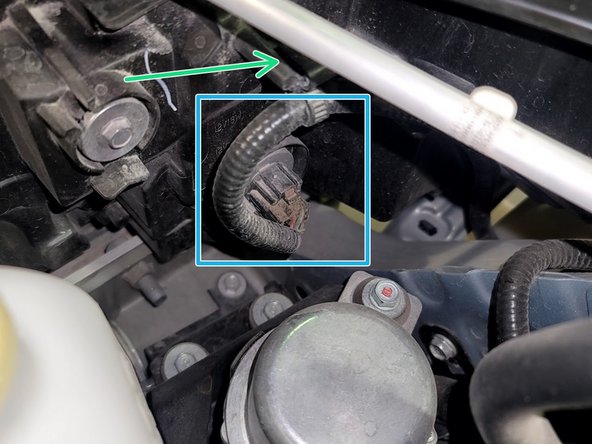
This step is for cars like the Integra that have Honda Sensing Suite. Skip for other cars
-
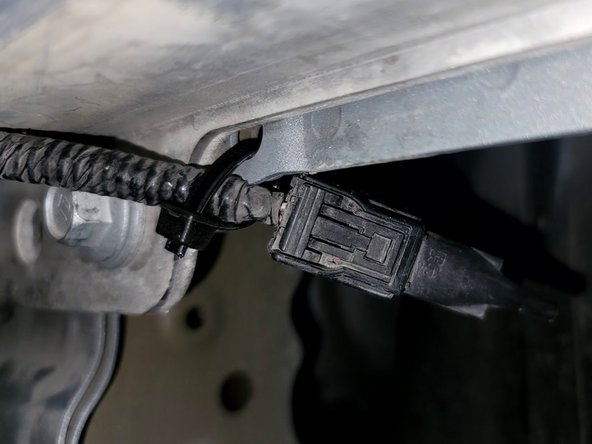
Use your hand to unclip the forward proximity sensor pig tail
-
-
-
Grab bumper with both hands near hood latch and walk it off the car
-
Set aside bumper in safe place
-
Use caution not to scratch paint on bumper
-
Integra
-
Civic Si
-
Civic EX
-
-
-
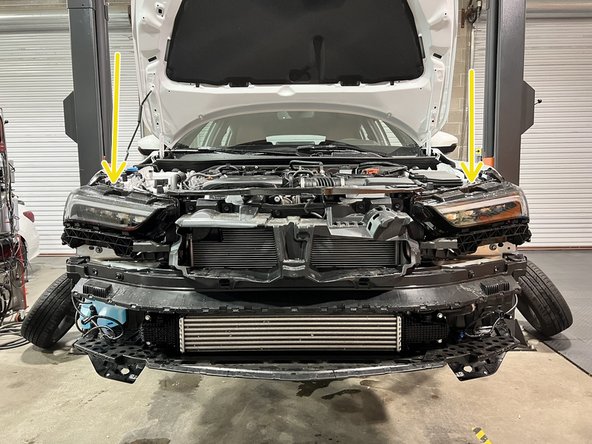
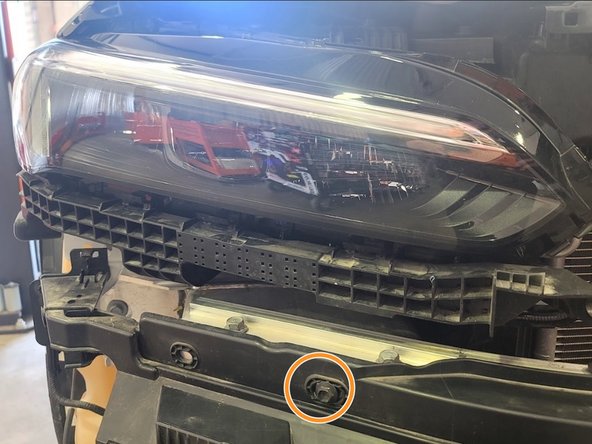
Integra Shown. Other models will be similar
-
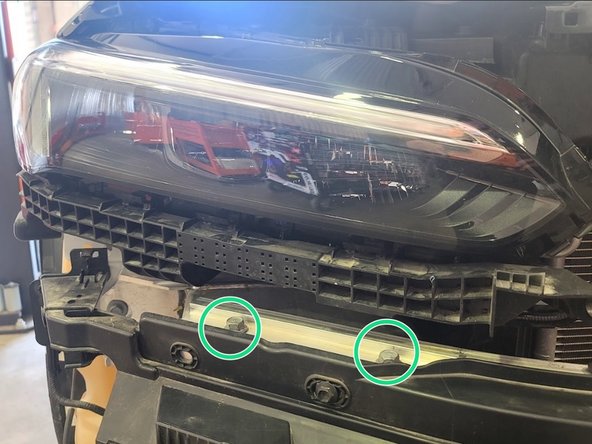
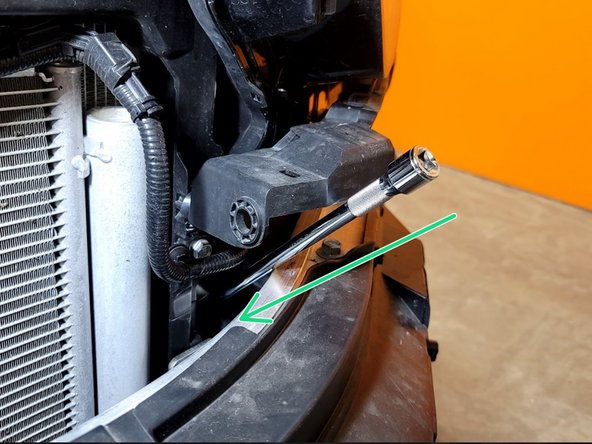
Remove four (4) bolts securing headlight to car using 10mm socket and ratchet
-
Two tabs have clips built into the plastic (orange arrows). Gently pry up tabs and slide headlight towards you
-
-
-
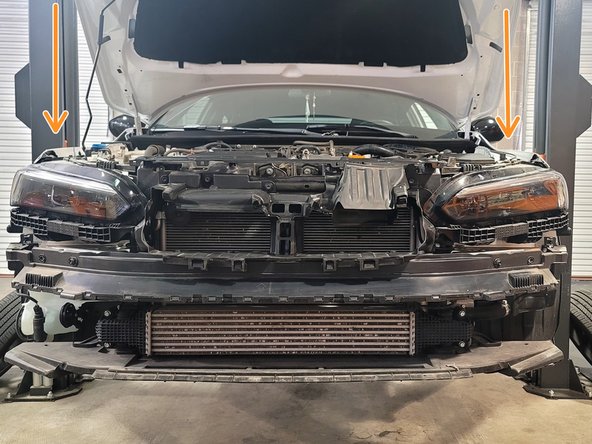
Unplug Headlight by pinching plug and pulling it out
-
Unclip loom by gently prying clip off with flat head screwdriver
-
Some Cars have an extra plastic clip. Pop that free
-
Remove headlight and safely set headlight aside
-
Do the same for the other headlight
-
-
-
Use a 3/8" drive ratchet and a 10mm socket to remove the two (2) bolts from the bracket
-
Use a 3/8" drive ratchet and a 12mm socket to remove the four (4) bolts connecting the intercooler to the air ducts
-
Remove OE FMIC from car
-
Bushings in the mounting brackets will be reused. Pull those out and set aside
-
-
-
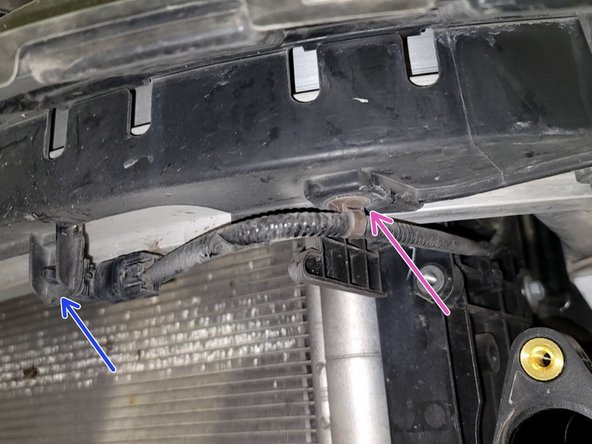
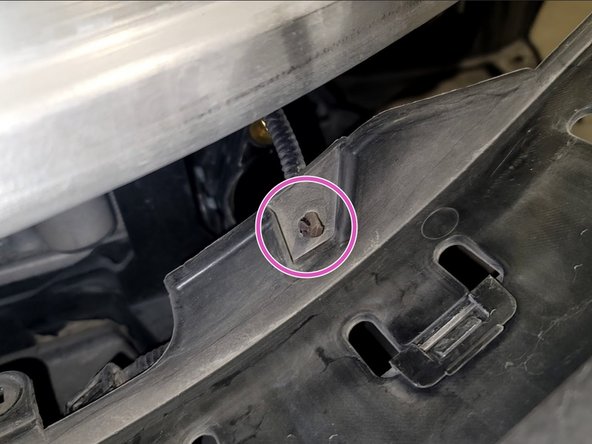
Remove two (2) bolts using a 10mm socket and ratchet
-
Remove two (2) plastic clips securing underside of plastic cover to the aluminum bumper
-
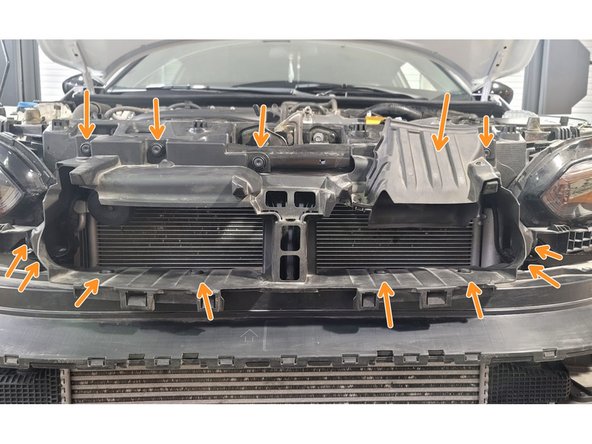
Remove the thirteen (13) plastic push clips with a flat head screwdriver or pry tool holding ducting in place
-
Civic Si shown. Other cars similar
-
-
-
Use pliers to disconnect ambient temperature sensor from cover. Pull cover slightly off bumper to access loom clip as shown. Remove clip with pliers
-
Pull cover slightly off bumper to access loom clip as shown. Remove clip with pliers
-
Remove Plastic Cover from aluminum bumper and set aside
-
-
-
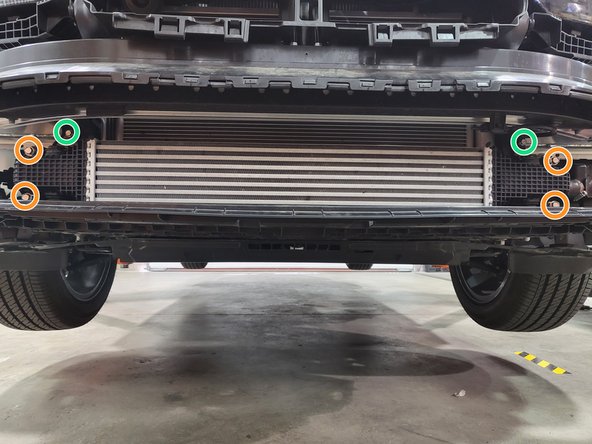
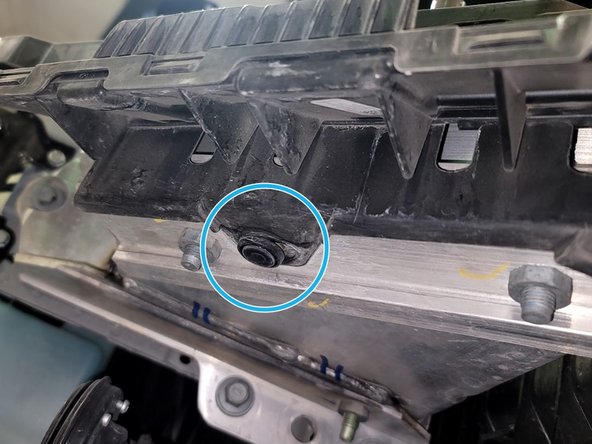
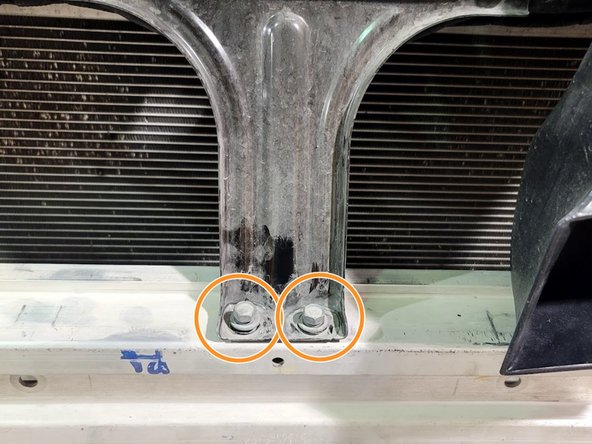
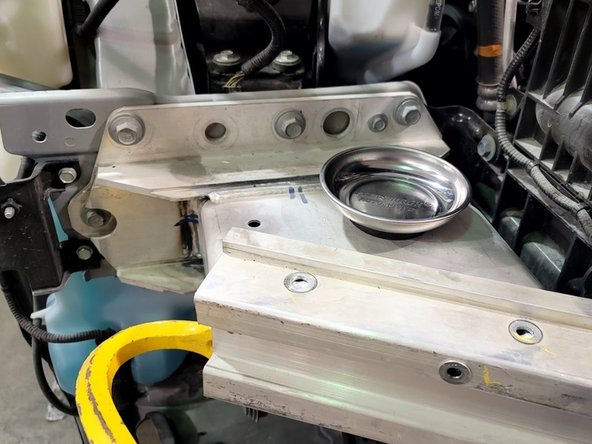
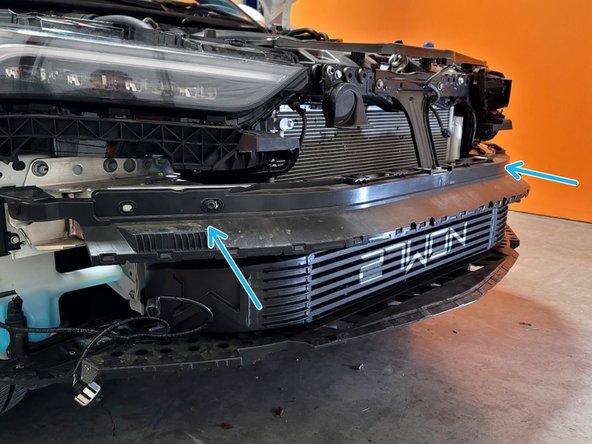
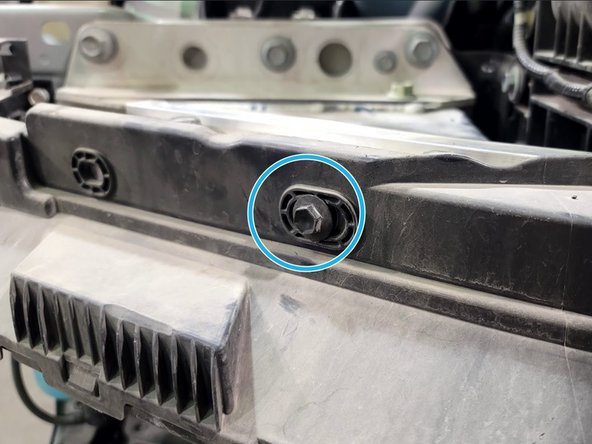
Remove four (4) bolts using 14mm socket and ratchet, two from each side
-
Remove two (2) bolts as shown using 12mm socket and ratchet
-
Use a rubber mallet to remove the Aluminum Bumper from car. Work evenly on each side so as not to bind up the bumper on the car
-
This can be difficult to get off
-
Use caution if pry bar is used as the aluminum is soft
-
Set aluminum bumper aside for later reinstallation
-
-
-
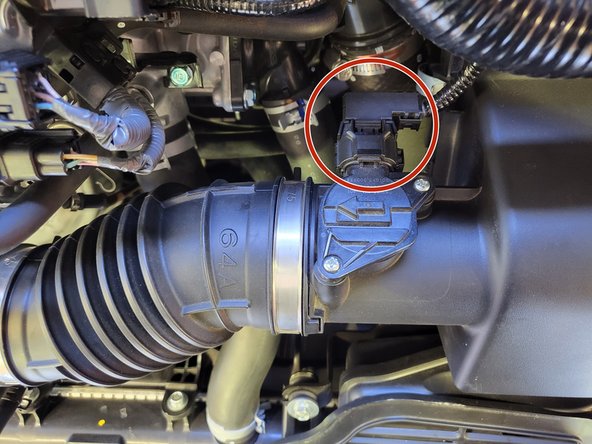
It's time to remove the Intake System. OE Shown
-
Unplug the connector for MAF sensor using your fingers
-
-
-
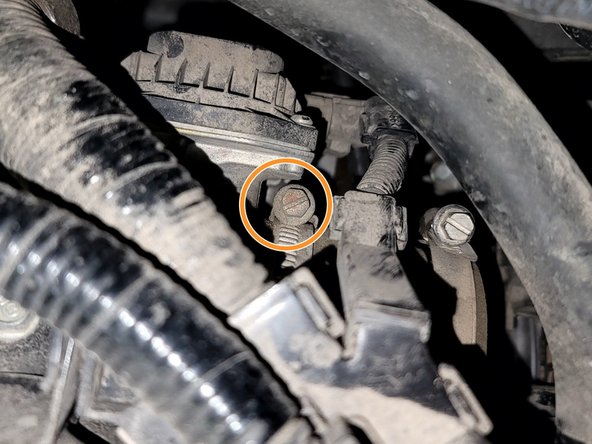
Use a 5.5mm socket and 3/8" ratchet or a small Phillips screwdriver to loosen the clamp circled in red
-
Tube should be able to freely pull off the turbo inlet pipe
-
-
-
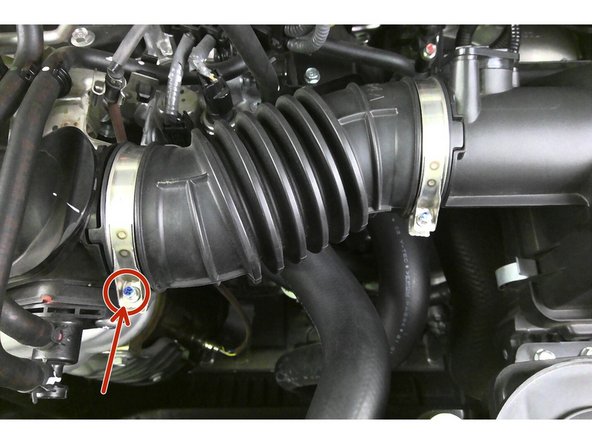
Use a 3/8" drive ratchet and a 10mm socket to remove two (2) bolts that hold the intake duct
-
Use a panel clip tool or flat head screw driver to remove one (1) clip
-
Plastic clip breaks very easily. Use Caution
-
Use a 3/8" drive ratchet and a 10mm socket to remove the bolt to intake bracket as shown
-
-
-
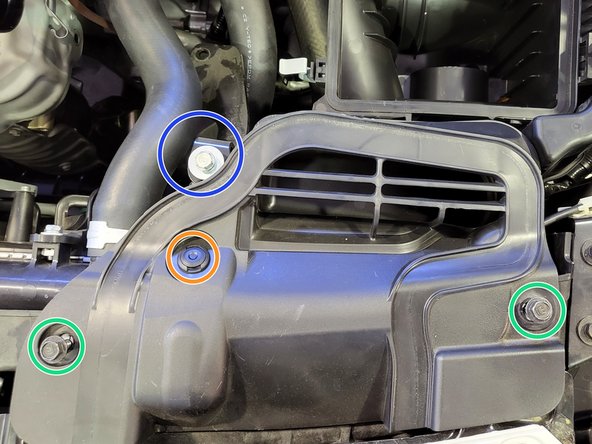
Intake shown without lid and filter for clarity
-
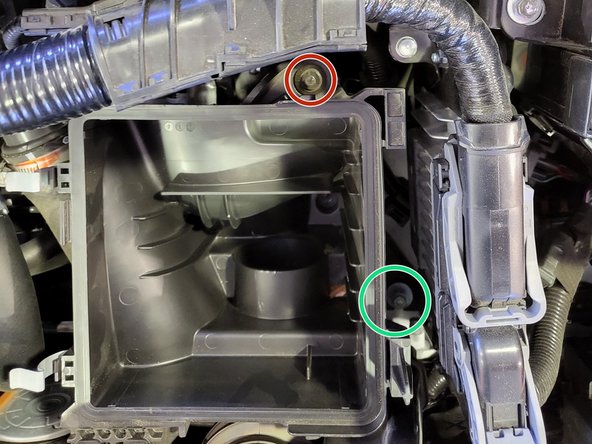
Use a 3/8" rachet, a long extension, and a 10mm socket to remove lower intake bolt as shown
-
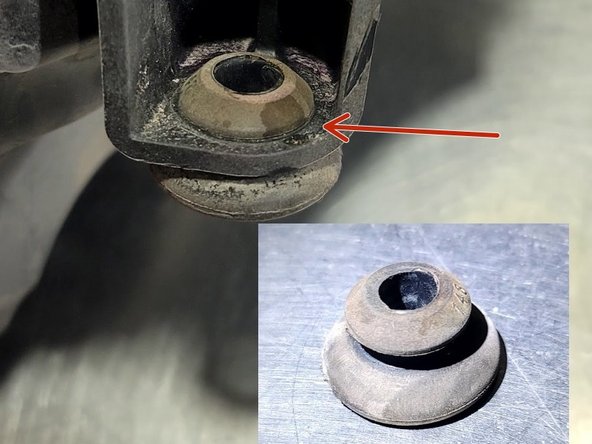
Wiggle the airbox and pull it up at the same time to loosen the airbox from the rubber bushing
-
This can be a PITA and you can get hurt when it breaks loose. Use Caution
-
Once you free the intake assembly from the bushing mount, it will easily come out of the car
-
-
-
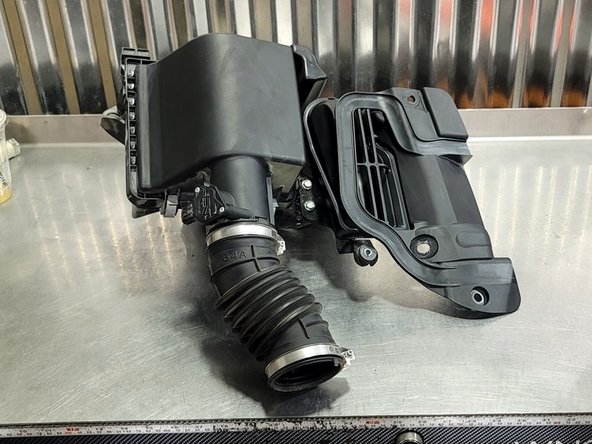
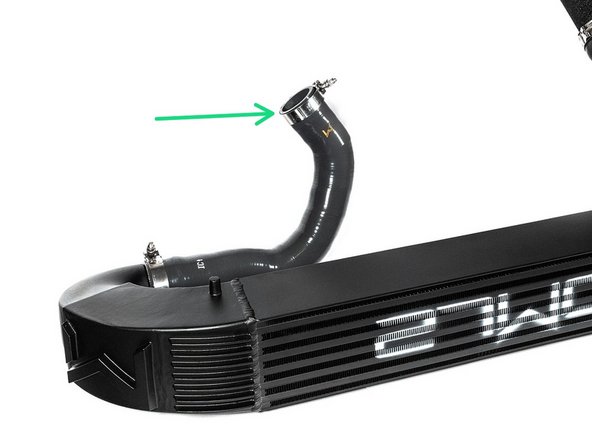
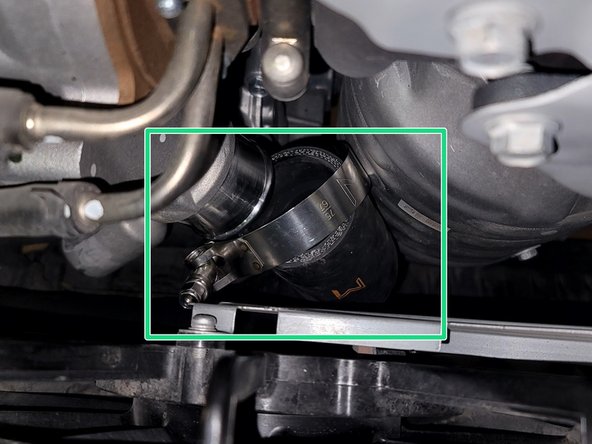
FMIC is shown in the first image off the car to aid understanding
-
Use 10mm wrench or short 10mm socket and 1/4" ratchet to loosen clamp at turbo outlet
-
Pull rubber hose off turbo and then the intercooler inlet assembly off car as shown
-
-
-
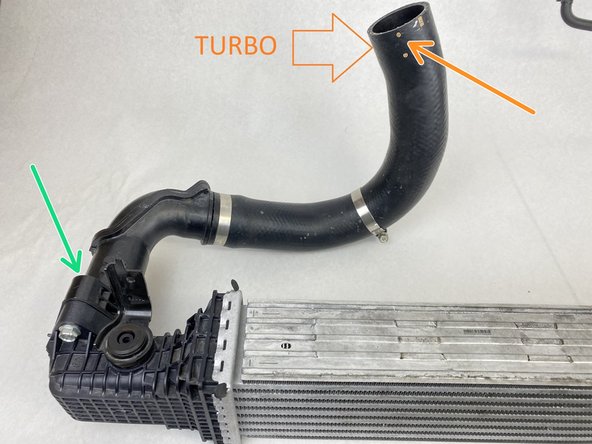
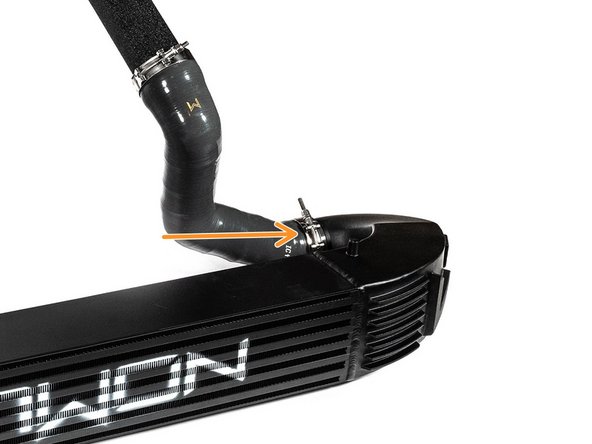
FMIC is shown in the first image off the car to aid understanding
-
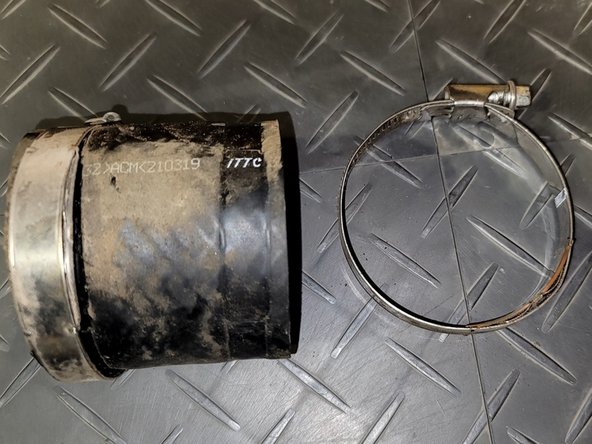
Use 10mm socket and ratchet to loosen clamp at the OE cold pipe
-
Pull rubber hose off cold pipe
-
Rubber might be stuck to cold pipe. Twist the rubber at the cold pipe to break it free before pulling it off
-
-
-
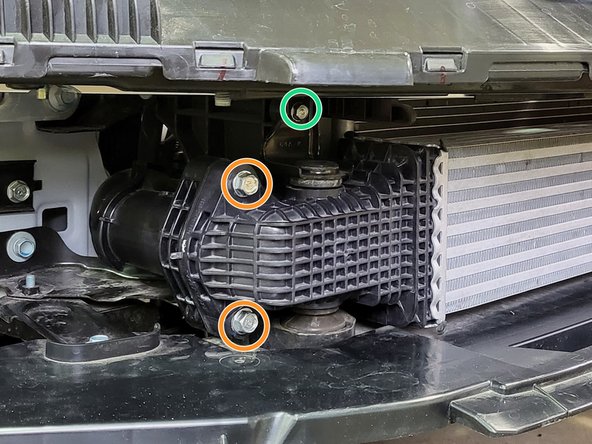
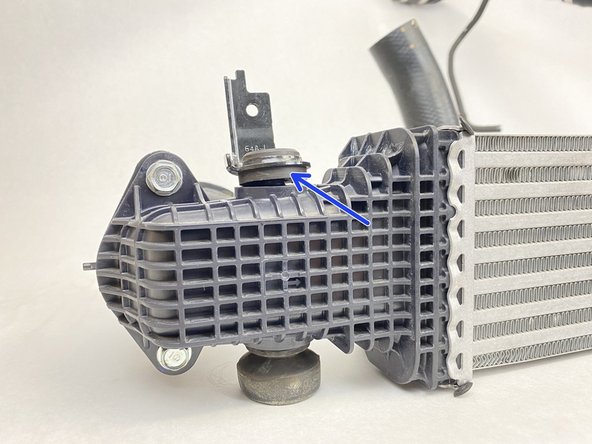
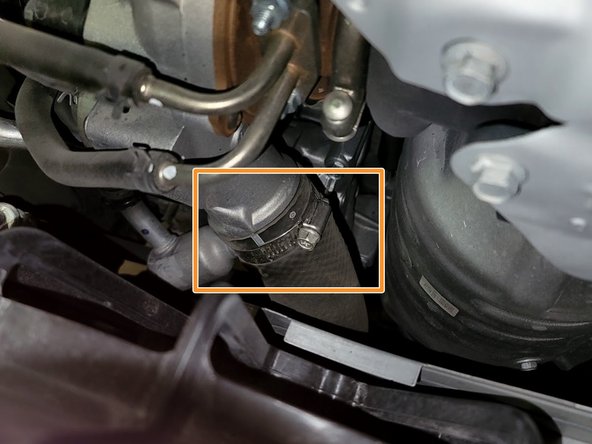
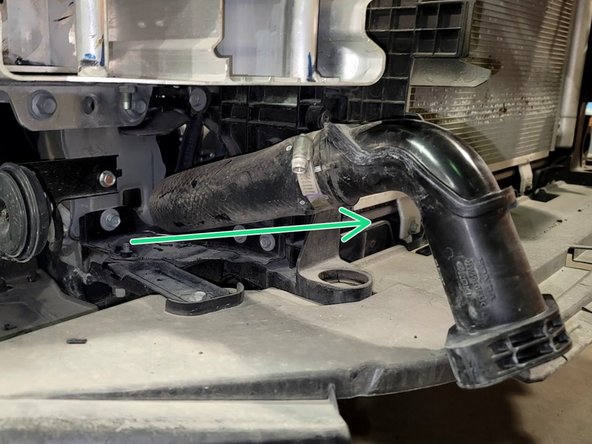
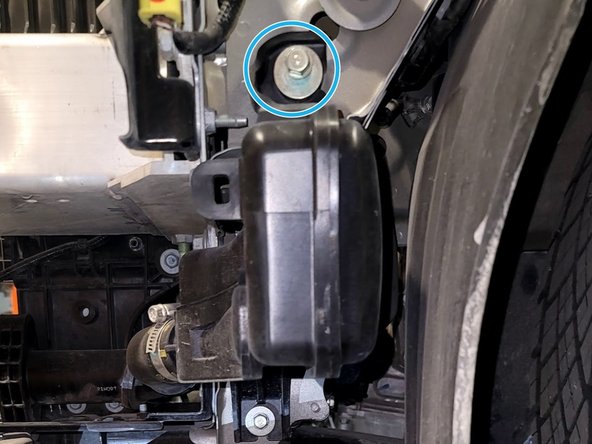
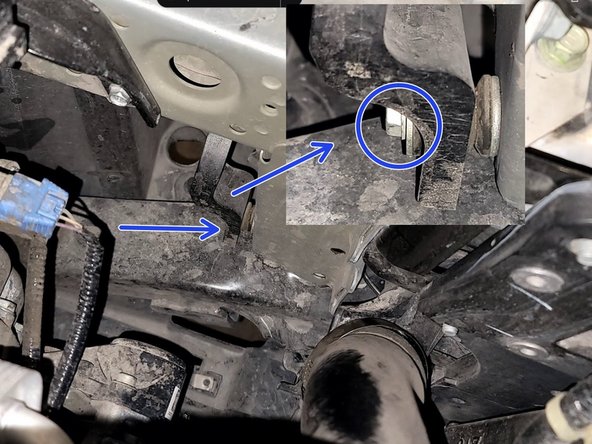
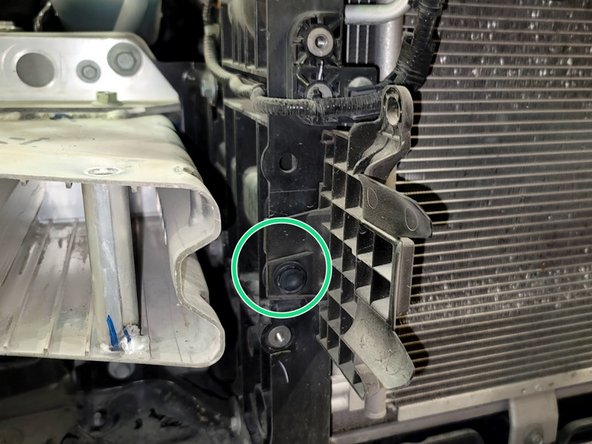
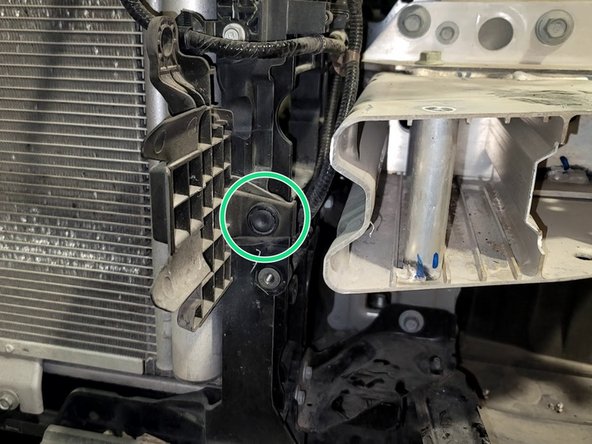
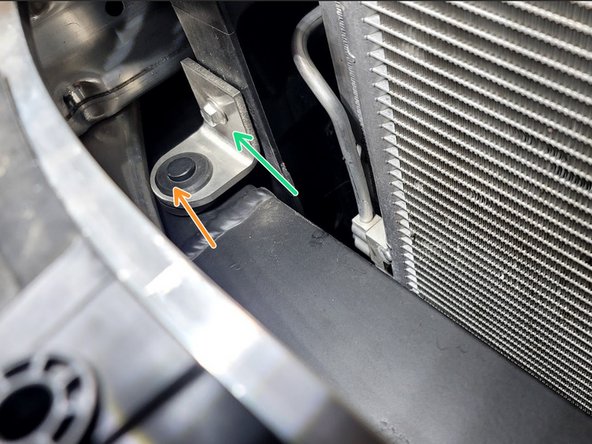
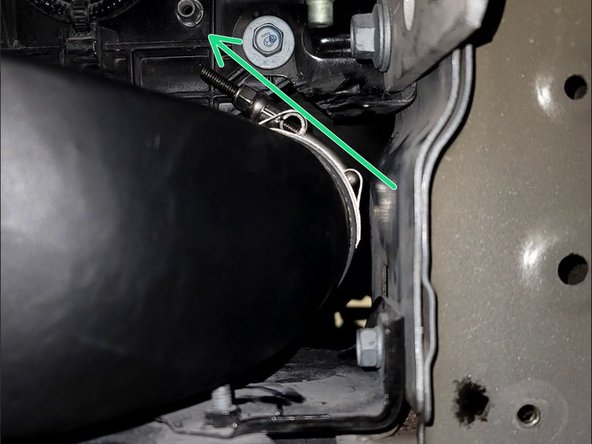
FMIC Resonator is shown in the first image off the car to aid understanding
-
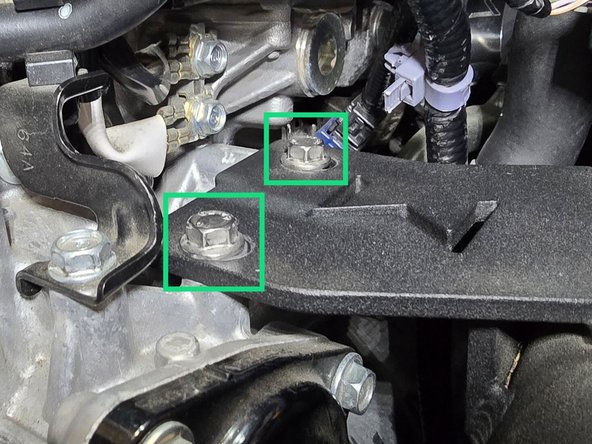
Use 10mm socket, extension, and ratchet to remove two (2) nuts shown
-
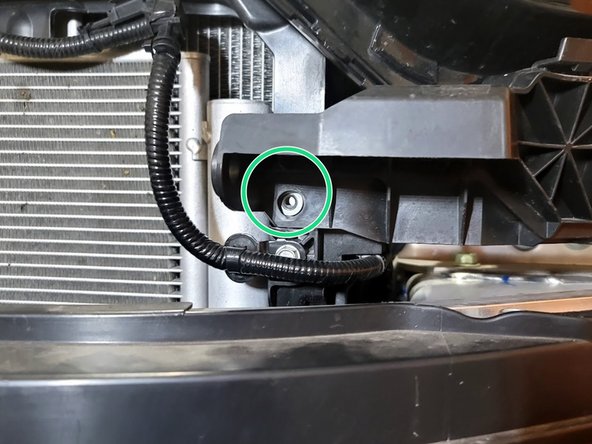
One is in fender well area. Use a 10mm socket and 1/4" ratchet to remove the one (1) nut as shown
-
One is in fender well area. Use a 10mm socket and 1/4" ratchet to remove the one (1) nut as shown
-
Remove OE FMIC Resonator and OE Outlet hose from car
-
-
-
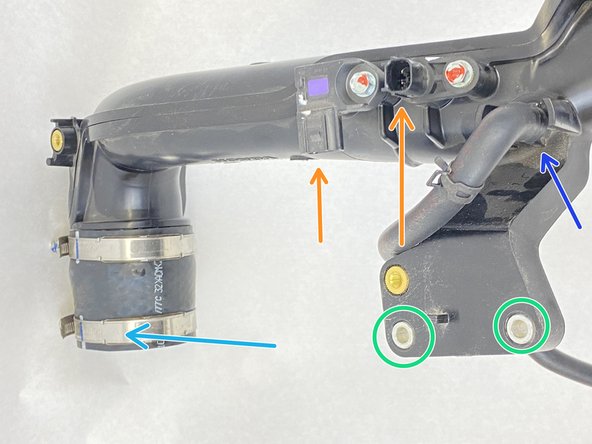
Cold Pipe is shown in the first image off the car to aid understanding
-
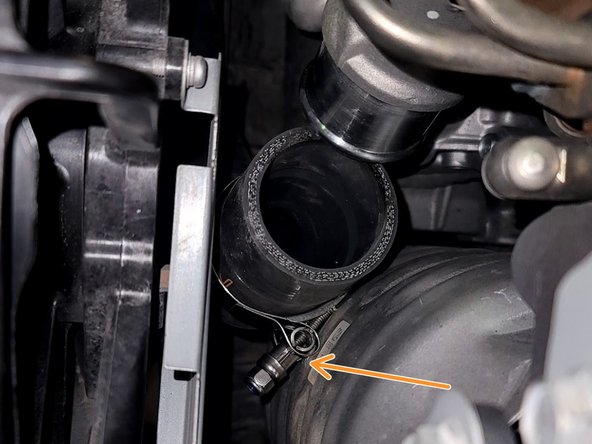
Disconnect both sensors from OE Cold Pipe using 8mm socket and ratchet
-
Use caution to keep sensors safe
-
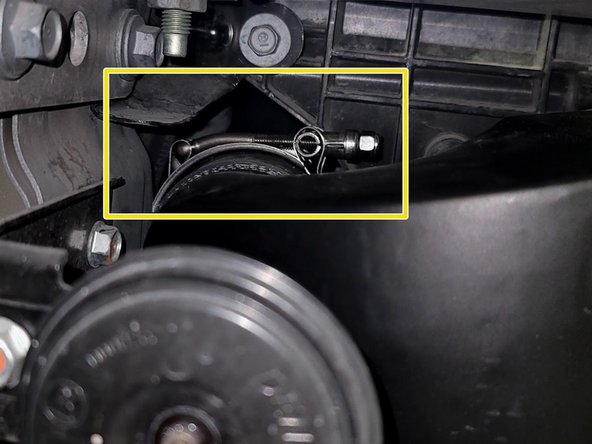
Use pliers to slide clip up rubber hose. Pull hose from cold pipe and tuck away
-
Twist hose loose before pulling to avoid breaking the cold pipe nipple. Hose pliers are handy here
-
It may be easier to disconnect rubber line at turbo inlet pipe then remove it from cold pipe off the car
-
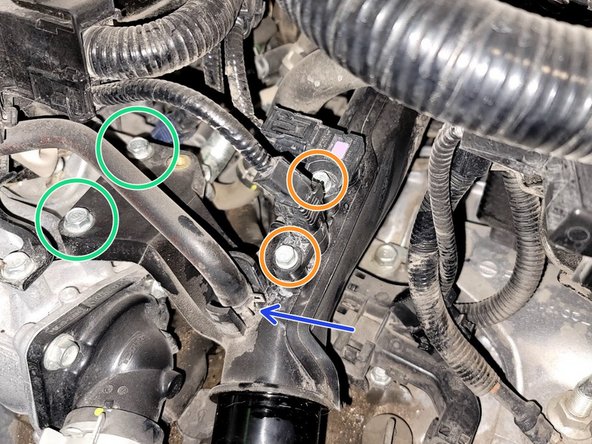
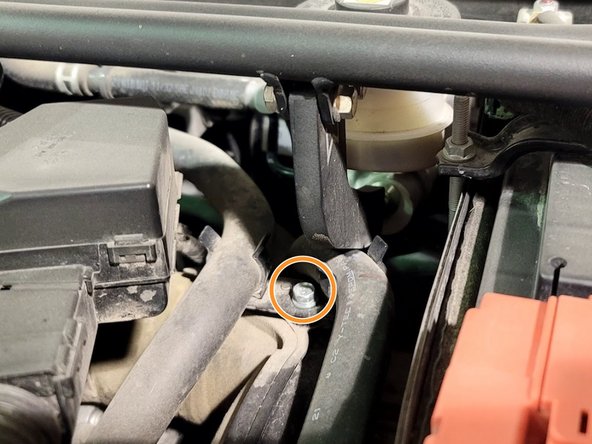
Remove two (2) bolts securing the Cold Pipe to the Engine using 10mm socket and ratchet
-
-
-
If Front Strut Tower Bar is installed, remove it
-
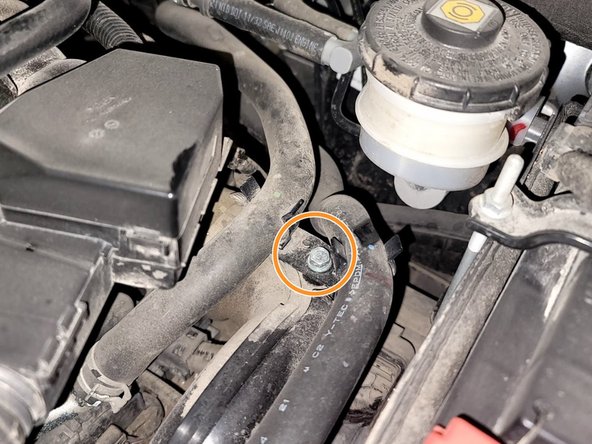
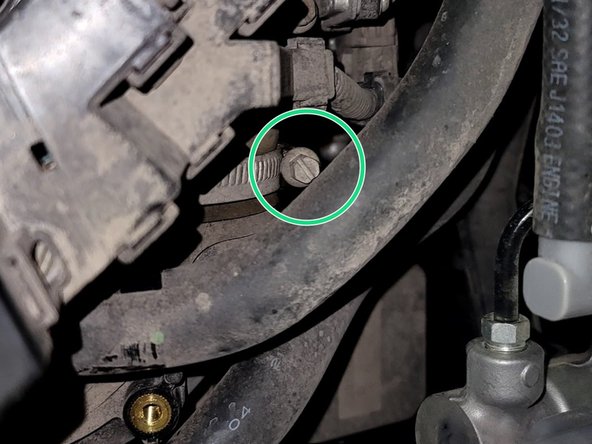
Remove hose bracket using 8mm socket and ratchet
-
Loosen hose clamp at throttle body with 10mm socket and ratchet
-
Pull cold pipe from car
-
-
-
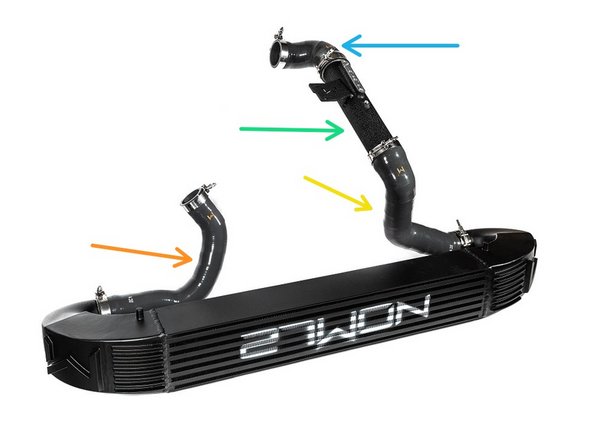
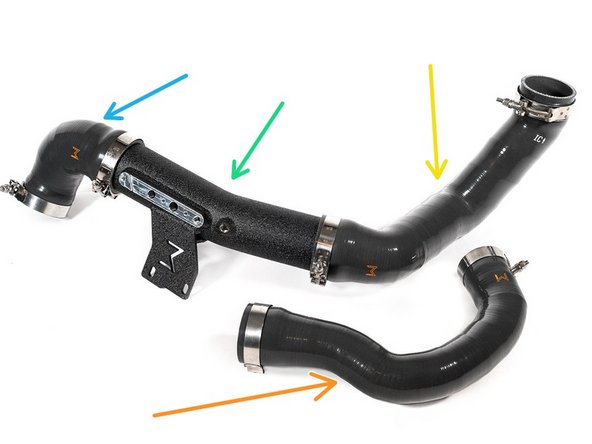
Identify components to be installed
-
FMIC Inlet Hose
-
FMIC Outlet Hose
-
Cold Pipe
-
Throttle Body Silicone
-
Mounting Brackets
-
Mounting Pucks
-
-
-
Remove both shrouds by pulling push clip as shown
-
You could instead trim them for 27WON FMIC clearance and reinstall
-
Set aside shrouds. These will not be reused
-
-
-
Remove caps off FMIC end tanks
-
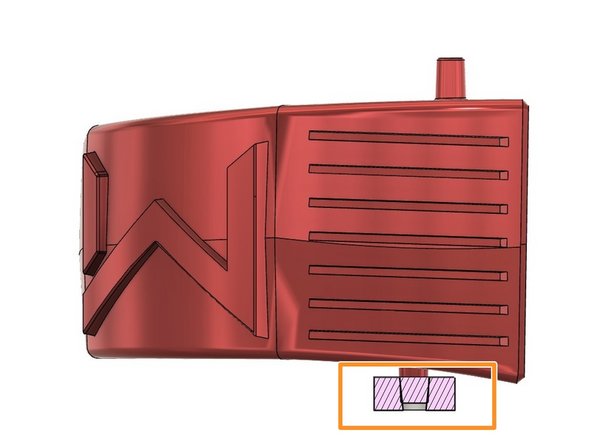
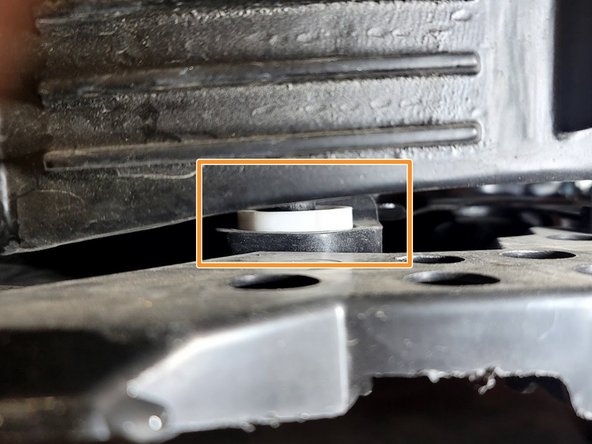
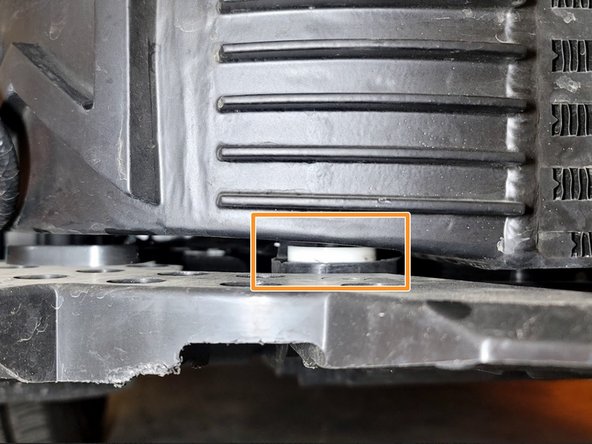
Place Q=1 provided polyurethane bushing on the bottom peg of each end tank. Don't push bushing all the way on the peg
-
Puck has cone shaped interior. Be sure to install the right way on the cone peg
-
Prototype shown, in white
-
Place FMIC assembly with puck in mount points on core support as shown
-
-
-
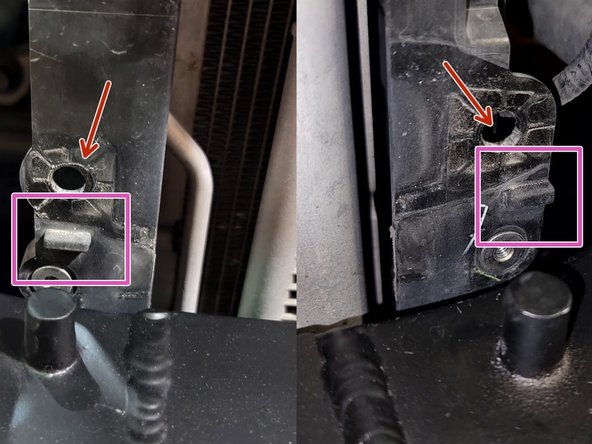
Remove nubs on core support to allow new brackets to seat. Use Dremel, grinder, file, or hammer and chisel for this
-
There are two ways to mount brackets. Riv-nut or Bolt/Nut. Hardware is included for either way. Riv-nut method is recommended if you have the tool
-
OPTIONAL: Install provided M6 Riv-nut in the locations shown
-
Take the bushings from the top brackets of the OE FMIC removed in step 17, flip over, and insert into both provided brackets
-
-
-
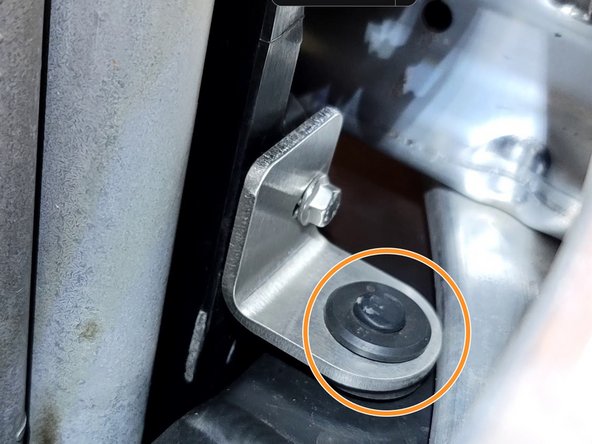
Bracket may rotate when tightened. Make sure they rest as shown when secured
-
Secure FMIC with OE M6 bolt and 10mm wrench using provided passenger side bracket
-
If not using Riv-nut then use provided M6 nut with OE bolt
-
Note slot is centered on passenger side bracket
-
Secure FMIC with OE M6 bolt and 10mm wrench using provided driver side bracket
-
If not using Riv-nut then use provided M6 nut with OE bolt
-
Note slot is offset on driver side bracket
-
-
-
Now loosen both top brackets just attached that secure FMIC
-
Take the nut off one of the provided 67-75mm hose clamps. Thread it back on to two threads
-
Tape clamp in place exactly as shown
-
This is one of the most difficult parts of the install
-
This serves to get the clamp into the proper position to secure the silicone
-
Reposition FMIC and secure top brackets
-
-
-
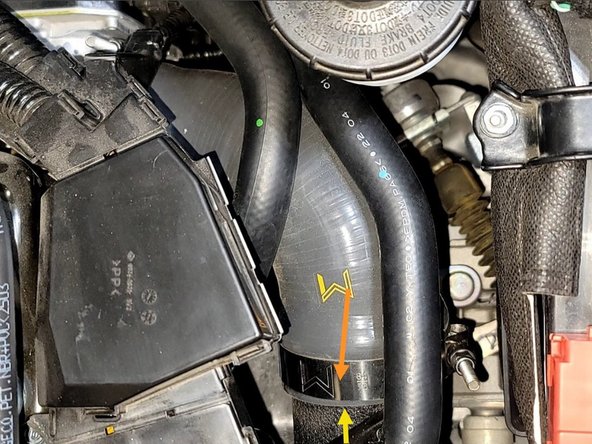
Place the FMIC outlet silicone. Slide outlet silicone on end tank. Make sure the FMIC end hits the bump stop on the end tank. Rotate it so the cold pipe end rests close to the coolant hose as shown
-
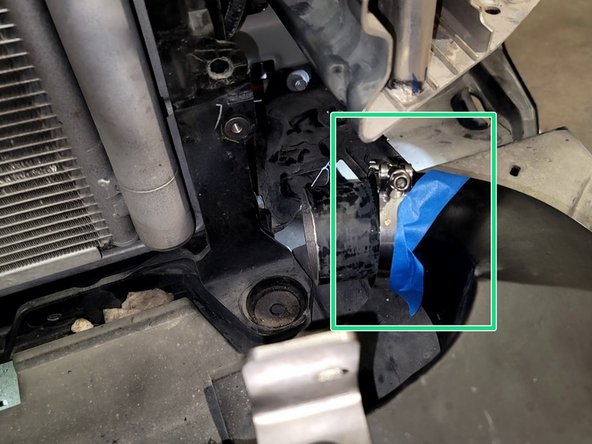
Orient the taped clamp so it can be accessed through bumper as shown
-
Bumper is not reinstalled at this point. Image shows bumper so you can see how small a slot you are going for here
-
Clamp should sit loose over silicone as silicone is slipped over end tank
-
Failure to secure this connection will result in a boost leak and would require removal of bumper to reconnect. This orientation of the clamp allows to minimize the work necessary in the event that happens
-
Secure silicone in position using 10mm socket, extension, and ratchet on the previously taped clamp
-
Make sure outlet Silicone is not touching any sheet metal. Reposition as needed
-
-
-
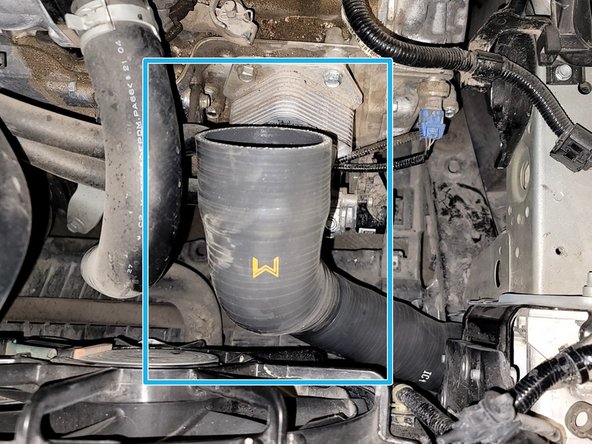
Slide hot side silicone in and around down pipe as shown. Do not connect to FMIC yet
-
Temporarily put silicone on turbo outlet as shown. This makes it easier to get the other end on the FMIC
-
Connect inlet silicone to FMIC end tank. Make silicone hits the bump stop on the end tank
-
Remove nut from a provided 67-75mm hose clamp then reset it to two threads
-
Pop the silicone off the turbo and run the 67-75mm hose clamp down the silicone in the correct orientation as shown to the FMIC inlet
-
Reinstall silicone on turbo
-
-
-
Secure Inlet Silicone to FMIC using the T-bolt clamp slid into place
-
Make sure outlet Silicone is not touching any sheet metal. Reposition as needed
-
Orient clamp so it can be accessed through bumper just like outlet side earlier
-
Set clamp as far left as possible to make sure it's fully seated on end tank
-
Well secured silicone will have a hose clamp that slightly indents the silicone
-
Failure to secure this connection will result in a boost leak and would require removal of bumper to reconnect. This orientation of the clamp allows to minimize the work necessary in the event that happens
-
SECURE silicone in position using 10mm socket, extension, and ratchet
-
-
-
Make sure you can access both inlet and outlet hose clamps through bumper once it's installed
-
Line up aluminum bumper back on car using a rubber mallet
-
Striking the bumper from the center works better than from either side
-
Hint: Look through top hole on bumper and line up bottom holes. It can be a real PITA to get the aluminum bumper back into position
-
Reinstall four (4) bolts for bumper using 14mm socket and ratchet
-
Reinstall two (2) bolts for center bracket using 12mm socket and ratchet
-
-
-
Place bumper plastic shroud back in place
-
Reinstall two (2) bolts using a 10mm socket and ratchet
-
Reinstall plastic clips securing air flow ducting to plastic cover. Quantity varies by car
-
Reinstall two (2) plastic clips securing underside of plastic cover to the aluminum bumper
-
-
-
Integra Shown. Other models will be similar
-
Clip headlight into position at the two upper and one side clips
-
Reinstall the four (4) bolts securing headlight to car using 10mm socket and ratchet. Two shown. Refer to Step 15 for more detail
-
Plug the headlight back in
-
Install loom clamp freed in step 16
-
Do the same for the other headlight
-
-
-
Pull ambient temperature sensor over end tank as shown
-
Secure ambient temperature sensor out of the way. A zip tie was used in this instance and the sensor was moved to the driver side fender area
-
Relocation could impact accuracy of sensor. The location shown provides good data based upon our experience. It's unlikely this will present an issue
-
Some cars have the option to adjust ambient temperature sensor to be more accurate and could compensate from a difference created by relocating the sensor
-
-
-
Loosen hose clamp as shown with 8mm socket, extension, and ratchet
-
Pull rubber coupler off throttle body
-
-
-
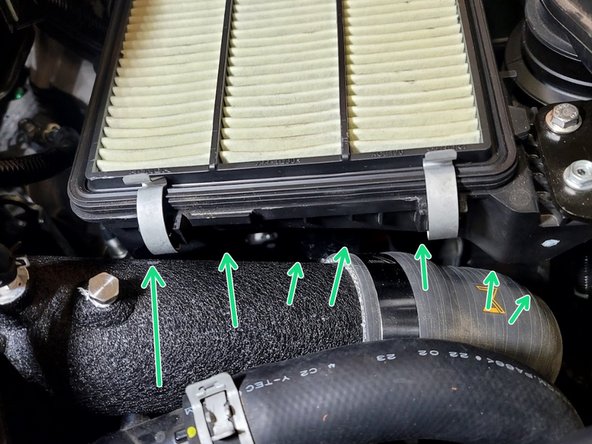
Slide 70-78mm hose clamp over silicone elbow and place elbow on throttle body as shown. Do not secure it yet
-
Pass hose clamp under loom as shown
-
Rotate clamp into position as shown
-
-
-
You are about to install the cold pipe. Do not start connecting sensors yet
-
Slide 76-84mm hose clamp over silicone as shown. Do not secure it yet
-
Insert cold pipe into throttle body silicone
-
Hand thread the two supplied 20mm M6 bolts through the cold pipe bracket into the engine block as shown
-
These will be tightened in the next step
-
-
-
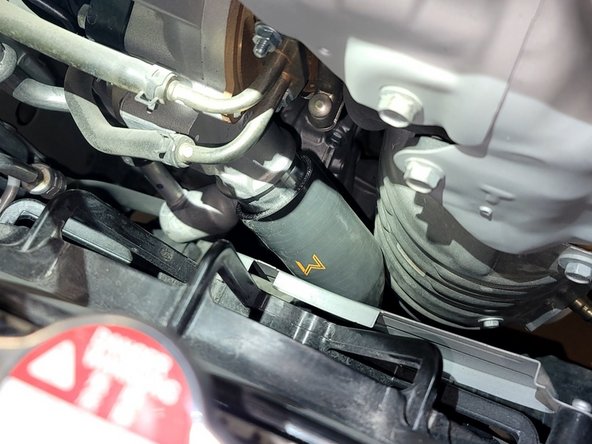
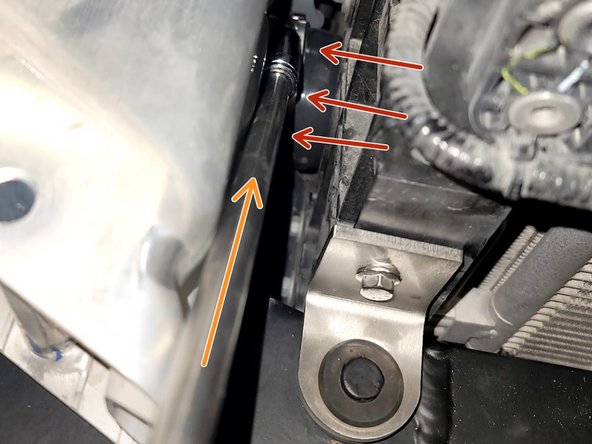
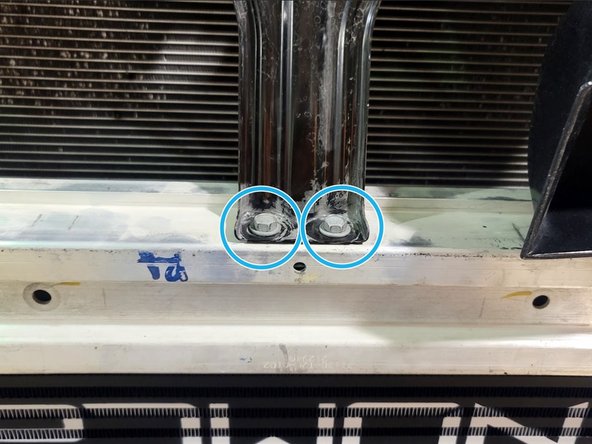
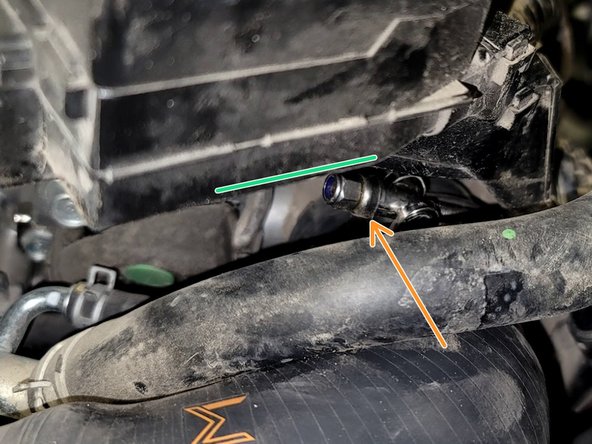
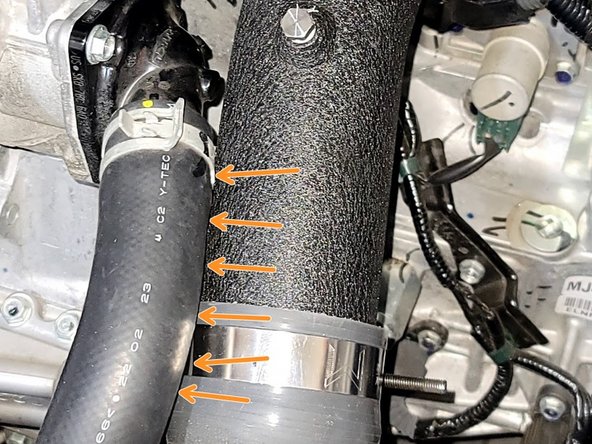
Push cold pipe into position by checking gap near coolant hose as shown. There should be about a 3mm or 1/8 inch gap
-
Push cold pipe down so its bracket is flush with the engine while using a 10mm socket and ratchet, secure both 20mm M6 bolts on the cold pipe bracket
-
Do not over torque
-
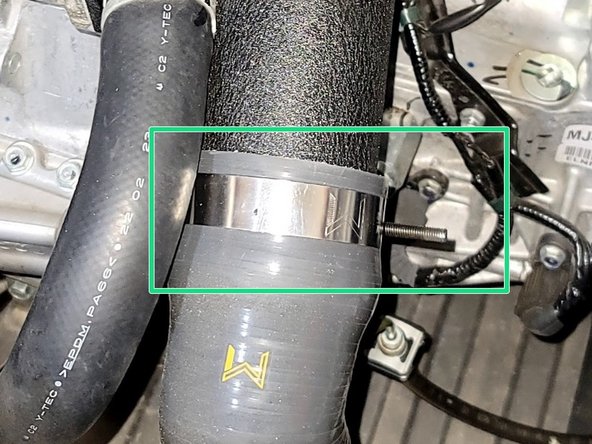
Insert Cold Pipe into FMIC outlet silicone and secure with 76 -84mm hose clamp
-
-
-
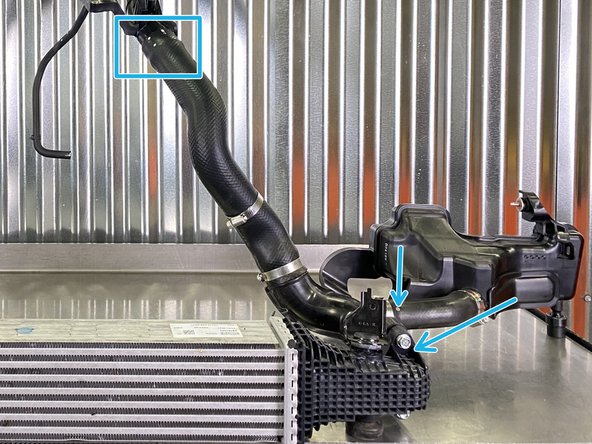
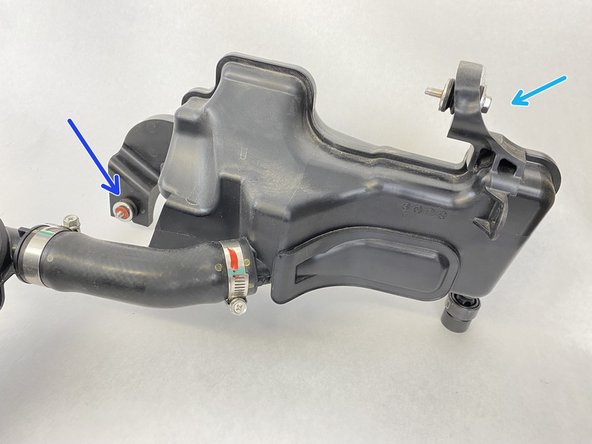
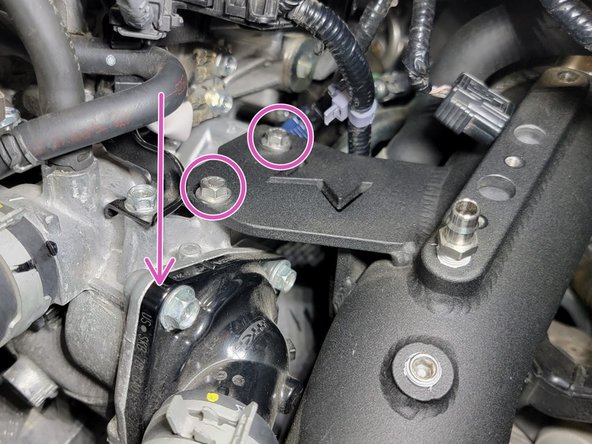
Install MAP sensor as shown, secure with OE bolt and insert plug
-
Connect temperature sensor as shown, secure with OE bolt and insert plug
-
Press the rubber hose onto the barb fitting and use needle nose pliers to position the spring clamp over the hose where the barb is pressed in
-
Spare 1/8-27 NPT port for methanol auxiliary cooling/fueling
-
Ignore Hardware Difference. Product Revision
-
-
-
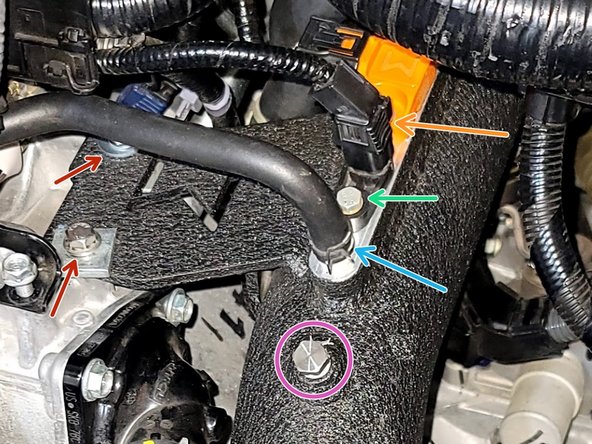
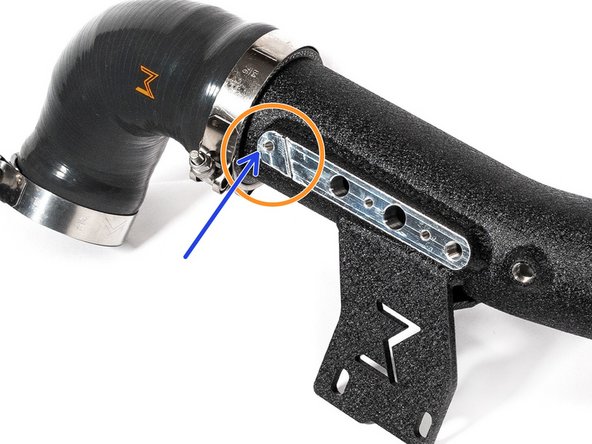
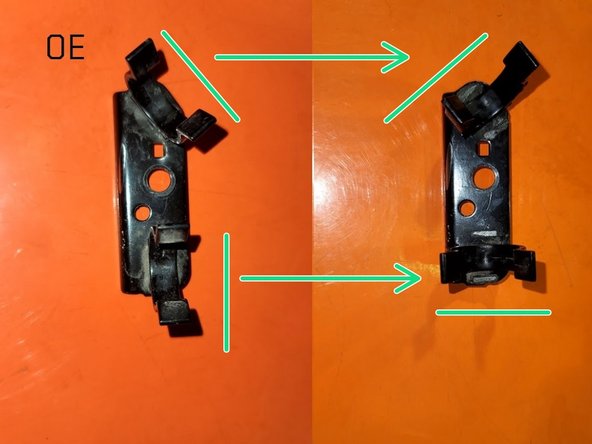
There is a machined slot on the cold pipe to keep hose bracket in position
-
Remove plastic clips from bracket and rotate each 90 degrees as shown
-
Use caution not to break these clips. They can be brittle
-
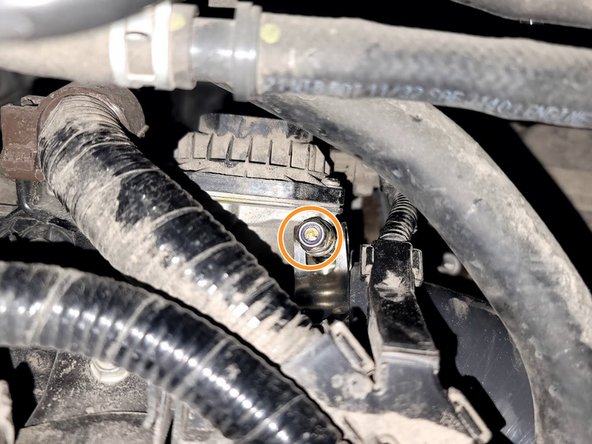
Secure hose bracket to cold pipe with OE M6 bolt using 10mm socket and ratchet
-
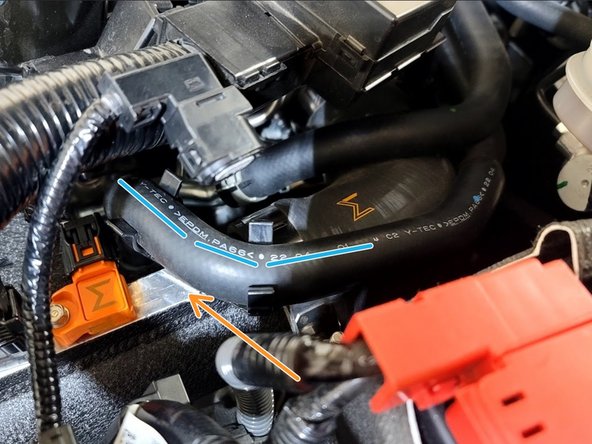
Reposition OE Rubber hose using OE hose bracket as shown. The other line that was connected to this bracket floats free
-
There is a bracket on the OEM cold pipe that has 2 wires clipped into it that is not able to mount to the 27WON cold pipe
-
-
-
Position clamp as shown. Make sure it is fully on the silicone and not on the bead roll
-
Secure cold pipe to throttle body silicone using 10mm socket, extension, and ratchet
-
-
-
Place provided 54-62mm hose clamp over turbo outlet silicone as shown
-
Verify silicone hose is not touching anything, especially the radiator fan. You can rotate the silicone at the turbo to create clearance
-
Secure hose clamp. Make sure it is evenly on the silicone and not resting on the bead roll
-
-
-
Double check connection at all 6 hose clamps provided with the FMIC kit
-
This is a list of codes that could arise from an air leak. This list is not comprehensive
-
P2101 - Throttle Actuator “A” Control Motor Circuit Range/Performance
-
P2187 - System Too Lean at Idle (Bank 1) DTC
-
-
-
Reinstall intake system. See previous steps for more detail on OE intake installation if needed
-
Verify at least 10mm or 1/3" of clearance between FMIC Outlet piping and intake as shown
-
OE Intake
-
PRL Intake
-
-
-
If you have a safe way to do so, it's not a bad idea to pause the install process as this point and give the car some boost to make sure all the new connections are going to hold
-
This can save a bumper R&R if a connection fails in that area
-
Optional: Warm the car up and take it on a drive where you can give it full boost
-
-
-
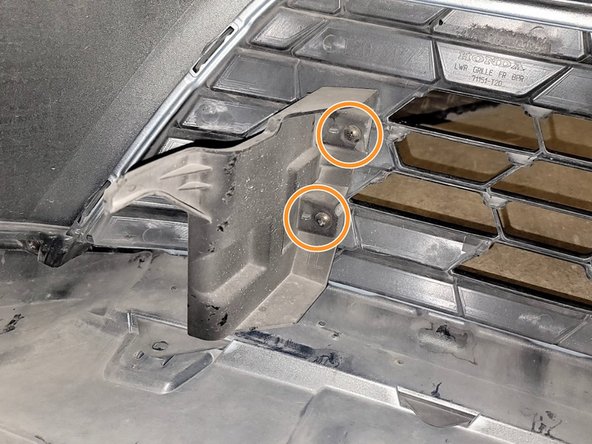
It's possible to trim these instead of removing them. This process is not documented here
-
Remove two (2) phillips screws holding duct to bumper
-
Set duct aside. It will not be reused
-
Repeat for other side
-
-
-
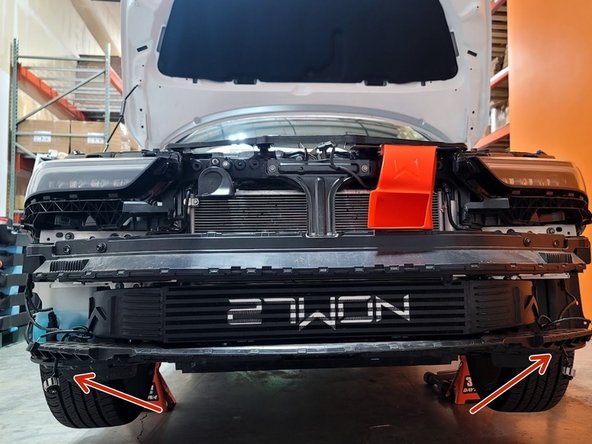
Integra process shown. Other cars similar. Refer to removal instructions as installation is the reverse of removal
-
Intake Snorkel Shown. Sold Separately https://store.27won.com/honda-civic-acur...
-
Make sure fog light plugs are not hanging below skid plate
-
Move bumper almost in place and connect proximity sensor
-
Continue carefully moving bumper into position until it's nearly lined up with fender on each side
-
Bumper can get caught on headlights
-
Install one push clip to help secure bumper while plugging in fog lights and parking sensors on each side
-
Reach between bumper and car to plugs. You may need to lightly pull bumper at corners to create space
-
-
-
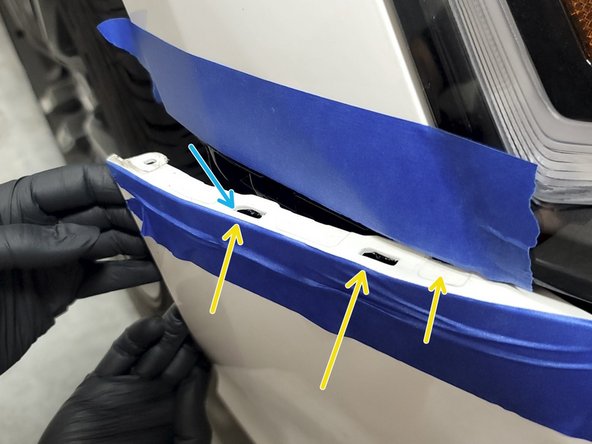
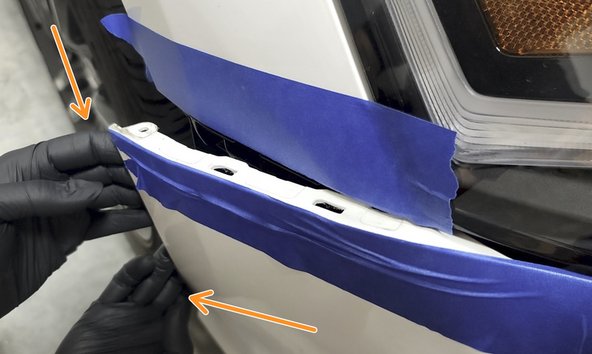
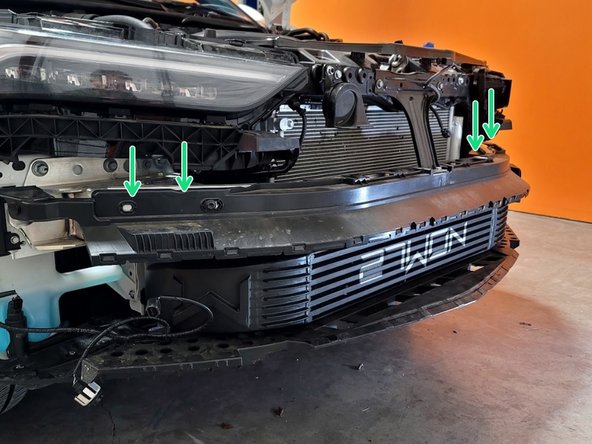
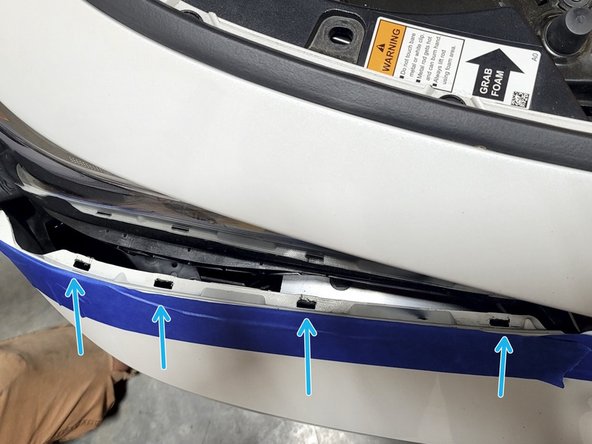
Note locking tabs at upper fenders. Slide each end of bumper into upper fender tabs
-
Push four clips under each headlight into place
-
Push three clips at each fender into place
-
-
-
Integra
-
Reinstall the ten (10) push-clips on the bottom of the bumper
-
Use 10mm socket and ratchet to reinstall two (2) M6 bolts
-
Civic
-
Reinstall the eight(8) push-clips on the bottom of the bumper
-
Use 10mm socket and ratchet to reinstall two (2) M6 bolts
-
Use Phillips head screwdriver to reinstall two (2) screws
-
-
-
The passenger side wheel and tire were removed for clarity but not required for bumper removal
-
Reinstall the dome head screw with Philips screwdriver
-
Reinstall the flat head screw with Philips screwdriver
-
Reinstall two (2) push clips with flat head screw driver
-
Civic
-
Reinstall two (2) flat head screws with Philips screwdriver
-
Reinstall one push clip with flat head screw driver
-
-
-
Civic shown, refer to Step 4 for Integra
-
Reinstall the ten (10) push-clips on the top of the bumper
-
The 2nd and 3rd images give you a better view of the clips
-
Other Civic trims not shown but process will be similar
-
-
-
Check for boost leaks
-
Start the car and check for boost leaks at all intercooler and piping connections
-
Once the car is up to temperature, complete a drive in which you can get the engine into boost
-
If a boost leaks develops, typically the car will go into limp mode
-
If a whistling sound is heard, you may have a small boost leak, check and tighten the connections for the intercooler and piping
-
-
-
This completes the installation of your 27WON FMIC
-
We hope you were impressed with your 27WON experience and love your new FMIC for years to come. Email us at sales@27won.com or call us at 571-271-0271 with any questions or concerns
-
Please Leave a review here: https://store.27won.com/2022-honda-civic...
-
Share your experience using #27WON on Instagram and Facebook
-
Stay Connected with the latest developments with the 27WON Monthly Newsletter: https://store.27won.com/27won-newsletter...
-
See the latest Products and Tech Videos from 27WON with a quick Subscribe: https://www.youtube.com/channel/UCF7uI0N...
-