Introduction
In this installation guide we have provided step by step instructions to install the 27WON Performance 4 bar MAP Sensor
Advisory:
- The engine bay will be hot after recent vehicle operation. Allow the vehicle to cool or use a fan to cool the engine bay before working on the vehicle.
Parts
-
-
First and foremost; THANK YOU for becoming a part of the 27WON Family. We hope to REDEFINE your experience of the aftermarket with the highest level Parts, Customer Service, Packaging, & Support
-
These instructions were written with a 2018 Honda Civic SI. Other models will be similar
-
Configuring the software on your tuner and reflashing it will be required after installing this part. The car should not be driven until the new flash is applied
-
Please note some CVT's might not have 4 bar map sensor support
-
-
-
These instructions are specifically made for the 2016+ Honda Civic SI which requires two MAP Sensors
-
If you are installing your MAP Sensors into a different vehicle then you can follow our general MAP Sensor install instructions here: https://www.performanceinstalls.com/Guid...
-
Please note that the test vehicle is using aftermarket Intercooler pipes
-
-
-
The red arrows shows where the two (2) MAP Sensors are located in the engine bay
-
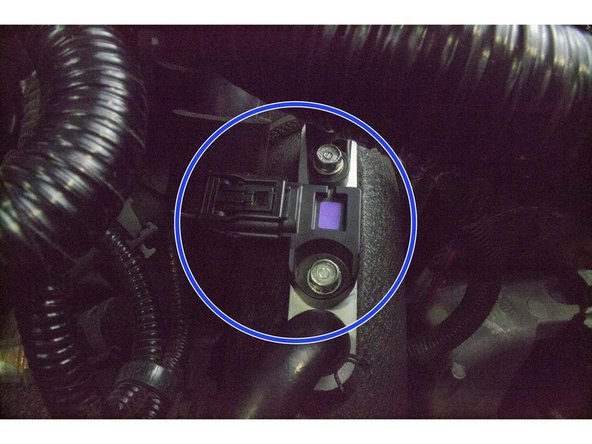
The blue circle shows the OEM MAP Sensor located on the cold side charge pipe
-
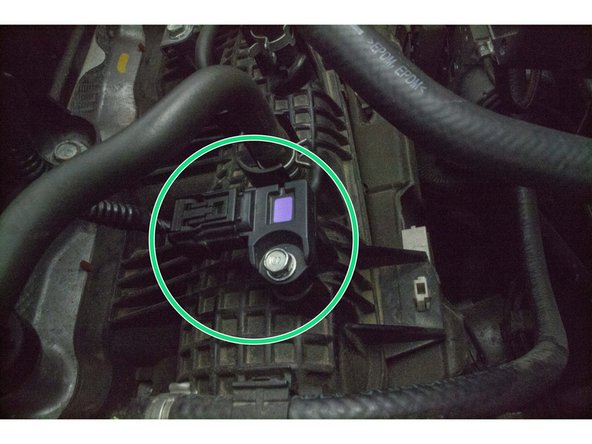
The green circle shows the OEM MAP Sensor located on the intake manifold at the rear of the engine
-
-
-
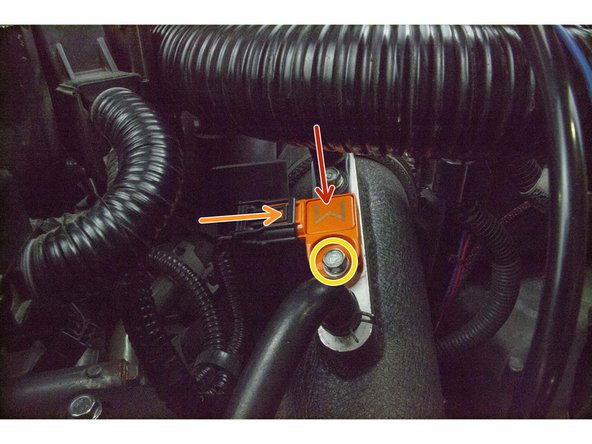
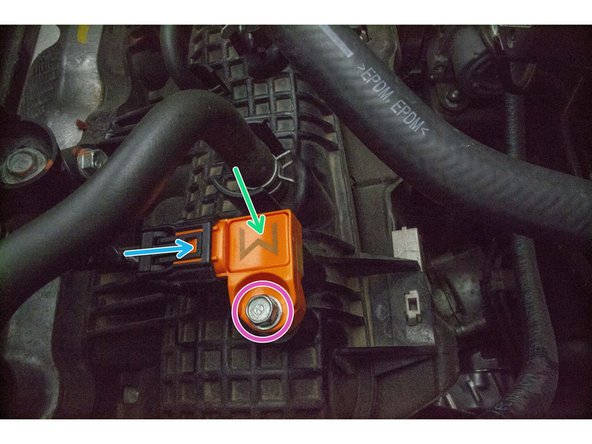
Squeeze the tab shown by the red square and gently unplug the wire harness from the MAP sensor
-
Remove the bolt circled in orange with a 8mm socket, extension and ratchet
-
Pull the MAP Sensor straight out of the charge pipe
-
-
-
Insert the MAP Sensor into the charge pipe until it is fully seated
-
Make sure not to pinch the O-ring when installing the MAP Sensor
-
A small dab of silicone on the oring can be used to aid in install
-
Plug the wire into the MAP Sensor until it is fully seated
-
You will hear a click when it clips in
-
Insert the bolt and tighten until snug with a 8mm socket, extension, and ratchet
-
Avoid over tightening the sensor, the bolt will be snug with less than 12 in lbs of torque.
-
-
-
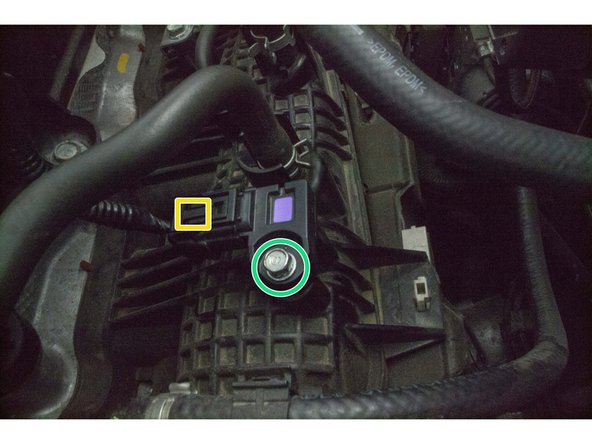
Squeeze the tab shown by the yellow square and gently unplug the wire harness from the MAP sensor
-
Remove the bolt circled in green with a 8mm socket, extension and ratchet
-
Pull the MAP Sensor straight out of the intake manifold
-
-
-
Insert the MAP Sensor into the intake manifold until it is fully seated
-
Make sure not to pinch the O-ring when installing the MAP Sensor
-
A small dab of silicone on the oring can be used to aid in install
-
Plug the wire into the MAP Sensor until it is fully seated
-
You will hear a click when it clips in
-
Insert the bolt and tighten until snug with a 8mm socket, extension, and ratchet
-
Avoid over tightening the sensor, the bolt will be snug with less than 12 in lbs of torque.
-
-
-
Open your Ktuner or Hondata software and open your current tune, from there you will either follow the instructions below for Ktuner or Hondata
-
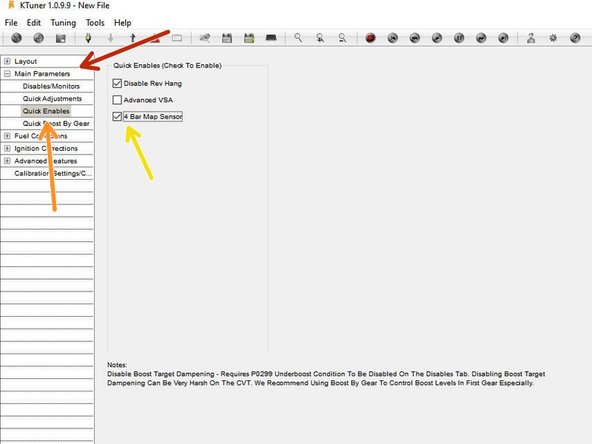
For Ktuner: Click Main Parameters
-
Click Quick Enables
-
Check the 4 Bar Map sensor box and resave your tune
-
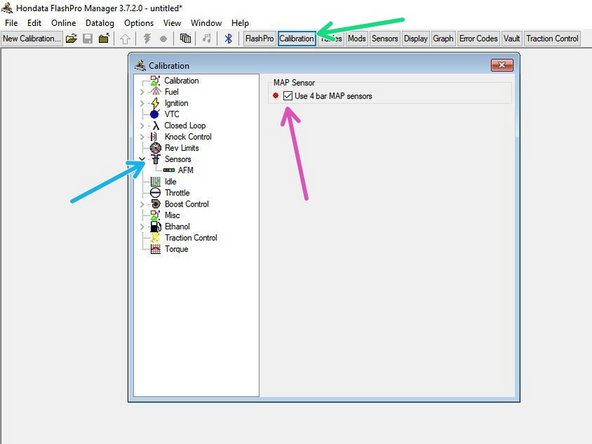
For Hondata: Click Calibration
-
Click Sensors
-
Check the Use 4 Bar MAP sensors box and resave your tune
-
Now that you have resaved your tune, Flash the newly saved tune onto your tuner
-
-
-
This completes the installation of your 27WON Performance MAP Sensors. You can now safely measure boost levels above 28+ PSI. Running boost over ~28 psi is typically only done on built engines with the correct supporting mods. Consult your tuner in regards to determining the safe levels of boost for your setup.
-
We hope you were impressed with your 27WON experience and love your new MAP Sensors for years to come. Email us at sales@27won.com or call us at 571-271-0271 with any questions or concerns
-
Please Leave a review here:https://store.27won.com/4-bar-map-sensor...
-
Stay Connected with the latest developments with the 27WON Monthly Newsletter: https://store.27won.com/27won-newsletter...
-
See the latest Products and Tech Videos from 27WON with a quick Subscribe: https://www.youtube.com/channel/UCF7uI0N...
-
Share your experience using #27WON on Instagram and Facebook
-