Introduction
In this installation guide we have provided step by step instructions to remove the OE motor mount and install a 27WON performance rear motor mount.
Advisory:
Working under the vehicle requires a safe and sturdy location for the vehicle to sit on jackstands.
The engine bay will be hot after recent vehicle operation. Allow the vehicle to cool or use a fan to cool the engine bay before working on the vehicle.
Tools
Parts
No parts specified.
-
-
First and foremost; THANK YOU for becoming a part of the 27WON Family. We hope to REDEFINE your experience of the aftermarket with the highest level Parts, Customer Service, Packaging, & Support
-
Install was performed on a 2022 Civic EX. Installation on other models may vary
-
-
-
Hello and welcome to the 27WON Rear Motor Mount install guide
-
Noise, Vibration, & Harshness is an evaluation of the various irritants that can be transmitted through the vehicle into the cabin and directly to the driver and passengers. Not all NVH is created equal, an OE designer may consider turbo noise to be unwanted NVH, whereas a performance enthusiast may consider it a desired sound
-
With the addition of a 27WON performance engine mount, increased NVH will be an inherent part of the upgrade
-
While we do our absolute best to deliver a mount that works great and feels amazing some customers may find the higher levels of NVH to be too great. It is our guarantee that 100% of customers will love this mount. If for any reason you have any concerns with the mount simply reach out to us and our team will take care of any issues for you
-
-
-
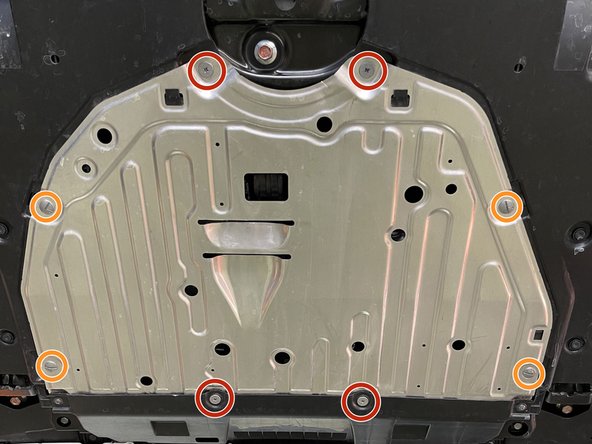
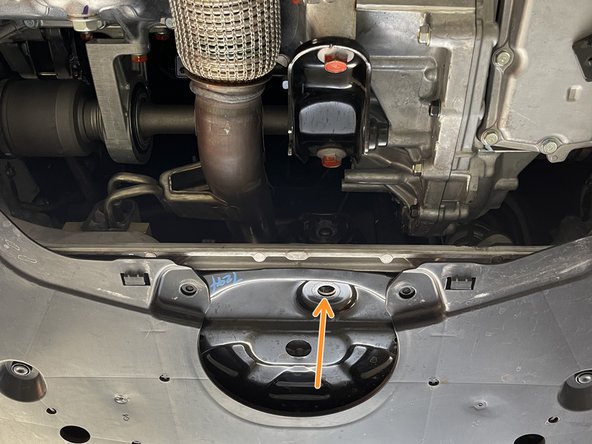
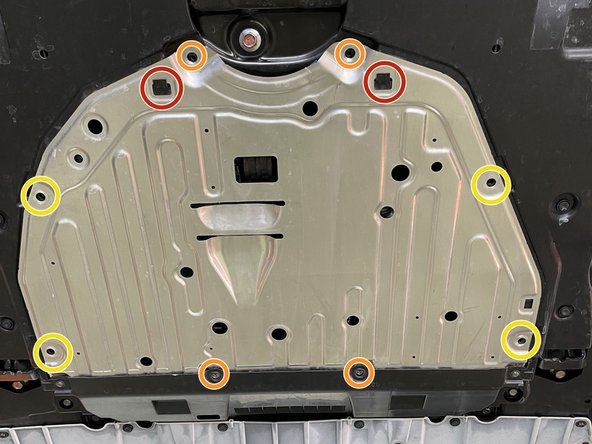
Locate the skidtray
-
Use a Philips head screwdriver to remove four (4) screws
-
Use a flat head screwdriver to remove four (4) half-turn screws
-
Gently hold the skidtray up a little bit and move it toward the rear of the car to remove the skidtray
-
-
-
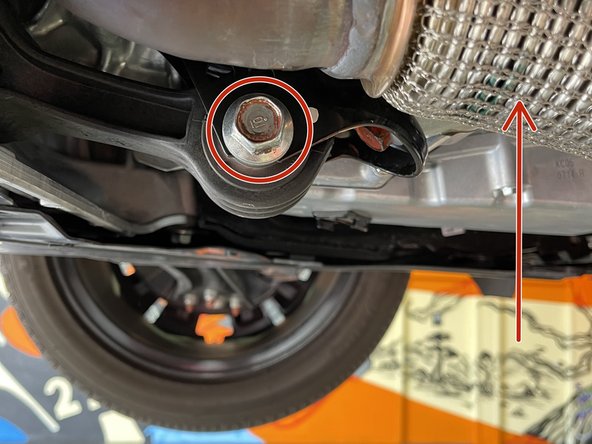
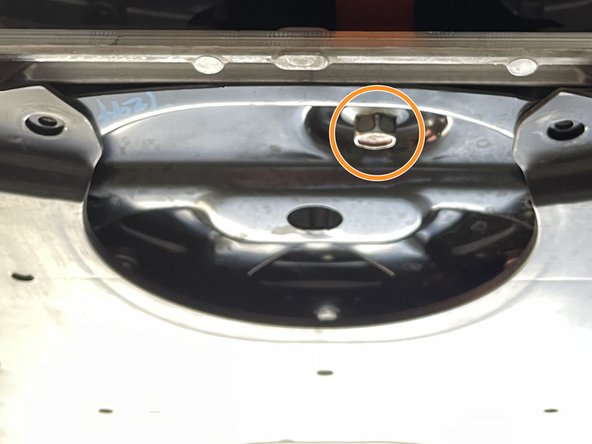
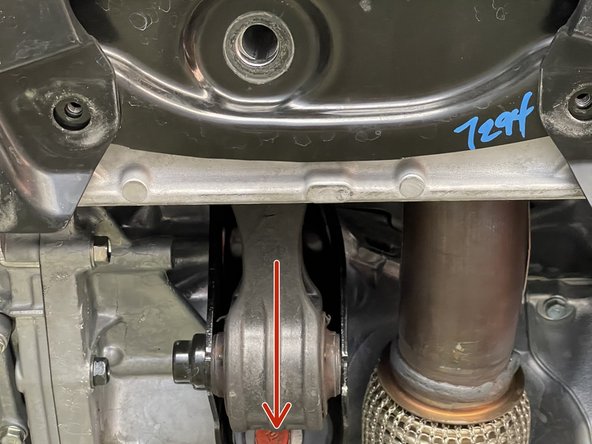
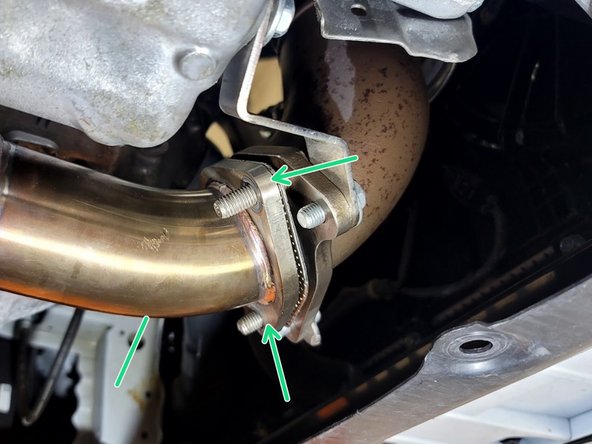
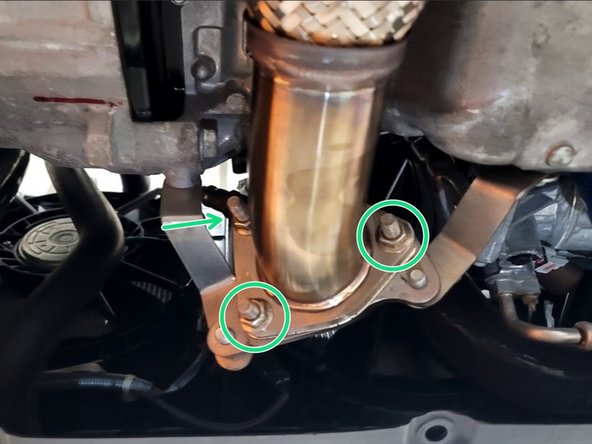
Locate the front and rear bolts for OE rear motor mount
-
Grab a 3/8" ratchet, extension and a 19mm socket to remove front bolt
-
Use one hand to lift the frontpipe when removing the front bolt
-
Use the same 3/8" ratchet and a 17mm socket to remove the rear bolt as shown
-
Front and rear bolts different lengths so make sure you don't mix them up
-
-
-
Pull the motor mount down a little bit and slide the OE Motor Mount toward the front to take it out
-
With aftermarket exhausts it may be easier to disconnect the front pipe before removing the OE motor mount. See next step
-
-
-
For Civic Type R skip to next step
-
27WON Front Pipe Shown
-
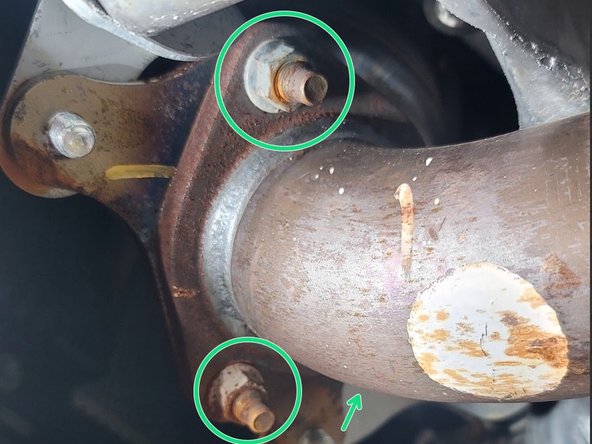
Remove three (3) nuts securing front pipe to down pipe using 14mm socket and ratchet
-
Pull front pipe off studs and rest to the side as shown
-
This is to allow movement of front pipe to install hardware and align mount later
-
-
-
For 1.5T models, skip to next step
-
Prior to attempting removal of the front pipe, liberally apply penetrating lubricant (PB Blaster, Deep Creep, etc.) on the front pipe nuts & bolts
-
Remove three (3) nuts securing front pipe to down pipe using 14mm socket and ratchet
-
Remove exhaust hanger from chassis hanger rod. To do this spray hanger as shown with lubricant. We like glass cleaner. Next, using either Tongue & Groove pliers or Exhaust pliers, pry the rubber bushing/hanger away from the metal rod
-
Alternatively, you could remove the two nuts that hold the chassis hanger in place
-
Remove three (3) nuts securing front pipe to exhaust using 14mm socket and ratchet
-
Remove front pipe from car
-
This is to allow movement of front pipe to install hardware and align mount later
-
-
-
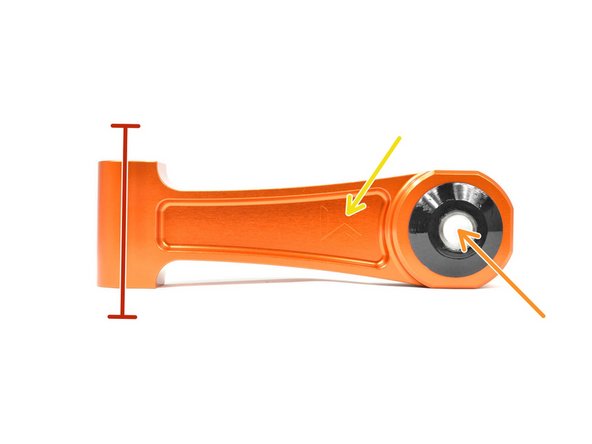
The 27WON RMM was design to be installed in one orientation. Please review before proceeding to the 27WON RMM installation
-
Chassis End - This side of the RMM will be mounted to the chassis sub-frame. We refer to this bolt as the back one
-
Engine End - This side of the RMM will be mounted to the engine mounting bracket. We refer to this bolt as the front one
-
Engraved W Logo - This logo should face the exhaust front-pipe of the vehicle when installed
-
-
-
CTR shown. 1.5T Civic/Integra similar
-
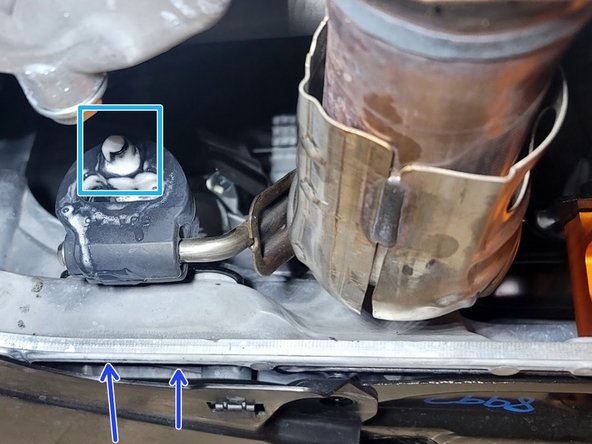
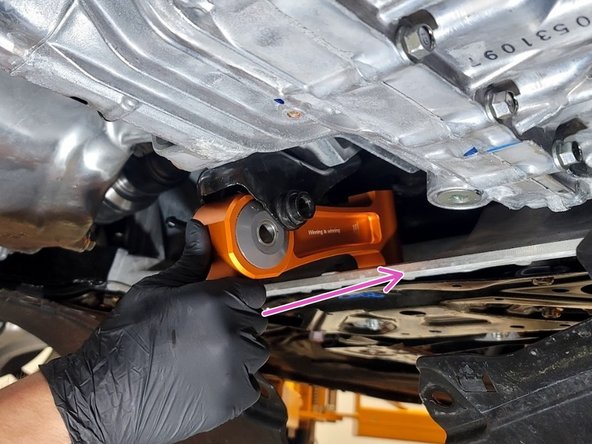
Gently slide the rear end of 27WON RMM into the bracket as shown
-
Make sure that the "REDEFINE" text is facing the passenger's side
-
You should not need to force the RMM in
-
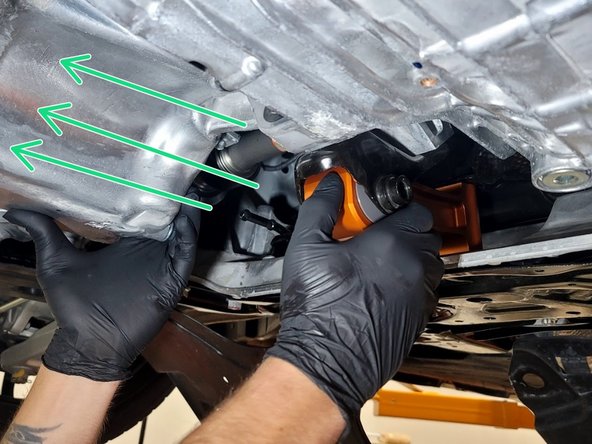
Line up the front RMM bolt by moving the engine
-
Insert front bolt and thread by hand until resistance is felt. You will torque this bolt down in a later step
-
-
-
For CTR skip to next step
-
Reposition front pipe over the downpipe studs as shown
-
-
-
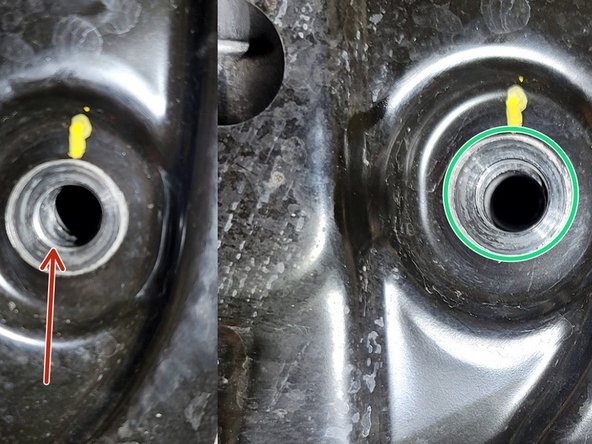
The rear bolt hole on the mount needs to be aligned with the chassis hole before inserting the last bolt
-
An alignment issue here can cause unnecessary NVH
-
Pivot or rotate engine to align bolt hole as shown
-
Reinstall rear bolt and thread by hand until resistance is felt. You will torque this bolt down in a later step
-
This should be easy if the hole is aligned right
-
-
-
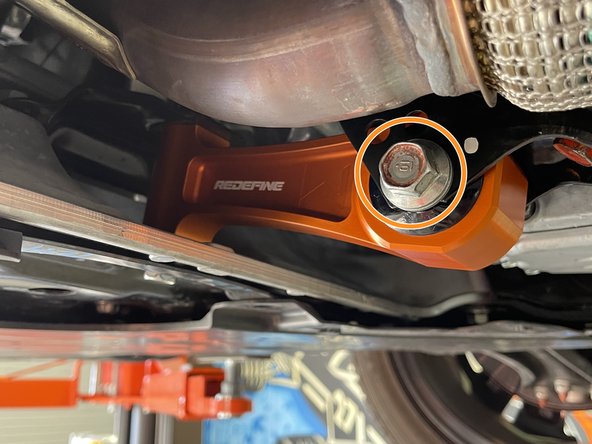
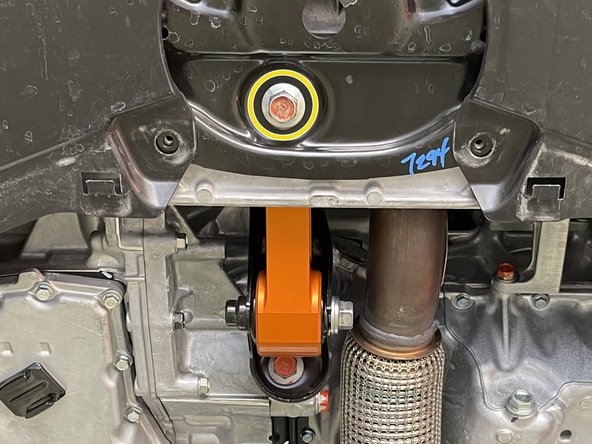
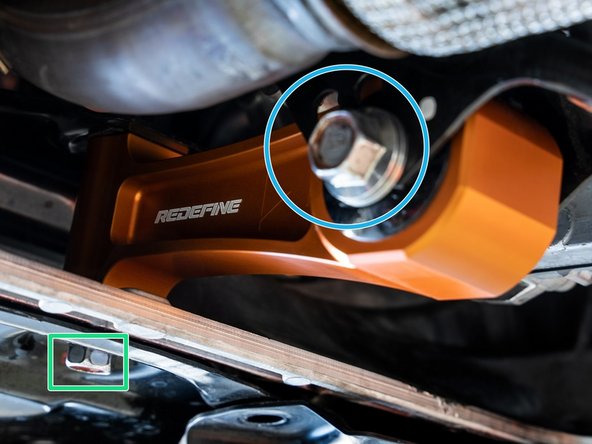
Use a 17mm socket and torque wrench to torque rear bolt to 65lb-ft
-
Use a 19mm socket and torque wrench to torque front bolt to 50lb-ft
-
-
-
For CTR skip to next step
-
Reinstall three (3) nuts securing front pipe to down pipe using 14mm socket and ratchet
-
Use a 14mm socket & torque wrench to torque each to 30-40 lb-ft
-
-
-
For 1.5T models, skip to next step
-
Place front pipe back on car
-
Reinstall three (3) nuts securing front pipe to exhaust using 14mm socket and ratchet
-
Reinstall exhaust hanger to chassis hanger rod
-
Reinstall three (3) nuts securing front pipe to down pipe using 14mm socket and ratchet
-
-
-
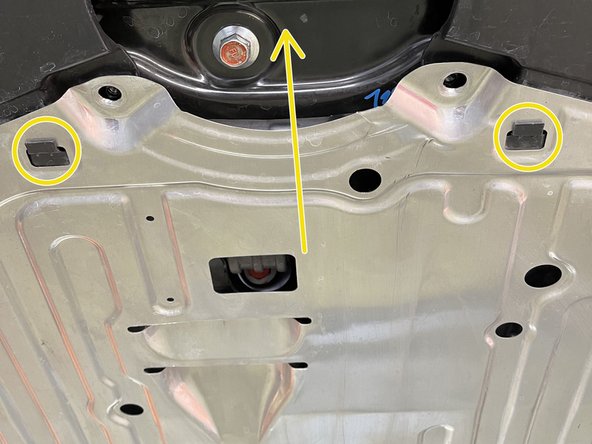
Slide the skidtray back on the car
-
Make sure skidtray is on the two clips in the rear
-
Reinstall the four (4) Philips head screws back on
-
Reinstall the four (4) Flat head screws back on
-
-
-
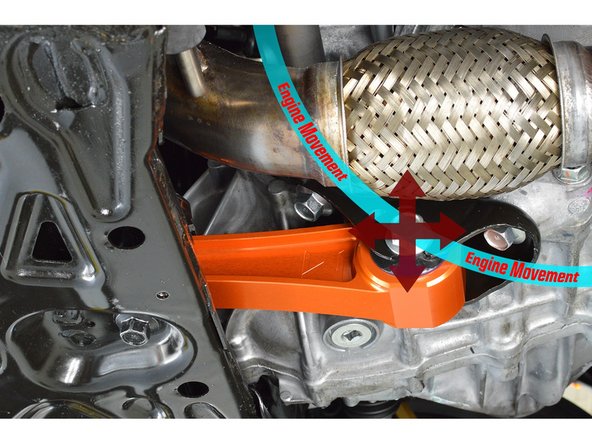
A performance rear motor mount by design reduces engine movement to mitigate unwanted wheel hop, slow throttle response, and torque steer - the by-product of this is increased NVH (Noise, Vibration, Harshness) that is transmitted to the vehicle cabin
-
Like most performance modifications, understanding the changes to the vehicle caused by the modification is critical. In these instructions we want to advise you on the expected changes :
-
Polyurethane has a "break-in" period, we advise that you drive with the RMM for a couple weeks to let the RMM poly settle in. We are confident that you will love the new performance benefits
-
Increased vibration to the vehicle cabin is to be expected, there are some driving habit changes that will reduce the added vibration: try not to to "lug" the engine at low RPM. High engine load (hard throttle) at low RPM may exaggerate the vibration
-
The temperature of the poly will affect its stiffness, cold mornings may transmit more vibration. This will disappear as the polyurethane warms up with the engine heat
-
We want every customer totally satisfied with our RMM. Your personal satisfaction with the 27WON RMM is very important to us. If you have questions or concerns please give us a call at 571-271-0271.
-
-
-
This completes the installation of your 27WON Performance Rear Motor Mount
-
We hope you were impressed with your 27WON experience and love your new RMM for years to come. Email us at sales@27won.com or call us at 571-271-0271 with any questions or concerns
-
Please leave a review here: https://store.27won.com/honda-civic-rear...
-
Share your experience using #27WON on Instagram and Facebook
-